Cleaning or Replacing Batteries
Cleaning Batteries
Cleaning is a key element in battery maintenance, for both safety and performance. Regular cleaning will reduce dirt and corrosion from forming. This reduces the chance of acid contact, and will provide efficient electrical connections. Lack of cleaning can cause the following problems:
- Reduced reliability and performance.
- Shortened overall battery life.
- Increased corrosion.
- Possibility of a fire.
-
Park the vehicle safely. (See Parking Safely in the SAFETY section.)
-
Turn key switch to the OFF “0” position.
-
Press the directional control switch into the neutral “N” position.
-
Lock park brake.
-
Turn off all vehicle electrical accessories.
Move service/drive switch to the SERVICE position. (See Using the Service/Drive Switch in the OPERATING Section.)
-
 Help prevent serious injury or death from an electrical
shock or electrocution. This utility vehicle is equipped with a 48
volt electrical system which is capable of passing a high voltage
electrical current. Always use extreme caution when servicing the
battery set in this vehicle.
Help prevent serious injury or death from an electrical
shock or electrocution. This utility vehicle is equipped with a 48
volt electrical system which is capable of passing a high voltage
electrical current. Always use extreme caution when servicing the
battery set in this vehicle.Use extreme caution when using tools, wires or metal objects near batteries. A short circuit and/or spark could cause an explosion. Wrap tools with vinyl tape to prevent shorting out batteries.
Remove all jewelry (watches, rings, bracelets, etc.) before servicing the electrical system or batteries.
Lift and secure cargo box in the raised position.
-
Do not allow solution to enter battery cells through vent cap holes. This can overfill the battery cells causing electrolyte to be pumped from the cell during use or charging.
Clean all moisture and corrosion in battery compartment with a solution of one part baking soda to five parts water. Rinse with clean water and allow to dry.
-
Directing pressurized water at electrical components or connectors, bearing, or other sensitive parts and components may cause a vehicle malfunction. Reduce water pressure if pressurized spray is used to clean the batteries and surrounding areas.
Wash down batteries, battery terminals and battery compartment. If battery corrosion is excessive, additional cleaning of the battery(s) and surrounding area may be necessary.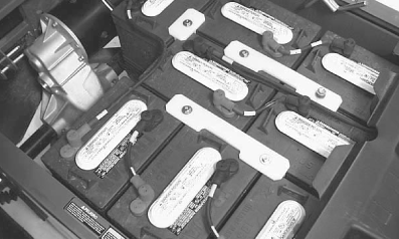
MXAL47817-UN-12APR13 -
 To prevent electrical shock, do not touch battery terminals,
connectors, or wires that are not insulated.
To prevent electrical shock, do not touch battery terminals,
connectors, or wires that are not insulated.Note the position of each battery in the battery compartment and the location of both the positive and negative terminals.
-
 Use extreme caution when using tools, wires or metal
objects near batteries. A short circuit and/or spark could cause an
explosion. Wrap tools with vinyl tape to prevent shorting out of batteries.
Using insulated tools, remove battery pack POSITIVE (+) cable (A) labeled “B+” and wire from positive terminal on battery labeled number “1” in the diagram.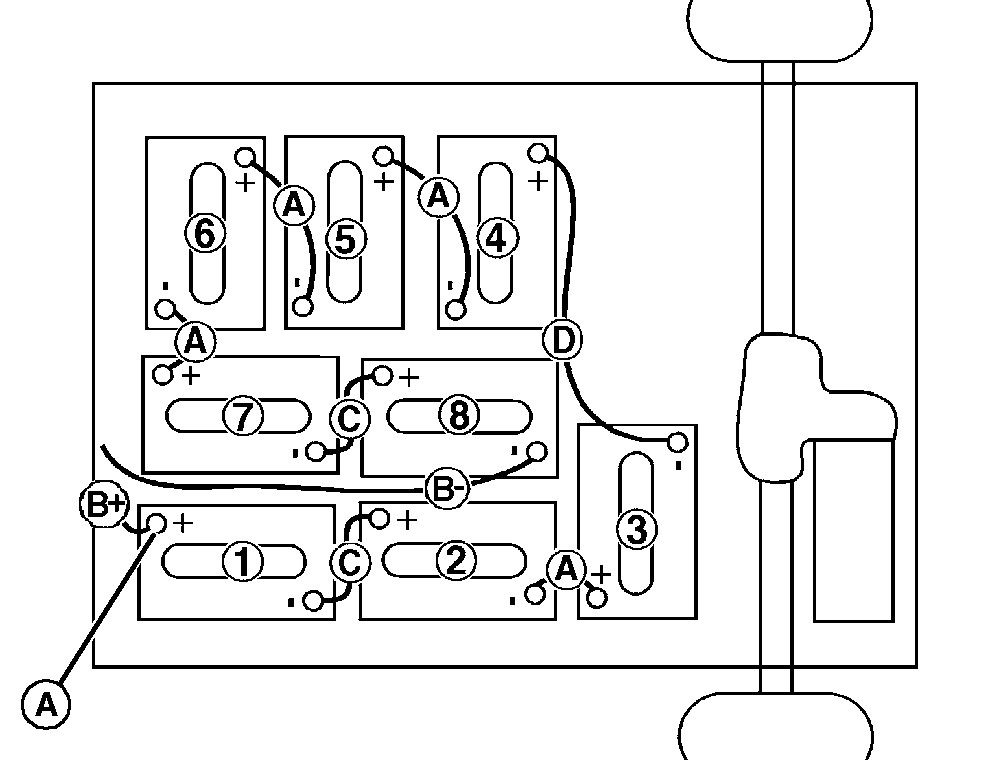
MXAL47818-UN-12APR13 -
Pull the boots (B) on the terminal cables back far enough to expose each terminal for cleaning.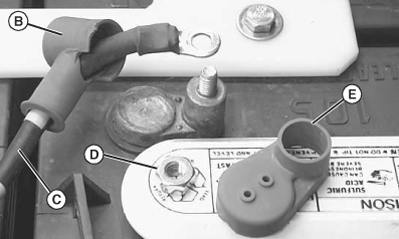
MXAL47819-UN-12APR13 -
Battery positive “+” and negative “-” connections are marked and color coded.
Battery cables are of specific length and labeled for each connection. See Battery Position and Connection Diagram in this section or refer to the safety/diagram label attached to the front of the vehicle cargo box for the proper installation.
Remove cables (C) from battery terminals that are corroded
- Loosen and remove hex nut (D).
- Remove rubber post cover (E).
-
Remove corrosion from battery terminals and cable ends.
- Clean battery terminals and cable ends with a solution of one part baking soda to five parts water. Use a wire brush if additional cleaning is required.
- Rinse all parts with clean water and allow to dry.
Replace Batteries
-
It is not recommended to change one or more batteries without verifying that the state of charge of all batteries are the same. Be certain to charge batteries to the same state of charge of the new battery(s), so that an overcharge or boilover state does not occur.
Remove battery(s).
-
Remove battery hold down bolts (F).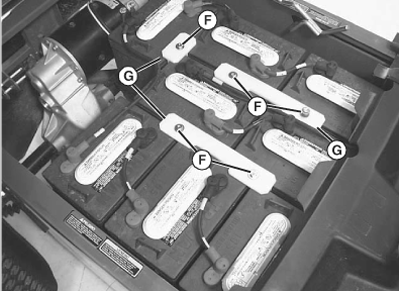
MXAL47820-UN-12APR13 - Remove battery hold down(s) (G).
 Help prevent serious personal injury or a damaged battery:
- Batteries are heavy. Always use proper lifting techniques and a proper lifting device when moving them.
- Never lift by the battery terminals. A dropped battery could cause an acid spill causing severe burns.
- Carefully lift the battery out of the vehicle. Store the battery until it can be properly disposed of.
- Clean plastic battery tray and battery hold downs if corroded or rusty.
- If necessary, remove battery tray and check vehicle supports for corrosion.
- Clean area with a solution of one part baking soda to five parts water.
- Rinse area with clean water and allow to dry.
-
-
Paint areas affected by rust or corrosion with acid resistant paint.
-
Install batteries in the same position and orientation as shown in the Battery Position/Connection diagram. (See Position and Connection Diagram in this section or diagram attached to the front of the cargo box.)
-
Install battery cables using the Battery Position/Connection diagram as reference.
-
Install rubber post cover (E).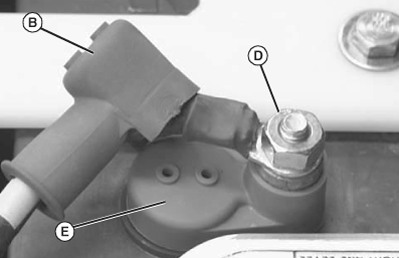
MXAL47821-UN-12APR13 -
Tighten each terminal connection hex nut (D) to specifications.
Battery Terminal Connection Hex Nut Torque 14 - 16 N·m (124 - 142 lb-in.)
-
-
Replace the proper terminal boots (B) (red on positive, and black on negative) securely over each battery terminal.
-
Keep battery hold downs in place and properly tightened:
- Hold downs that are not tightened properly can allow the batteries to bounce and spill acid, or cause internal damage to battery plates.
- Overtightened hold downs can cause the battery case to crack or buckle, causing acid to leak out.
Install battery hold down(s) (G).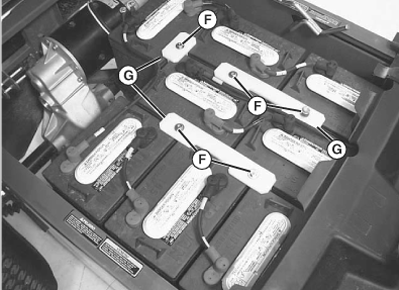
MXAL47822-UN-12APR13-
Tighten hold down bolts (F) to specifications.
Battery Hold-Down Bolts Torque 7- 9 N·m (62 - 80 lb-in.)
-
Check the electrolyte level in each battery cell.
-
Lower cargo box.
-
Charge batteries.
|
OUO1023,0000993-19-20130417 |