Replacing Headlight Bulb and Housing
There are two types of headlight assemblies. Earlier models use a 48 volt system and newer models use a 12 volt system. If a converter kit has been installed, you will have a 12 volt lighting system.
Replace 48 Volt Headlight Bulb
MXAL47829-UN-12APR13
-
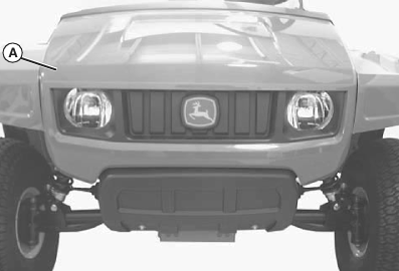
Remove hood (A), and locate headlight housing in the front frame.
-
Locate headlight assembly housing (B).
MXAL47830-UN-12APR13 -
Rotate bulb socket (C) counterclockwise approximately 1/3 turn and remove from headlight housing (B).
-
Push down top of bulb (D) and rotate counterclockwise to remove from socket.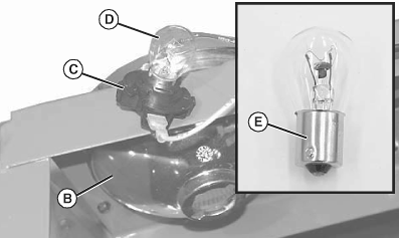
MXAL47831-UN-12APR13 -
This is not a standard replacement bulb. If bulb replacement is required, use only a 48 volt bulb. Using a 12 volt replacement bulb could cause a blown vehicle fuse.
Install new headlight bulb (E) into bulb socket (C).
- Push down top of bulb and rotate clockwise into locked position.
-
Install bulb socket (C) into headlight housing (B).
- Rotate bulb socket clockwise into a locked position.
-
Test head lamp function.
-
When installing the hood be sure there is clearance all around each headlight housing. Premature failure of headlight bulbs may occur if the hood should make contact with a headlight housing.
Install hood onto vehicle.
Replace 12 Volt Headlight Bulb
-
This procedure is for vehicles equipped with the 48v to 12v converter kit already installed.
Remove hood (A), and locate headlight housing in the front frame.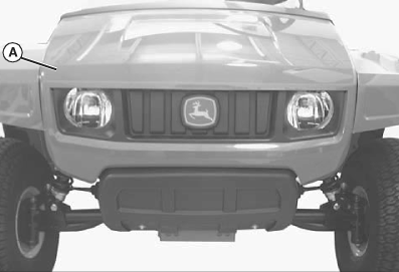
MXAL47832-UN-12APR13 -
Locate headlight assembly housing (B).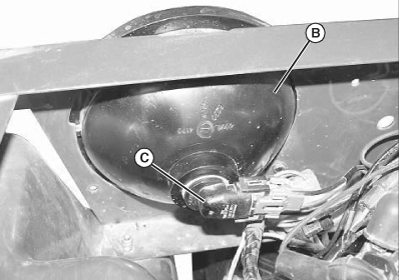
MXAL47833-UN-12APR13 -
Rotate bulb socket (C) counterclockwise approximately 1/8 turn and remove from headlight housing (B).
-
Release tabs (D), and disconnect wire connector (E) from bulb/socket assembly (F). Discard the bulb/socket assembly.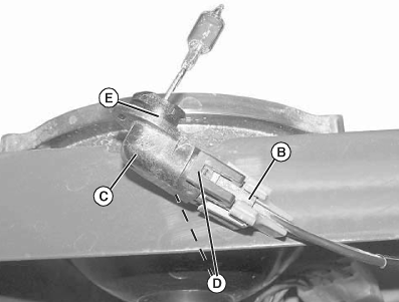
MXAL47834-UN-12APR13 -
Connect wiring connector to new bulb/socket assembly. Install the assembly into housing and rotate 1/8 turn to lock in place.
-
Test head lamp function.
-
When installing the hood be sure there is clearance all around each headlight housing. Premature failure of headlight bulbs may occur if the hood should make contact with a headlight housing.
Install hood onto vehicle.
Replace Headlight Housing
-
Remove vehicle hood.
-
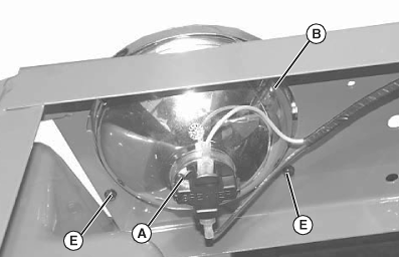
MXAL47835-UN-12APR1348 volt system shown
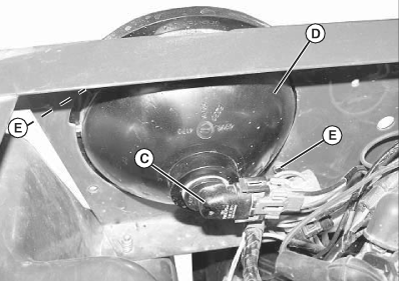
MXAL47836-UN-12APR1312 volt system shown
Remove bulb socket:- 48 volt system: Rotate bulb socket (A) counterclockwise approximately 1/3 turn and remove from headlight housing (B).
- 12 volt system: Rotate bulb/socket assembly (C) counterclockwise approximately 1/3 turn and remove from headlight housing (D).
-
Remove screws (E) securing headlight housing to the utility vehicle frame.
-
Install replacement headlight housing.
- Attach housing to utility vehicle frame with screws.
-
Install bulb socket into headlight housing.
- Rotate bulb socket clockwise into locked position.
-
Install hood onto utility vehicle.
|
OUO1023,000099A-19-20130418 |