Bleeding Stabilizer Cylinder (Two Person Job)
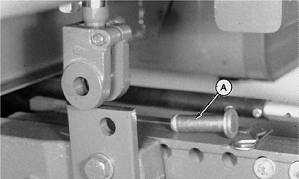
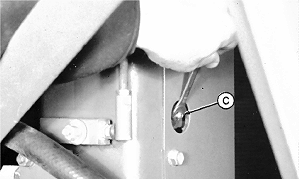
NOTE: Before proceeding, see CHECKING STABILIZER CYLINDER FUNCTION in this section. 1. Remove pin (A) from rod end of stabilizer cylinder and axle.2. Remove button plug (B) from cylinder cover and loosen bleed fitting plug (C). 3. Remove air from cylinder by pushing up on rod end of cylinder until oil comes out. Use board under rod end to keep it in up position. IMPORTANT: Keep cylinder bottomed out while tightening plug. If not bottomed out while tightening plug, air will get back in cylinder and it will have to be re-bled. 4. Tighten bleed fitting plug. 5. Start engine and operate at 1000 rpm. 6. The hydraulic system will push cylinder rod downward so it can be pinned. Pin the cylinder. 7. Be sure bleed fitting plug is tight. Replace button plug in cylinder cover. NOTE: It is acceptable to have a slight movement in the cylinder as all air may not be totally purged. 8. Check cylinder. Raise basket approximately 152 mm (6 in.) so stabilizer system is actuated. Drive left-hand guide tire on a 102 x 102 mm (4 x 4 in.) block. If stabilizer cylinder retracts more than 6 mm (1/4 in.), repeat bleeding procedure. |
|
 CAUTION:
During bleeding process, make sure that one person is in the cab and remains alert to actions of the other person. The machine is heavy and can cause serious injury or death if it should move unexpectedly. Be sure that the transmission is in neutral. Place basket lock valve in the LOCK position.
CAUTION:
During bleeding process, make sure that one person is in the cab and remains alert to actions of the other person. The machine is heavy and can cause serious injury or death if it should move unexpectedly. Be sure that the transmission is in neutral. Place basket lock valve in the LOCK position.

AG,OUO1011,1178 -19-08SEP99-1/1 |