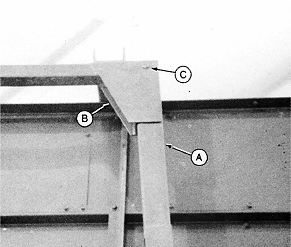
Bleeding Telescoping CylindersIMPORTANT: Bleeding the telescoping cylinders can only be accomplished when the front cylinder is allowed to reach full extension of the piston rod. Cylinders left un-bled can cause basket to come down causing basket damage. NOTE: If basket extension is pinned in the intermediate field position, complete Steps 1 and 3. If machine does not have intermediate field position, proceed to Step 4. 1. Disconnect front and rear upper arm assemblies (A) from lid lift frame (B) by removing screw (C).
|
|
OUO6043,0001528 -19-25OCT01-1/6 |
|
2.
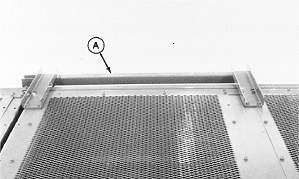
Remove front and rear lid lift frames (A).
|
|
OUO6043,0001528 -19-25OCT01-2/6 |
|
3.
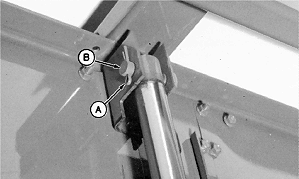
Unpin telescoping cylinder at top by removing cotter pin (A) and round head pin (B).
|
|
OUO6043,0001528 -19-25OCT01-3/6 |
|
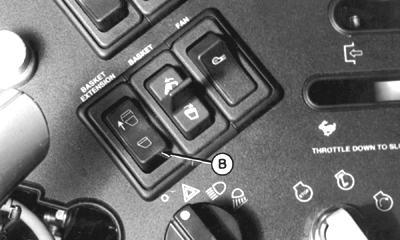
4.
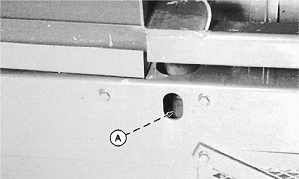
Loosen bleed screw (A) on rear cylinder 1/4 to 1/2 turn.
5. Start engine and operate at slow idle. IMPORTANT: If basket extension is pinned in intermediate position, hold the cylinder piston rods out from basket extension to prevent them from contacting top of extension when raising. 6. Slowly extend the telescoping cylinders using basket extension switch (B). 7. Continue to press basket extension switch until front cylinder is fully extended and a solid flow of oil (without bubbles) is present at bleed screw. 8. Tighten bleed screw.
|
|
OUO6043,0001528 -19-25OCT01-4/6 |
|
9.
Pin cylinders (front and rear) to extension using round head pin (B) and cotter pin (A).
NOTE: On baskets with extension in intermediate position 3 people will be needed to perform this task. One person in operator's station holding basket telescoping switch. One person at each cylinder, pushing down on rod until it can be pinned in position.
|
|
OUO6043,0001528 -19-25OCT01-5/6 |
|
NOTE: On baskets with extensions in intermediate position, complete Steps 10 and 11. 10. Install front and rear lift frames. 11. Insert upper arm assembly (A) into lid lift frame (B). Reinstall screw (C) and lock nut. Tighten nut just enough to retain nut on screw but still allow parts to rotate on screw. DO NOT OVERTIGHTEN. Upper arm MUST pivot freely.
|
|
OUO6043,0001528 -19-25OCT01-6/6 |