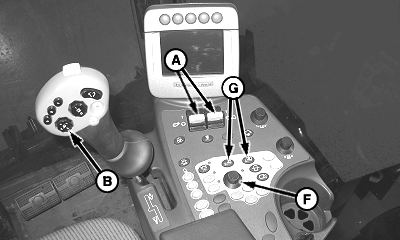
Operate and Adjust Header Height ControlIMPORTANT: Before operating or adjusting the system, verify row unit tilt is correct. Incorrect tilt can result in damage to units or machine. (See ADJUSTING ROW UNIT TILT in Section 60.) NOTE: System will not operate unless fans and units switches are engaged. Verify switches are engaged before checking system for proper operation. 1. Position entire machine on the cotton rows. Drive and guide wheels must be in the field, on the rows, and at the same level. Place multifunction control handle in neutral and move fan and units switches (A) fully down, then forward. 2. With engine operating at mid throttle and hydraulic system warmed up, lower units using raise/lower units button (B).
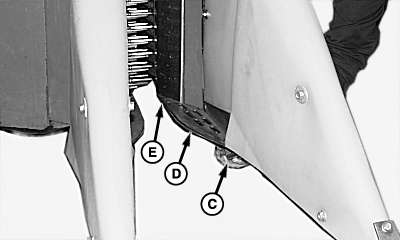
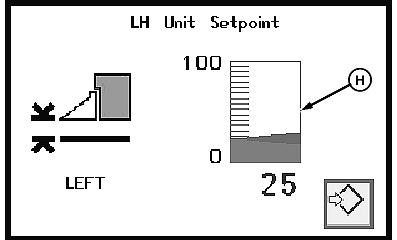
3. Have an assistant lift one of the unit height sensing shoes (C) until units are fully raised, then release shoe. Units should return to previous height. NOTE: Set header height so units are positioned no lower than necessary to pick cotton. For low hanging bolls or lodged and tangled limbs, position plant guides (D) or wear plate (E) so they just touch the top of the beds (just skim the surface, not plow). 4. To adjust header height: Press left- or right-hand height adjust buttons (G) and rotate display/setpoint dial (F) clockwise to raise operating height of corresponding row units or counterclockwise to lower operating height. Observe setpoint (H) on console display. |
|
 CAUTION:
If you or others become entangled in a unit, serious injury or death can result. Make sure multifunction control handle remains in neutral position and stand clear of units during testing. Keep away from areas which might pinch or crush as units move up and down.
CAUTION:
If you or others become entangled in a unit, serious injury or death can result. Make sure multifunction control handle remains in neutral position and stand clear of units during testing. Keep away from areas which might pinch or crush as units move up and down.
OUO1078,000003C -19-24MAR09-1/2 |
|
5.
Recheck unit tilt adjustment. (See ADJUSTING ROW UNIT TILT in Section 60.)
6. Set rate response. (See HEADER HEIGHT CONTROL RATE RESPONSE ADJUSTMENT in this section.) |
OUO1078,000003C -19-24MAR09-2/2 |