Preparing To Operate Machine In Field
|
| 1. Make sure tractor and machine are properly prepared. (See Preparing Tractor and Preparing Machine sections.) (See Attaching And Detaching | section to attach machine to tractor following procedure.) |
OUO6061,00022C4 -19-06MAY08-1/10 |
|
Before operating, make sure air has been bled from wing-fold hydraulic system Keep all persons away from machine when raising and lowering wings. Always locate machine on level ground when raising and lowering wings. Never raise or lower wings when moving. 2. Place tractor transmission in "Park" and/or set brakes and start engine. |
|
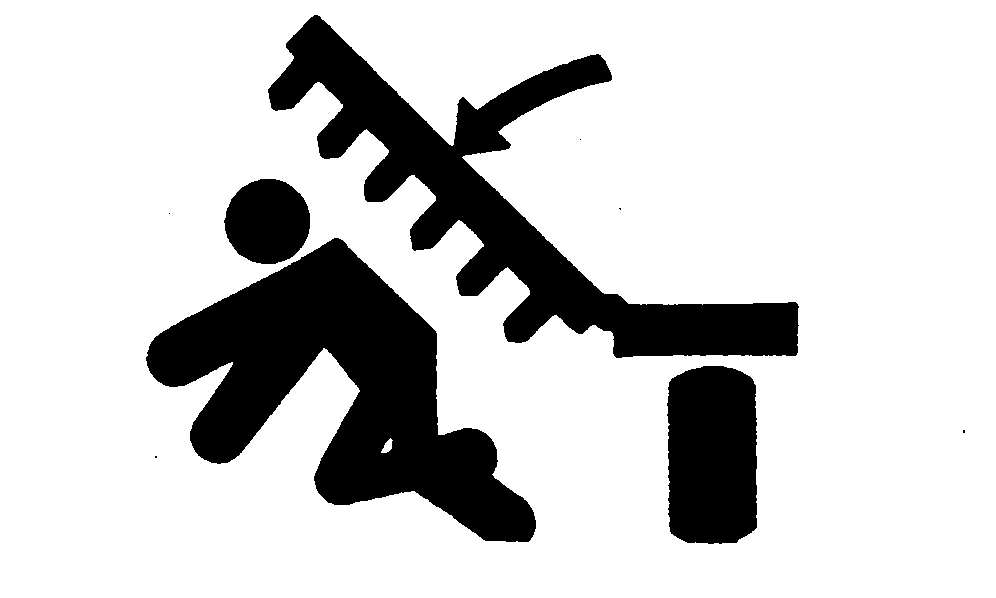
 CAUTION:
To help prevent severe injury or death to you or someone else:
CAUTION:
To help prevent severe injury or death to you or someone else:
OUO6061,00022C4 -19-06MAY08-2/10 |
|
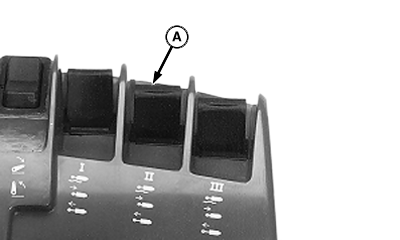
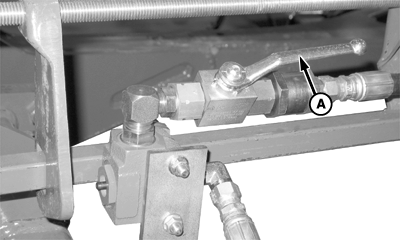
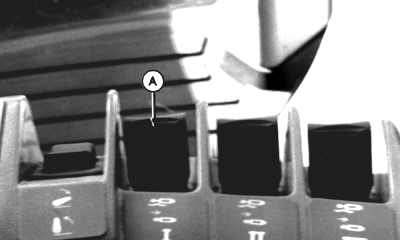
IMPORTANT: 5-SECTION MACHINES ONLY- In order for wings to be folded and unfolded, a 7-pin connector (A) including a safety valve circuit MUST BE CONNECTED TO TRACTOR. If 7-pin safety valve connector is not connected, wings will not fold or unfold. 5-SECTION MACHINES ONLY- In order for wings to be folded and unfolded, set SCV II selector button flow control knob to fast (rabbit) position and verify tractor is running at 1800 rpm. 5-SECTION MACHINES WITH ROLLING BASKETS- Wings should NOT fold or unfold with rolling baskets raised. Folding or unfolding wings with rolling baskets raised will cause machine damage. NOTE: A new safety valve has been added that will not allow the operator to fold or unfold machine until the 7-pin connector is plugged into tractor. If there is no connection hydraulic fluid has no path and wings will not fold or unfold properly. When 7-pin connector is attached, it energizes the safety valve on the wing-fold valve. Then the circuit is in normal operating mode and the wings can be folded and unfolded. To obtain narrow transport the switch is triggered to energize the wing-fold valve. Hydraulic oil is then diverted from the wing circuit to the wing depth control cylinders which retracts wheels for narrow transport. DO NOT USE FLOAT FUNCTION DURING WING UNFOLDING OPERATION. 3. Verify 7-pin connector (A) is connected to tractor. |
|
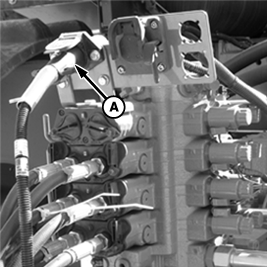
OUO6061,00022C4 -19-06MAY08-3/10 |
|
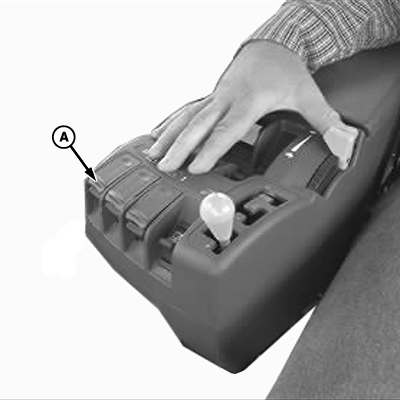
4. With machine on level ground and wing area clear of bystanders, push SCV II lever (A) forward to unfold wings and fully extend cylinders. 5. Return control lever to "neutral" for field operations.
|
|
OUO6061,00022C4 -19-06MAY08-4/10 |
|
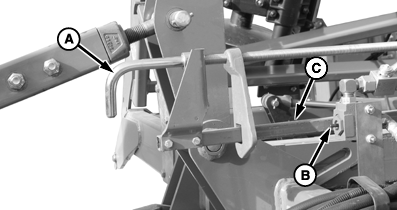
IMPORTANT: Single Point Depth Control-Make sure tractor flow control is set to fast position. NOTE: For consistent single point performance, always move tractor control lever rapidly from neutral to lower position. 6. SINGLE POINT DEPTH CONTROL- is a convenient method to control working depth and eliminates crawling over or under frame to make adjustments. Use the following procedure when making initial depth control adjustment. For field operation, OPEN transport lock-up valve by turning handle (A) in-line with valve. 7. Place tractor transmission in PARK and/or set brakes and start engine. |
|
OUO6061,00022C4 -19-06MAY08-5/10 |
|
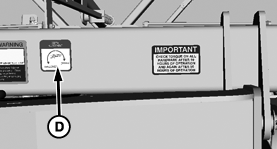
8.
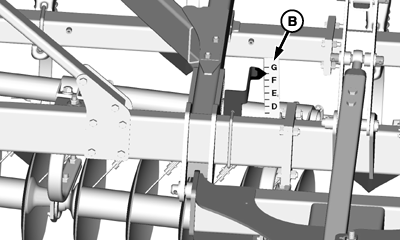
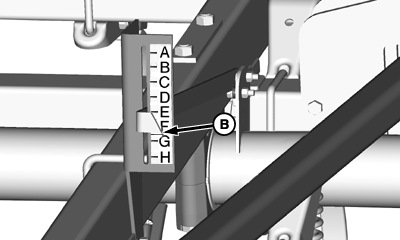
Crank (A) moves depth stop which pushes against plunger (B) on control valve to set depth. Use Depth decal (C) as a guide when adjusting single point depth control. On decal, "A" is shallow and "L" is deep. Machine can be set outside of decal's range. Refer to Turn Crank decal (D) and turn crank counterclockwise to raise shanks, clockwise to lower shanks. Five turns equals 25 mm (1 in.) of shank movement.
9. With machine on level ground pull SCV I rearward to raise machine.
|
|

OUO6061,00022C4 -19-06MAY08-6/10 |
|
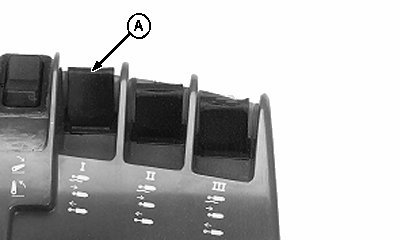
10. SINGLE POINT DEPTH CONTROL- Confirm depth setting. Pull SCV I control switch (A) rearward to raise machine; and then push forward to lower machine and confirm depth setting. Make a test pass with sweeps in the soil. Stop and check sweep depth. If sweeps are at proper depth, machine is set, if not repeat process until proper depth is achieved. |
|
OUO6061,00022C4 -19-06MAY08-7/10 |
|
IMPORTANT: Be sure all disks are level with each other. Uneven disk gangs can result in inaccurate disking. See LEVEL DISK GANGS in Preparing Machine Section. 11. DISK GANGS ONLY- Push SCV III (A) forward to lower disk gangs. Lower disks no deeper than necessary to level surface irregularity and slice residue. Disk depth indicator arrow (B) on disk shows relative depth only and should not be used for depth setting. IMPORTANT: If operating machine without disks for large portions of time, stabilizer wheels should be attached. Without using stabilizers, and by not using disks, machine life can be reduced and there may be a lack of field performance over time.
|
|
OUO6061,00022C4 -19-06MAY08-8/10 |
|
12.
OPERATE MACHINE OVER A TEST DISTANCE-
while pushing SCV I (A) forward.
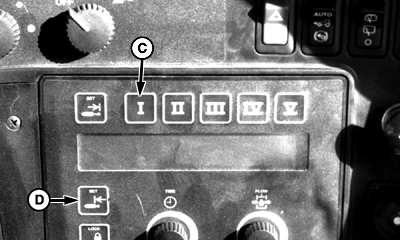
13. Stop machine and check depth at sweeps. 14. When desired depth is measured at sweeps, set depth control so it returns machine to this depth. Note depth indicator position for this depth. Depth indicator arrow (B) on machine shows relative depth only and should not be used for depth setting. Depth control must be set by measuring sweep depth. 15. SINGLE POINT DEPTH CONTROL- Place transmission in PARK and/or set brakes and turn tractor off. Set Single Point Depth Control using crank at front of machine. See SETTING SINGLE POINT DEPTH CONTROL. TOUCHSET DEPTH CONTROL- Select SCV I button (C) on monitor panel and push lower set button (D). (See ADJUSTING AND OPERATING TOUCHSET DEPTH CONTROL FOR JOHN DEERE 8000/9000/8020/9020 SERIES TRACTORS in this section.)
|
|
OUO6061,00022C4 -19-06MAY08-9/10 |
|
16.
Operate machine at normal speed and raise and lower machine to confirm depth setting.
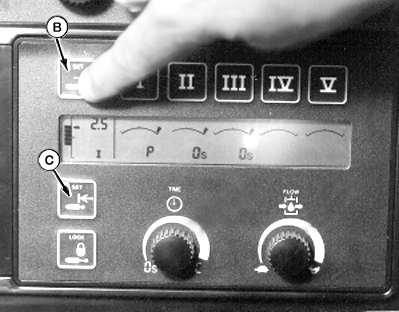
SINGLE POINT DEPTH CONTROL- Pull SCV I (A) rearward to raise machine, then forward to lower machine. Confirm depth setting. TOUCHSET DEPTH CONTROL- SCV I switch needs to be moved to detent position to position machine at preset limits. Upper (B) and lower (C) set buttons on touch control panel are used to set depth and upper limit. (See ADJUSTING AND OPERATING TOUCHSET DEPTH CONTROL FOR JOHN DEERE 8000/9000/8020/9020 SERIES TRACTORS in this section.) IMPORTANT: Be sure to rephase depth control cylinders periodically. Rephase cylinders by holding depth control lever for a few seconds after machine has been fully raised. Release control and allow at least three seconds for cylinders to settle past rephasing grooves before lowering machine to operating depth.
|
|
OUO6061,00022C4 -19-06MAY08-10/10 |