Disassemble Gangs
-
Before disassembling a gang, record diameter and location of blades and location of bearings for correct gang assembly.
Retain gang bolt hardware in order removed. (See GANG COMPONENT DIAGRAM in this manual.)

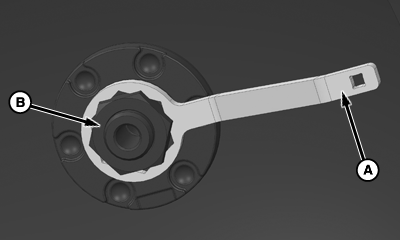
N90998-UN-10FEB11A - Lock Bolt, M24
B - Collar
C - Washer, Serrated
Remove and retain M24 lock bolt (A), collar (B), and serrated washer (C). -
N113119-UN-16JUL14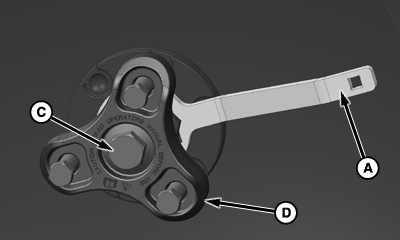
N113120-UN-16JUL14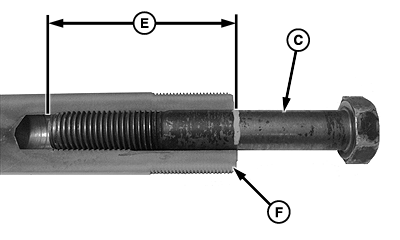
N92716-UN-19FEB15Cross Section View
A - Wrench
B - Gang Nut, M50
C - Cap Screw, M24 x 170 Grade 10.9
D - Gang Bolt Tensioner
E - Dimension, Length 106 mm (4.17 in)
F - Gang Bolt
Place wrench (A) on gang nut (B). -
Cap screw (C) MUST engage gang bolt 106 mm (4.17 in) (E) to prevent gang bolt (F) damage.
Lubricate cap screw using grease on threads.
Mark cap screw (C) to determine proper gang bolt engagement.
Lubricate threads on M24 x 170 cap screw (C) using grease and install through gang bolt tensioner (D) as shown. Verify gang bolt thread engagement of 106 mm (4.17 in) (E).
-
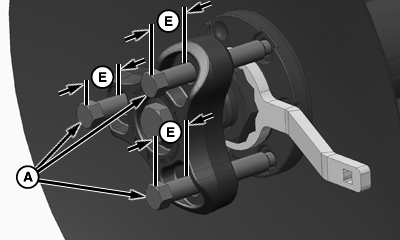
Lubricate compression cap screws (A) using grease on threads (B), contact points (C), and cast ring dimples (D).
Compression cap screws MUST align with cast ring dimples.
N113121-UN-16JUL14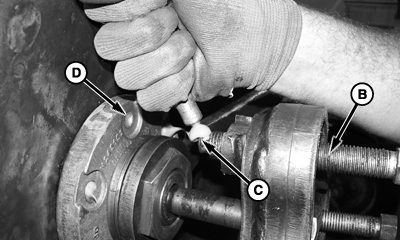
N92057-UN-26APR11
N113122-UN-16JUL14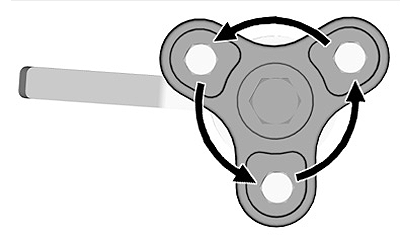
N92712-UN-19FEB15Tightening Sequence Diagram
A - Cap Screw (3 used)
B - Threads
C - Contact Points
D - Dimple
E - Dimension, Length
F - Ratchet
G - Wrench
Lubricate compression cap screws (A) using grease on threads (B), contact points (C), and cast ring dimples (D). -
Hand tighten compression cap screws until fully engaged in gang bolt tensioner. Verify that compression cap screws are equal length (E) to gang bolt tensioner.
-
DO NOT use impact wrench when tightening compression cap screws to prevent damaging gang bolt tensioner.
DO NOT exceed 190 N·m (140 lb·ft) when tightening compression cap screws to prevent damaging gang bolt tensioner.
Compression cap screws may not reach equal torque values simultaneously. Tightening cap screws individually may be necessary to achieve correct gang bolt tension.
Tighten compression cap screws in a circular pattern, turning one a full rotation before moving to the next. (See Tightening Sequence Diagram.)
-
After each compression cap screw is tightened two full rotations, attempt gang nut removal using ratchet (F) and wrench (G).
-
DO NOT use impact wrench when tightening compression cap screws to prevent damaging gang bolt tensioner.
DO NOT exceed 190 N·m (140 lb·ft) when tightening compression cap screws to prevent damaging gang bolt tensioner.
Compression cap screws may not reach equal torque values simultaneously. Tightening cap screws individually may be necessary to achieve correct gang bolt tension.
If nut cannot be removed, tighten each compression cap screw another quarter turn in a circular pattern until nut can be removed. (See Tightening Sequence Diagram.)
-
Remove gang bolt tensioner by loosening each compression cap screw one full rotation in sequence. Repeat if necessary.
-
Remove and retain gang nut. Disassemble gang.
|
KB78086,0000ABD-19-20160915 |