Adjusting Pressure Plate Spring Tension
N42165DX-UN-01AUG95
N42166HJ-UN-16JAN96
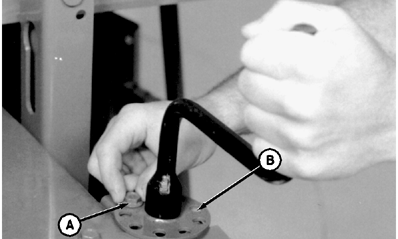
A - Flange Head Cap Screw
B - Adjusting Holes
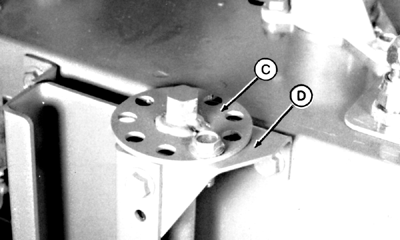
C - Adjusting Plate
D - Bracket
 CAUTION: Shaft is under spring tension. Once flange head cap
screw is removed, shaft can spin quickly and release spring tension.
Avoid serious injury or death to you or to others from flying parts.
Control shaft from releasing spring tension by firmly holding wrench
in position on top of shaft.
CAUTION: Shaft is under spring tension. Once flange head cap
screw is removed, shaft can spin quickly and release spring tension.
Avoid serious injury or death to you or to others from flying parts.
Control shaft from releasing spring tension by firmly holding wrench
in position on top of shaft.
NOTE: Spring tension recommended is best for most conditions but can be altered for varying crop and field conditions. Too much tension can knock off green bolls and cause too much trash in basket; too little tension can cause tagging, leaving open cotton on the plant.
RECOMMENDED SPRING TENSION FOR FIRST PICKING:
-
Hold shaft firmly with wrench and remove flange head cap screw (A). Note that adjusting holes (B) are not threaded.
-
Rotate adjusting plate (C) until springs touch pressure plate. Check alignment of holes in adjusting plate with holes in bracket (D). Rotate adjusting plate further until one hole in plate is aligned with a hole in bracket.
-
NOTE: If too much cotton is left on plant, tighten rear pressure plate first. Tighten front pressure plate only if necessary.
Tighten front adjusting plate two holes (three holes for rocky fields). Install flange head cap screw.
-
Tighten rear adjusting plate three holes. Install flange head cap screw.
-
NOTE: DO NOT use scrapping plates (particularly in front drum) in tall rank or very bushy plants. Unit plugging and plant damage can result.
For tall rank or very bushy plants:
-
Tighten front pressure plate one-half hole initially.
-
Tighten rear pressure plate three holes initially.
-
RECOMMENDED SPRING TENSION FOR SECOND PICKING:
For second picking, tighten front and rear pressure plates one or two additional holes if desired.
|
DP99999,0000403-19-20100505 |