Inspecting and Adjusting Module Forming Belt Tracking
Observe Belt Tracking

N96274-UN-05JAN12
N96732-UN-27JAN12
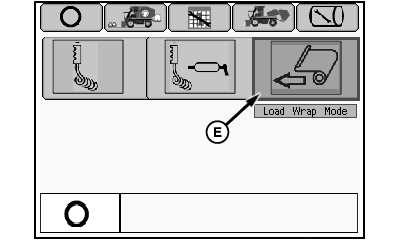
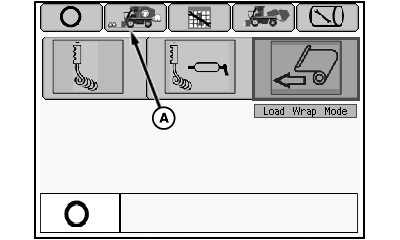
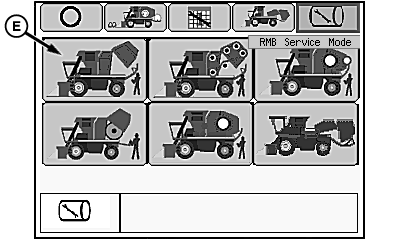
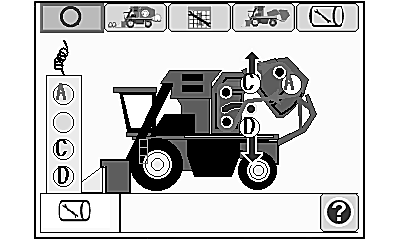
Mode Management Screen
N96733-UN-27JAN12
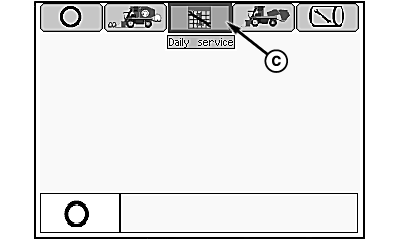
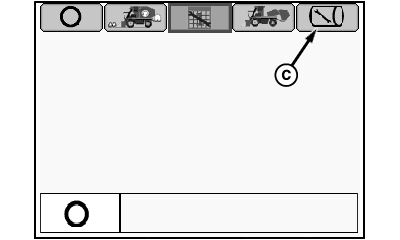
Daily Service Menu
N96267-UN-27JAN12
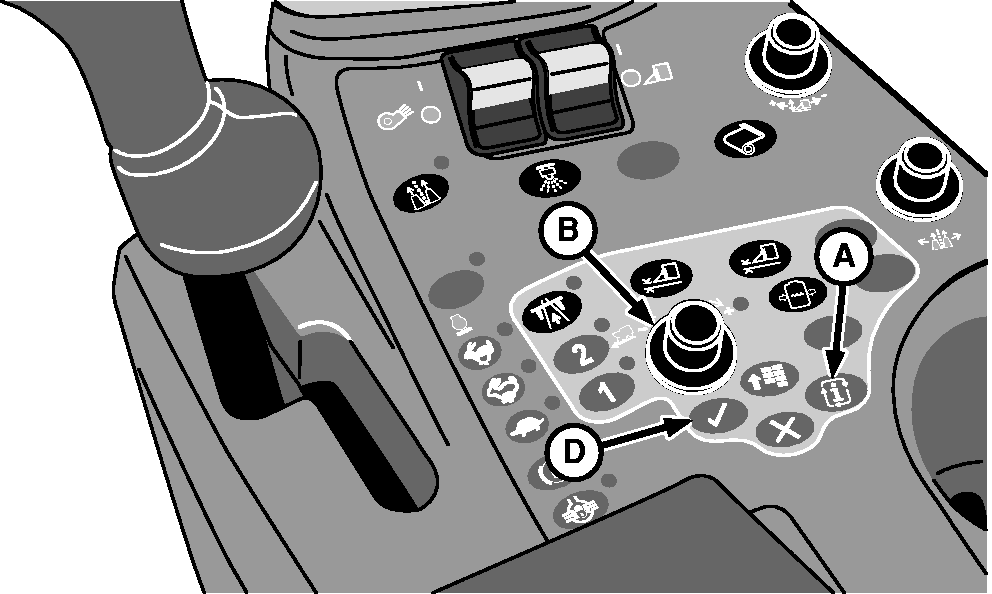
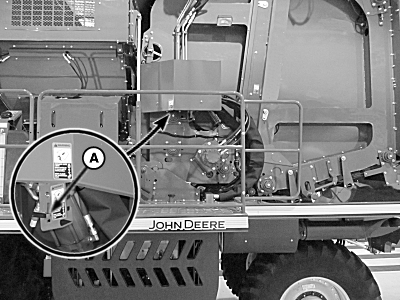
Tether Control Unit
A - Mode Select Button
B - Selection Dial
C - Daily Service Tab
D - Confirm Button
E - Load Wrap Mode Icon
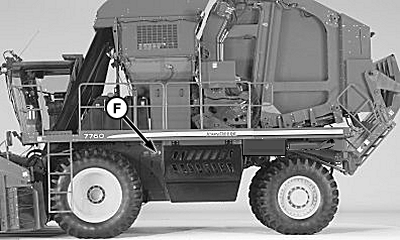
F - Tether Control Unit
-
IMPORTANT: Poor belt tracking is not normal and can lead to belt lace damage and subsequent belt failure. Every effort should be made to correct belt tracking issues when they are discovered.
Start engine and wait for control units and display unit to initialize.
-
Press mode select button (A) on armrest control console. Mode management screen appears.
-
Rotate selection dial (B) to highlight daily service tab (C).
-
Press confirm button (D). Daily service menu appears.
-
Using selection dial, highlight load wrap mode icon (E).
-
Press confirm button. External tether control unit is now active.
-
Remove tether control unit (F) from bracket on front of power module.
-
 CAUTION: Module builder gate and handler are heavy and can cause
serious injury or death. Before operating module builder tether control,
make sure that no one is on or near accumulator, module builder, or
handler.
CAUTION: Module builder gate and handler are heavy and can cause
serious injury or death. Before operating module builder tether control,
make sure that no one is on or near accumulator, module builder, or
handler.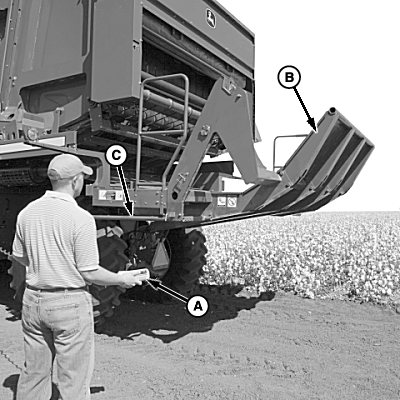
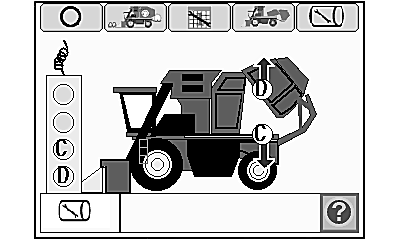
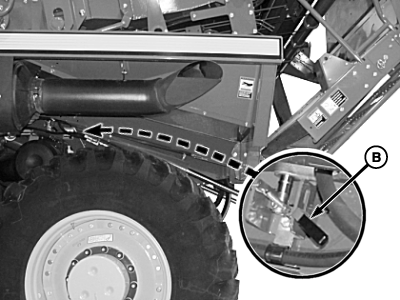
N88299-UN-30MAR10A - Tether Control Unit
B - Handler
C - Ladder
Press button D on tether control unit (A) and lower handler (B). -
Remove handler ladder (C) from storage position and lock it down to provide access to handler platform.
-
NOTE:
N87336-UN-19NOV09
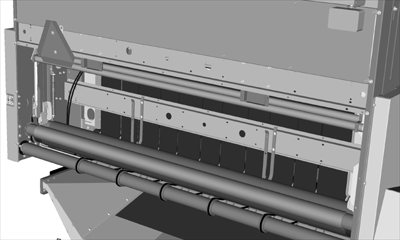
Best view of belts is obtained when there is no roll of wrap on upper wrap rollers.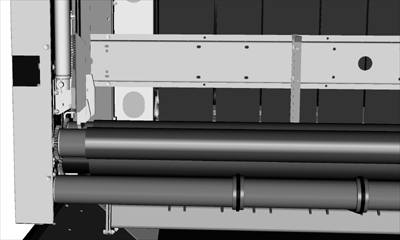
N87337-UN-19NOV09From handler platform, look through wrap box and observe position of module builder belts in relation to rear guides.
-
Climb down from platform and return handler ladder to harvest position.
-
N88300-UN-30MAR10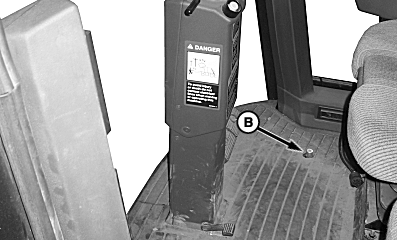
N88301-UN-30MAR10A - Harvest Mode Tab
B - Foot Switch
In cab, highlight harvest mode tab (A) on display and press confirm button. -
Press high engine speed button to run engine at full speed.
-
Press and hold foot switch (B) to run material handling system for 5—10 minutes.
-
Release foot switch. Press low engine speed button.
-
Lower ladder. Climb onto platform and again observe position of module builder belts in relation to rear guides.
-
NOTE: Belt edges rubbing on rear guides is normal and is not considered to be poor tracking.
Poor tracking occurs when belts ride up on rear guides and start to curl. Poor belt tracking can cause belts to ride on one another and stretch unevenly and further hinder belt tracking. Poor belt tracking can also cause the lace pin to break and the lace to eventually pull out of the belt.
Using the following table, select the condition that best describes the belt tracking observed and perform the corresponding corrective action.
Observed Belt Tracking
Corrective Action
1. Belts centered between guides and tracking properly.
None required.
2. Belts riding up on guides to the right.
Adjust tracking. See Reduce Excess Tracking to Right.
3. Belts riding up on guides to the left.
Adjust tracking. See Reduce Excess Tracking to Left.
4. Individual belt riding up on guide to right or left.
Adjust individual belt tracking. See Adjust Individual Belt Tracking.
Reduce Excess Tracking to the Right
N88293-UN-30MAR10
N87330-UN-17NOV09
Mode Selection Menu
N88294-UN-30MAR10
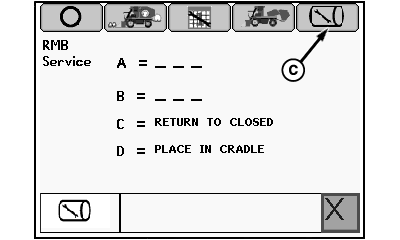
RMB Service Mode Menu
N88030-UN-02MAR10
Service Setup Functional Diagram
A - Mode Select Button
B - Selection Dial
C - RMB Service Mode Tab
D - Confirm Button
E - RMB Service Setup Mode Icon
Belt tracking is controlled by adjusting the position of the upper rear gate rollers. Adjustment must be made on one side of machine only. Adjustments are made in small increments and tracking is rechecked after each adjustment.
If belts are tracking to the right, the upper rear gate roller on the left side must be adjusted forward. If no further adjustment is available on the left side roller, then the right side roller must be adjusted rearward.
-
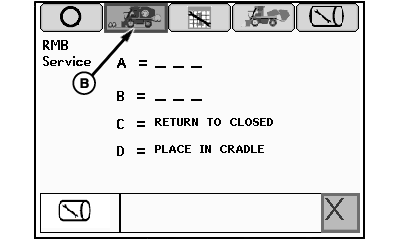
Press mode select button (A). Main menu appears.
-
Rotate selection dial (B) to highlight RMB service mode tab (C).
-
Press confirm button (D). RMB service mode menu appears.
-
Highlight RMB service setup mode icon (E) and press confirm button. RMB service setup functional diagram screen appears.
-
Press confirm button to view service text screen. Press confirm button again to return to functional diagram screen.
-
CAUTION: Module builder gate is heavy and can cause serious
injury or death. Before working on or around module builder, place
rear gate in cradle and engage gate hydraulic lock valve and handler
hydraulic lock valve.
Press button D on tether control unit to place gate in cradle.
-
N95990-UN-08FEB12Gate Hydraulic Lock Valve Lever
N95991-UN-02DEC11Handler Hydraulic Lock Valve Lever
N87357-UN-17NOV09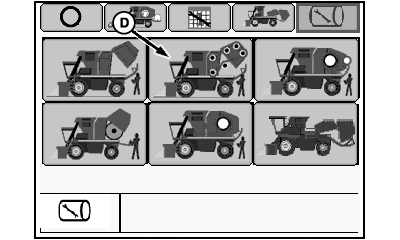
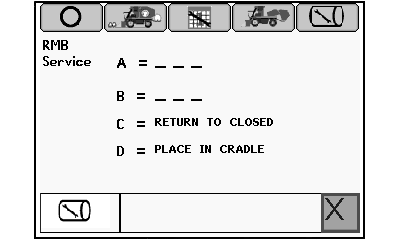
N88295-UN-30MAR10RMB Service Mode Menu
N88032-UN-02MAR10Belt Service Functional Diagram
A - Gate Hydraulic Lock Valve Lever
B - Handler Hydraulic Lock Valve Lever
C - RMB Service Mode Tab
D - Belt Service Mode Icon
Move gate hydraulic lock valve lever (A) and handler hydraulic lock valve lever (B) to locked position. -
Highlight RMB service mode tab (C) and press confirm button to return to RMB service mode menu.
-
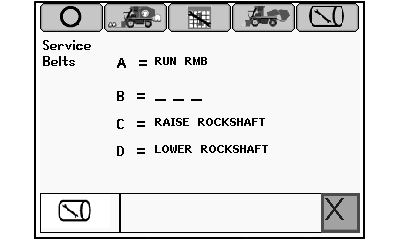
Highlight belt service mode icon (D) and press confirm button. Belt service functional diagram screen appears.
-
Press confirm button to view belt service text screen. Press confirm button again to return to functional diagram screen.
-
Press button C on tether control unit to raise rockshaft and relieve belt tension.
-
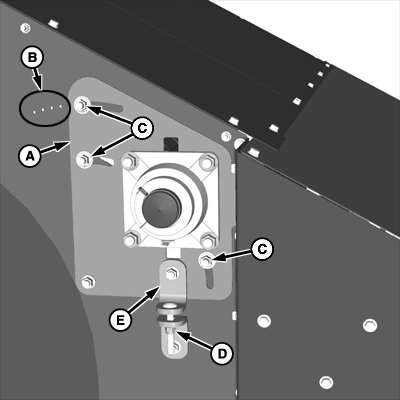
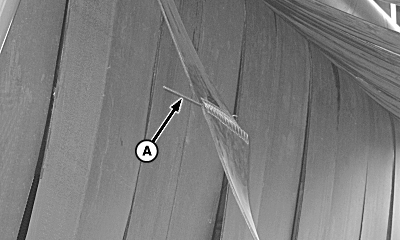
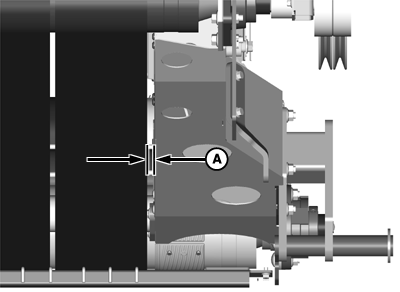
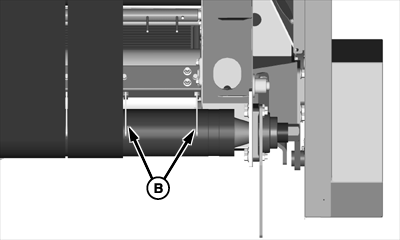
N87339-UN-17NOV09Roller Adjustment Plate
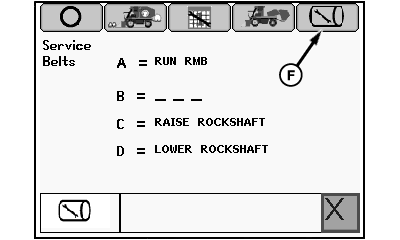
N87360-UN-17NOV09Service Belts Text Screen
A - Roller Adjustment Plate
B - Adjustment Indicators
C - Cap Screw (3 used)
D - Nut
E - Adjustment Plate Bracket
F - RMB Service Mode Tab
Observe position of left upper rear roller adjustment plate (A) relative to adjustment indicators (B). Also note position of retaining cap screws (C) in adjustment slots. If adjustment plate is already all the way forward, then the right side roller must be adjusted rearward. -
Loosen cap screws retaining adjustment plate.
-
Loosen nut (D) on bolt on adjustment plate bracket (E).
-
NOTE: It may be necessary to apply tension to belts to cause plate to move forward.
Rotate roller adjustment plate forward to align with the next indicator hole.
-
Tighten retaining cap screws, then tighten nut on bracket bolt.
-
Press button D on tether control unit to lower rockshaft and tension belts.
-
Disengage gate hydraulic lock valve and handler hydraulic lock valve.
-
Highlight RMB service mode tab (F) on display and press confirm button. RMB service mode menu appears.
-
N88296-UN-30MAR10RMB Service Mode Menu
N88297-UN-30MAR10RMB Service Text Screen

N88298-UN-30MAR10A - RMB Service Mode Icon
B - Harvest Mode Tab
C - Foot Switch
Highlight RMB service mode icon (A) and press confirm button. RMB service text screen appears. -
Press button C on tether control unit to return gate to closed position.
-
Highlight harvest mode tab (B) on display and press confirm button to return to harvest mode.
-
Press high engine speed button to run engine at full speed.
-
Press and hold foot switch (C) to run material handling system for 5—10 minutes.
-
Release foot switch. Press low engine speed button.
-
Lower ladder. Climb onto platform and again observe position of module builder belts in relation to rear guides.
-
Repeat adjustment as necessary until belts are tracking properly.
Reduce Excess Tracking to the Left
Belt tracking is controlled by adjusting the position of the upper rear gate rollers. Adjustment must be made on one side of machine only. Adjustments are made in small increments and tracking is rechecked after each adjustment.
If belts are tracking to the left, the upper rear gate roller on the right side must be adjusted forward. If no further adjustment is available on the right side roller, then the left side roller must be adjusted rearward.
The procedure for adjustment of the right side roller is the same as for the left side roller previously described.
Adjust Individual Belt Tracking
N88293-UN-30MAR10
N87330-UN-17NOV09
Mode Management Screen
N88294-UN-30MAR10
RMB Service Mode Menu
N87332-UN-17NOV09
A - Mode Select Button
B - Selection Dial
C - Service Mode Tab
D - Confirm Button
E - RMB Service Mode Icon
IMPORTANT: Poor tracking of an individual belt is not normal and must be corrected as soon as the problem is discovered. An individual belt tracking poorly can ride on the belts on either side of it and subsequently cause damage to or failure of all three belts
If a majority of the belts are tracking properly between the guides, but one or two of the interior belts are riding up on a guide, check for cotton buildup around the front rockshaft rollers and remove debris. If no buildup is present, flip the individual belt that is tracking poorly to reverse the tracking direction. Flip belt or belts as follows:
-
Press mode select button (A). Mode management screen appears.
-
Rotate selection dial (B) to highlight RMB service mode tab (C).
-
Press confirm button (D). RMB service mode menu appears.
-
Highlight RMB service mode icon (E) and press confirm button. RMB service text screen appears.
-
Press button D on tether control unit to place gate in cradle.
-
N95990-UN-08FEB12Gate Hydraulic Lock Valve Lever
N95991-UN-02DEC11Handler Hydraulic Lock Valve Lever
N87357-UN-17NOV09
N88295-UN-30MAR10RMB Service Mode Menu
N87359-UN-17NOV09A - Gate Hydraulic Lock Valve Lever
B - Handler Hydraulic Lock Valve Lever
C - Service Mode Tab
D - Belt Service Mode Icon
Engage gate hydraulic lock valve (A) and handler hydraulic lock valve (B). -
Highlight RMB service mode tab (C) and press confirm button to return to RMB service mode menu.
-
Highlight belt service mode icon (D) and press confirm button. Belt service text screen appears.
-
Press button A on tether control unit and run module builder until lace on belt is approximately 450 mm (18 in.) behind rockshaft roller.
-
Press button C on tether control unit to raise rockshaft to relieve belt tension.
-
N82414-UN-21JAN09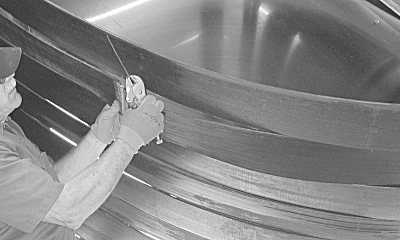
N82415-UN-21JAN09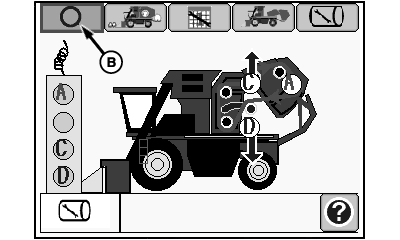
N87368-UN-17NOV09A - Splice Pin
B - Exit Tab
Grasp splice pin (A) with pliers and rotate pin 90 degrees (1/4 turn), then pull pin out of belt splice. -
Flip back half of belt over and install splice pin. Insert pin into splice with notches facing flat sides of belt, then rotate pin 90 degrees into locked position.
-
Press button D on tether control unit to lower rockshaft and tighten belts.
-
Press button A on tether control unit to run module builder until belt lace appears in original position.
-
Press button C on tether control unit to relieve belt tension.
-
Remove splice pin and flip back half of belt over. Belt has now been flipped 180 degrees. Install splice pin.
-
Disengage hydraulic lock valves.
-
Highlight exit tab (B) on belt service screen and press confirm button.
-
N88296-UN-30MAR10RMB Service Mode Menu
N88297-UN-30MAR10
N88298-UN-30MAR10A - RMB Service Mode Icon
B - Harvest Mode Tab
C - Foot Switch
Highlight RMB service mode icon (A) and press confirm button to enter RMB service mode. -
Press button C on tether control unit to return module builder to closed position.
-
In cab, highlight harvest mode tab (B) on display and press confirm button.
-
Press high engine speed button to run engine at full speed.
-
Press and hold foot switch (C) to run material handling system for 5—10 minutes.
-
Release foot switch. Press low engine speed button.
-
Lower ladder. Climb onto platform and again observe position of module builder belts in relation to rear guides.
-
If tracking is still not satisfactory, place machine in RMB service mode and apply talcum powder (Part Number A52577) to entire pulley side of affected belt.
-
Return machine to harvest mode and build five complete modules. When completing the fifth module, empty the accumulator using the cotton handling system foot switch in the cab.
-
After ejecting the fifth module, recheck tracking of the affected belt or belts.
-
If the affected belt or belts are still tracking poorly, return machine to RMB service mode.
-
Flip troublesome belts as described in preceding steps 6—17.
-
Apply talcum powder to entire pulley side of affected belt or belts.
-
If belts still do not track properly, contact your John Deere dealer to open a DTAC case.
Check and Adjust Belt to Gate Sidewall Clearance
N87341-UN-19NOV09
N87342-UN-19NOV09
Right Side Rear Belt Guides
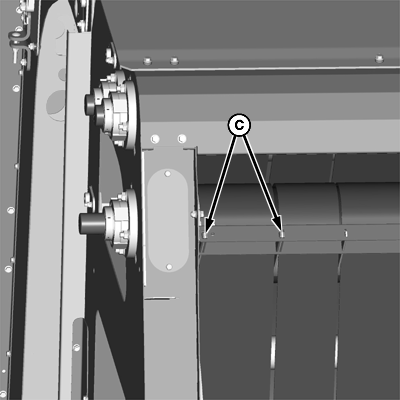
N87343-UN-19NOV09
Right Side Front Belt Guides
A - Distance
B - Rear Belt Guides
C - Front Belt Guides
Once belts are tracking properly, repeat steps to run machine for 5—10 minutes. Then, lower handler into wrap feed position and lower ladder. Measure clearance and adjust as necessary, as follows:
-
Measure distance (A) between outer baler belt and gate sidewall directly behind lower gate roller. This distance should be 19 mm (3/4 in.) or less. If distance is greater than 19 mm (3/4 in.), adjustment is required.
-
Adjust clearance by moving rear belt guides (B) and front belt guides (C) toward the outside of the machine to force the outer belt closer to the gate sidewall.
|
DP99999,00007E8-19-20120229 |