Calibration Test
|
|
|
|
|
|
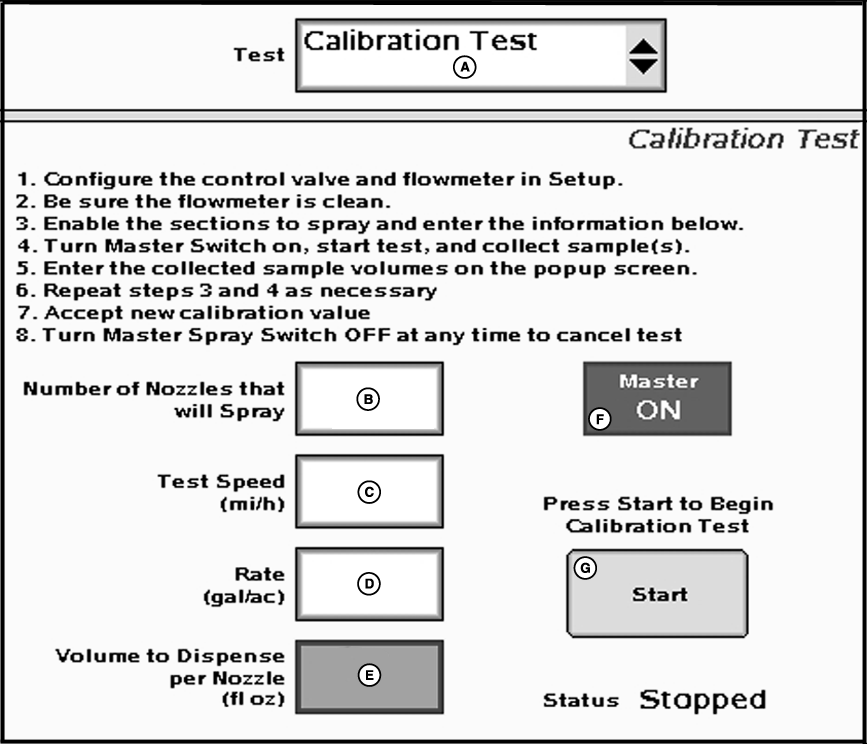
NOTE: The calibration test is for use on sprayers and liquid fertilizer (not for use on NH3). The Calibration test is used to calibrate the flowmeter. Place containers (such as calibration container) under up to 7 nozzles to capture volumes sprayed during the test. Note: Only 7 samples may be entered into the |
sample volumes popup screen therefore only 7 nozzles are needed for the test. The calibration test may be repeated as many times as needed if all nozzles are to be tested. By measuring these samples and entering the values into the system, an accurate flowmeter calibration value can be attained. Follow the on-screen instructions as described. |
JS56696,0000038 -19-05JUL07-1/2 |
|
1.
Select Calibration test from the tests drop-down menu.
a.
Go to the "GS2 Rate Controller - Setup" screen and select the "System" tab.
NOTE: Master switch must be off to enter data. b. Enter the recommended Control Valve Calibration value.c. Enter the default Flowmeter Calibration value as provided by the manufacturer. NOTE: For RAVEN flowmeters, divide the number on the tag by 10 before entering. E.g. "2650 L" = 265 ("700 gal" = 70). NOTE: The number on the RAVEN tag is pulses per 10 units of fluid and the value entered needs to be pulses per unit of fluid. 3. Be sure the flowmeter is clean. 4. Enable the sections to spray and enter the information below. a.
Go to the "GS2 Rate Controller-Main" screen.
|
NOTE: The entered values must ensure a test length of more than 10 seconds, but less than 60 seconds. The status will remain as "ENTER DATA" until this condition is met. IMPORTANT: Always fill the solution tank with clean water to do a proper calibration test. Variations of flow may exist between water and actual product, such as 32% N. 5. Turn Master Switch on, start test, and collect samples. a.
Ensure sample containers are properly positioned.
6. Enter the collected sample volumes on the popup screen. a.
Enter the measured amounts collected from each container.
7. Repeat steps 4 and 5 as necessary. a.
If it is desired to collect samples from other sprayer sections and/or nozzles in order to further confirm test results, press the cancel button and repeat steps 4 and 5.
8. Accept new calibration value. a.
Press the arrow button to accept the New Calibration Value.
9.
Turn Master Spray Switch OFF at any time to cancel test.
|
JS56696,0000038 -19-05JUL07-2/2 |