Initial Settings
|
|
|
|
|
|
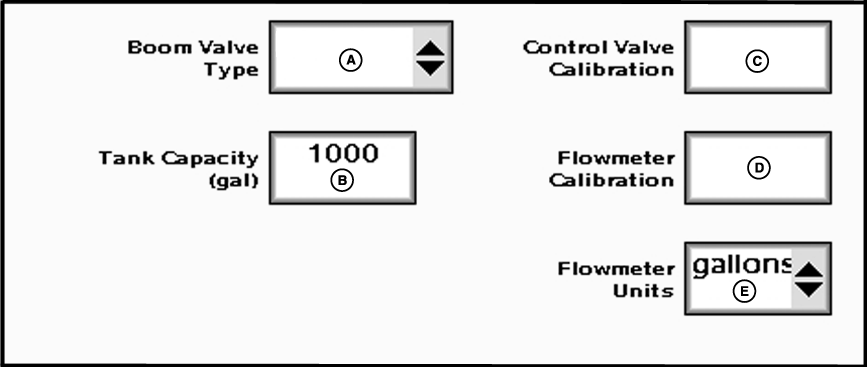
Enter one of two valves from boom valve type drop-down: 2-wire or 3-wire. The type of valve selected may reduce the number of boom sections the GS2 can control (See Maximum Number of Sections Table). Enter maximum volume of tank in input box labeled tank capacity.
Enter Control Valve Calibration number provided in manual into control valve calibration input box. The Control Valve Calibration number is a 4 digit number used to fine tune control characteristics. The number is in the form XXYZ, and is defined as follows: |
|
OUMX005,0001F2A -19-05JUL07-1/2 |
|
Example of tuning the control valve for optimal reponse: After entering the initial starting value for the control valve (e.g. 2512) and run a configuration test, the variance runs high (at or near 100%) and the valve response seems sluggish. The next step in tuning may be to increase the valve speed number (first 2 digits) from 25 to 35 and also increase the output deadband number (third digit) from 1 to 2 and retry the configuration test. Running a nozzle flow check is also a good way to obtain a better feel for valve speed and response time of the system.
Enter Flowmeter Calibration number as stamped on valve. |
NOTE: If the tag is no longer attached, start with a low calibration number such as 60. Conduct a Calibration Test, and change the value accordingly from that point. NOTE: For RAVEN flowmeters, divide the number on the tag by 10 before entering. e.g. "2650 L" = 265 ("700 gal" = 70). NOTE: The number on the RAVEN tag is pulses per 10 units of fluid and the value entered needs to be pulses per unit of fluid. Choose unit of measurement from flowmeter units drop-down. |
OUMX005,0001F2A -19-05JUL07-2/2 |