Harvest Monitor Moisture Correction
PC12882-UN-24SEP10
Moisture Sensor
Setup—Moisture Correction
IMPORTANT: Changing moisture correction in the “Moisture Correction” cell will not change the data already saved. After changes are made, all harvest information collected from that point will reflect the changes.
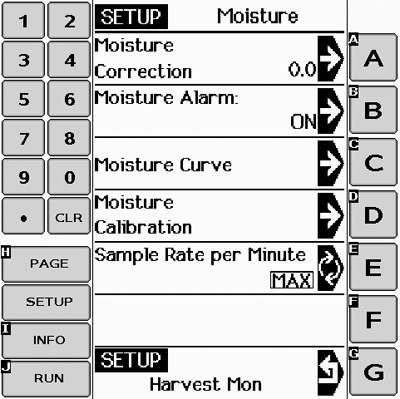
SETUP - MOISTURE screens are used to setup moisture correction, moisture alarm (on/off) and moisture curves.
Screen: SETUP—MOISTURE
Select: SETUP >> HARVEST MONITOR >> MOISTURE
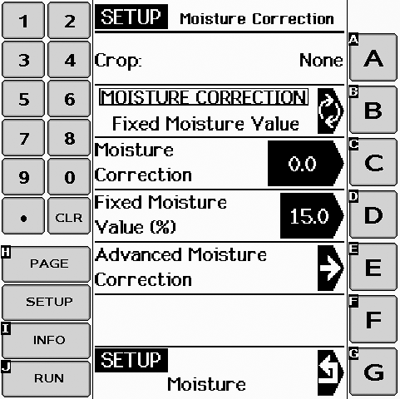
Moisture correction screen is used to set moisture correction to match reading from a customer or elevator certified moisture sensor as shown on RUN - PAGE 1 screen.
PC12883-UN-24SEP10
Moisture Correction
-
NOTE: Harvesting, recording is “ON”, determine how many points the moisture correction needs to be added or removed from the instantaneous moisture.
Not harvesting, recording “OFF”, will display average moisture of crop. Average moisture does not need to be corrected. If average moisture is corrected, the instantaneous moisture could be over corrected.
Screen: SETUP—MOISTURE CORRECTION
Select: SETUP >> HARVEST MONITOR >> MOISTURE >> MOISTURE CORRECTION
-
NOTE: “Crop” cell displays the selected crop.
MOISTURE CORRECTION button and FIXED MOISTURE VALUE button allow the operator to correct the moisture reading on RUN—PAGE 1 screen by toggling to FIXED MOISTURE VALUE, moisture sensor will be disabled and forces moisture value to what was entered.
-
If using MOISTURE CORRECTION: Select MOISTURE CORRECTION button and using numeric keypad input a number value to be added to reading displayed on RUN—PAGE 1 screen.
-
Select MOISTURE CORRECTION button again to save this value.
-
If using fixed moisture value; Select FIXED MOISTURE VALUE button and using numeric keypad, input a number value (%) to be displayed on RUN - PAGE 1 screen.
Advanced Moisture Correction
-
NOTE: This procedure is used to determine moisture correction when elevator readings do not agree with combine moisture readings.
Do not use this procedure if crop moisture levels are above 16%. For crops above 16% enter moisture correction manually.
Collect 1 L (1 qt) grain sample from the grain tank and place in a sealed container and have tested by elevator.
-
IMPORTANT: To finish this procedure the combine engine must be turned OFF.
Select ADVANCE MOISTURE CORRECTION button on SETUP—MOISTURE CORRECTION screen.
-
Select ELEVATOR GRAIN MOISTURE button on SETUP—ADVANCED CORRECTION screen.
-
Using numeric keypad, enter value from elevator.
-
Select ELEVATOR GRAIN MOISTURE button to save value.
-
To start sampling select START button.
-
NOTE: Screen will prompt operator to POUR SAMPLE IN MOISTURE SENSOR.
Make sure moisture sample chamber is fully filled and is free of air pockets. Air pockets will cause inaccurate moisture readings.
Pour sample into moisture sensor.
-
Screen will display CALIBRATION IN PROGRESS.
-
MEASURED MOISTURE IS cell will display the moisture of the sample in the moisture sensor.
-
Select ACCEPT button to save this value or select DECLINE button to decline this value.
PC12906-UN-24SEP10
Moisture Alarm
Moisture Alarm
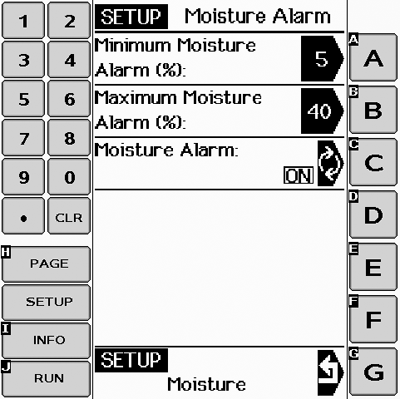
This screen is used to determine the set points (minimum and maximum) for activation of the moisture alarm.
Select MOISTURE ALARM button on SETUP—MOISTURE screen and SETUP—MOISTURE ALARM screen will appear.
Select MINIMUM MOISTURE button and using numeric keypad enter a new minimum setting.
Select MAXIMUM MOISTURE button and using numeric keypad enter a new maximum setting.
Select MOISTURE ALARM button to toggle ON/OFF.
PC10343-UN-29SEP07
Moisture Curves
Moisture Curve
Three moisture curve choices are:
- Enter New Curve — This would be used when a new curve has been developed for a new crop.
- Update Curve — This would be used when a better curve has been developed for a current crop.
- Restore Curve Defaults — This would be used when to reinstate the original curve.
Refer to MOISTURE CURVE CALIBRATION CODES later in this section for the latest available codes.
This screen is used to enter new moisture curves that may be provided by the factory.
Use the following to enter a new curve as directed.
-
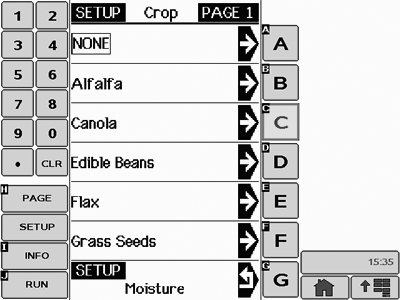
Select MOISTURE CURVE button on SETUP—H Mon—MOISTURE, MOISTURE CURVE
-
NOTE: If needed select page button until desired crop appears.
Select desired crop to be updated.
-
NOTE: To view current moisture curve, go to INFO Harvest Monitor section.
Select CROP button to toggle between ENTER NEW CURVE, UPDATE CURVE or RESTORE CURVE DEFAULTS.
-
If ENTER NEW CURVE is selected select letter button next to a blank cell and using numeric keypad enter the new moisture curve number.
-
Select SAVE THIS CURVE button.
-
NOTE: To update an existing curve, toggle to UPDATE CURVE on SETUP - MOISTURE CURVE screen.
Select letter button next to blank cell and using numeric keypad enter update.
-
Select SAVE THIS CURVE button .
-
To restore default curves, select CROP button to toggle to RESTORE CURVE DEFAULTS.
-
Select SAVE THIS CURVE button to restore default curves for the selected crop.
|
CZ76372,000017F-19-20100924 |