Harvest Monitor Setup
![]()
PC8663-UN-29APR15

PC12866CC-19-24OCT13
ORIGINAL GREENSTAR MONITOR Button
Select: MENU >> ORIGINAL GREENSTAR MONITOR button
Harvest Monitor is only available through the ORIGINAL GREENSTAR MONITOR application on the GS3 display. Once in the Original GreenStar Monitor application, operator interface will function the same as the Original GreenStar Display.
NOTE: The Original GreenStar Monitor is only viewable as a full screen.
NOTE: For all 9x70 combines, Harvest Monitor is located within the Command Center. See Combine Operator's Manual for more information.
IMPORTANT: If dual monitors are being used with an Original GreenStar Display on the system along with a GS3 display, Harvest Monitor will automatically function on the Original GreenStar Display and the Original GreenStar Monitor application will not be available and will not appear on menu.
Starting
NOTE: Errors may appear when first powering up the system. Cancel these errors before proceeding.
Screen: SETUP—HARV MON—PAGE 1
Select: SETUP >> HARVEST MONITOR
Operator will need to setup information in HARVEST MONITOR on SETUP—HARV MON—PAGE 1 screen:
- Header Width
- Header Type
- Yield Calibration
- Moisture Calibration
- Record Stop Height
NOTE: Farm, Field, and Crop need to be setup in HarvestDoc on GS3 >> DOC (I) button.
PC12875CC-19-24OCT13
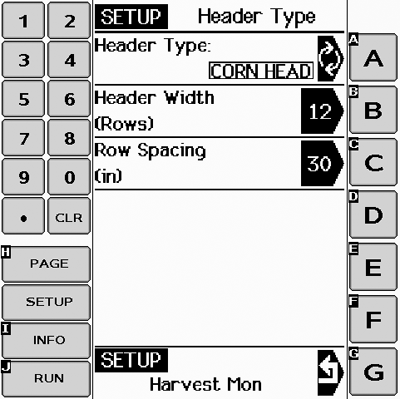
Define Header
Defining Header
Screen: SETUP—HEADER
Select: SETUP >> HARVEST MONITOR >> HEADER TYPE
IMPORTANT: Make certain header type is correct when changing from one header to another. The wrong header selection will result in an inaccurate information.
NOTE: To change from feet to meters see SETUP GreenStar DISPLAY.
Depending on which type of header is selected, there are additional items to be setup.
HEADER TYPE button will toggle between corn head, row crop, platform and belt pickup.
Select desired header type.
Corn Head/Row Crop Head
IMPORTANT: Make certain row spacing is correct when header types are changed. The wrong row spacing will result in inaccurate area calculation.
Header Width
Screen: SETUP—HEADER
Select: SETUP >> HARVEST MONITOR >> HEADER TYPE >> HEADER WIDTH
Enter header (in rows) width using numeric keypad.
Row Spacing
Screen: SETUP—HEADER
Select: SETUP >> HARVEST MONITOR >> HEADER TYPE >> ROW SPACING
Enter row spacing mm (inches) using numeric keypad.
Row Change
Screen: SETUP—HEADER
Select: SETUP >> HARVEST MONITOR >> HEADER TYPE >> ROW CHANGE
Set increments (in rows) for cut width to change on RUN - PAGE 1 screen. Use numeric keypad to enter number.
Platform/Belt Pickup
Screen: SETUP—HEADER
Select: SETUP >> HARVEST MONITOR >> HEADER TYPE >> HEADER WIDTH
NOTE: If row crop (e.g. soybeans) are being harvested with a platform, and row spacing does not allow use of full header width, adjust header width to crop width being cut. For example: 7.6 meter (25 ft) platform may be 7 meters (24 ft) depending on row spacing.
Platform = Actual field cutting width in meters (feet)
Belt Pickup = Actual width of grain cut to produce windrow in meters (feet).
Set increments (in m (ft) ) for cut width to change on RUN—PAGE 1 screen. Use numeric keypad to enter number.
Change increments (in meters or feet) for cut width to change on RUN—PAGE 1 screen. Use numeric keypad to input correct header width in meters or feet.
![]()
PC12876-UN-24SEP10
Record Stop Height
Selecting Recording
There are different methods of starting recording and these methods will change based model of combine and moisture sensor.
The most common method is the Record Stop Height.
The operator raises the header to the desired height for recording to shut off. Press the button next to Save, and a percentage height will be saved. If the header is lowered below that percentage, recording will turn on. If it is raised above that percentage, recording will turn off.
PC12877CC-19-24OCT13
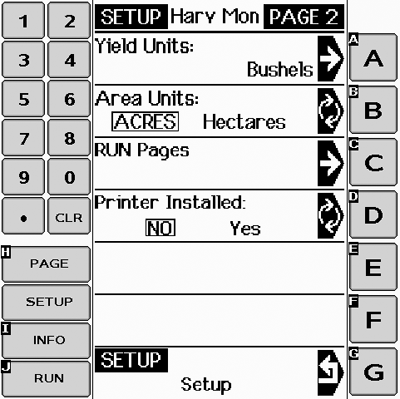
Harvest Monitor Page 2
Setting Yield/Area Units
This screen is a continuation of SETUP - HARV MON - PAGE 1 screen.
This screen allows operator to choose Yield Units and Area Units that will be displayed on RUN pages. It also allows operator to configure RUN pages and turn on and off printer functions.
Area Units
To select units of area select AREA UNITS button: on SETUP - HARV MON - PAGE 2 screen. AREA UNITS button will toggle between ACRES and HECTARES. Selection will appear boxed in capital letters.

PC12878CC-19-24OCT13
Yield Units
Yield Units
NOTE: See Standard Weights Chart section for standard weights of corps.
To select units of measure for yield readings, select YIELD UNITS button and SETUP - YIELD UNITS - PAGE 2 screen will appear.
Select desired unit.
|
CZ76372,000017E-19-20131024 |