AB Curve Mode
Theory of Operation

PC9030C-UN-27OCT06
PC9028-UN-16APR06
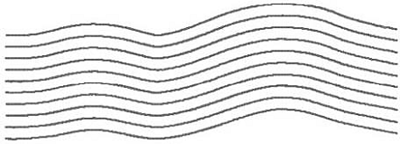
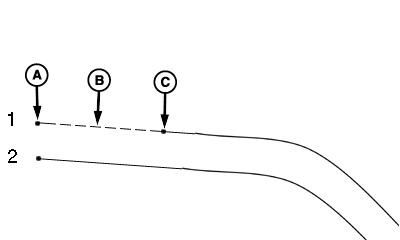
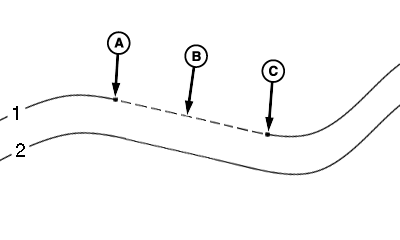
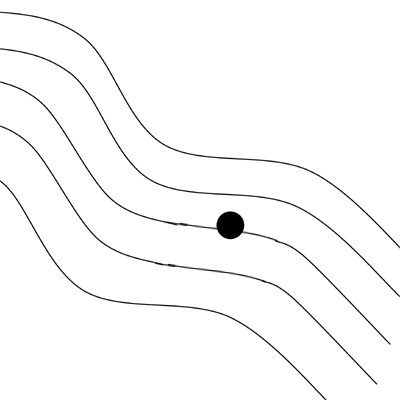
The curvature of the path changes as the subsequent paths get more convex or concave.
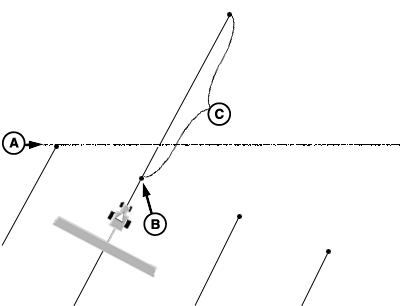
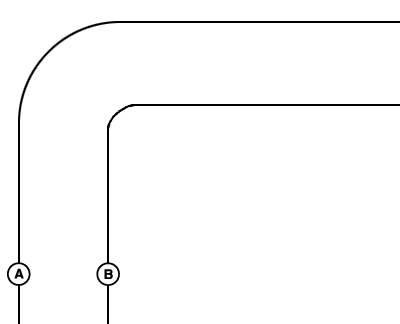
A - Start Recording of AB Curve (Track 0)
B - Stop Recording of AB Curve (Track 0)
C - Paths Generated from Track 0
AB Curves allows an operator to drive a curved line in the field with two end points (beginning and end) and the passes parallel to the track in either direction will be generated based on the original driven track. Each pass is generated from the original driven pass to ensure that steering errors are not propagated through the entire field. The passes are not identical copies of the original pass. The curvature of the pass changes to maintain pass to pass error.
Once the AB curve (Track 0) is recorded 5 tracks will be generated (Track 0 and 2 passes on either side of Track 0). When the vehicle drives past the 2nd track from Track 0, ten additional tracks will be generated in that direction. The system will continue to generate additional passes when the vehicle drives past the last pass displayed on the screen.
NOTE: Skip pass is available in AB Curves mode
Generating AB Curve Path Information As the system generates the initial passes after recording Track 0 or when generating additional passes the text “Generating AB Curve” will be displayed on the perspective view. During this time you will not be able to track off of any paths.
AB Curve Generation Limits The initially recorded AB curve must be at least 10 feet in length to be a valid AB Curve to use for guidance. The vehicle must be within 400 meters (0.25 miles) of where Track 0 was recorded for the system to start generating curve paths. If the vehicle is at this outer limit it may take several minutes to generate a path that shows up on the screen. During this time “Generating AB Curve” will be displayed on the screen.
Straight Line Extensions AB Curve paths are generated with a 91 m (300 ft) straight line extension attached to the end of the actual recorded path.
Multiple AB Curves in a field A field can contain multiple AB Curve paths. Each AB curve for a field must be recorded and uniquely named.
Track Numbering Tracks will be numbered to allow for skip pass and to aid in finding passes. The direction label (N,S,E, or W) is defined by the heading determined between the first and last point in the curve.
Straight Line Extensions
PC9540-UN-21OCT07
PC9541-UN-21OCT07
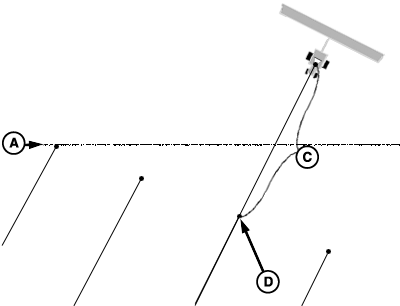
A - Headland Boundary, may or may not be defined by the GS3 system .(shown for reference only)
B - End of Projected A/B Curve
C - 91 m (300 ft) Straight Line Extension
D - Beginning of Projected A/B Curve
Straight Line Extensions A/B Curve paths are generated with a 91 m (300 ft) straight line extension attached to the end of the actual recorded path. This straight line extension allows the operator to get the vehicle back on the path prior to entering the field. It may also aid in continuing the guidance path when the recorded path gets shorter than the field boundary.Setup
PC14478CC-19-24OCT13
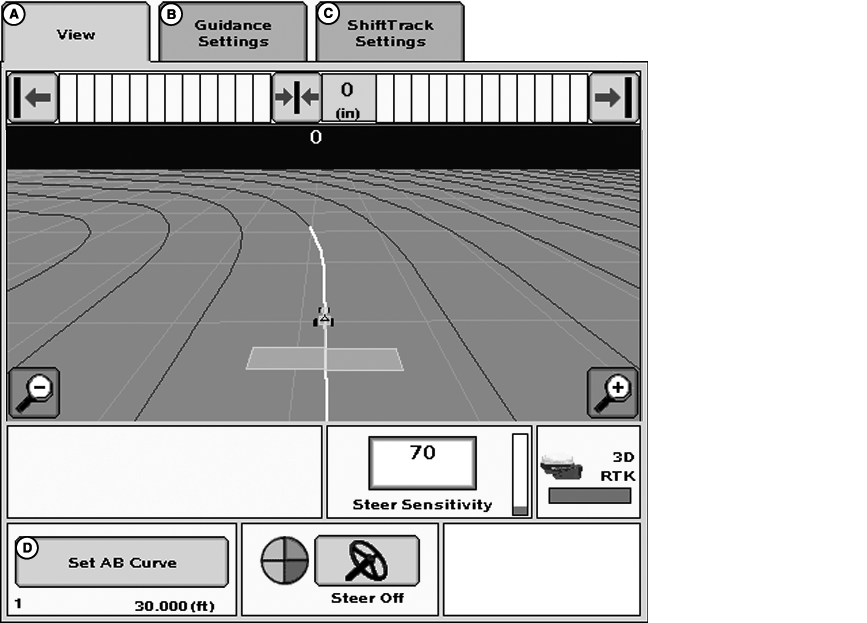
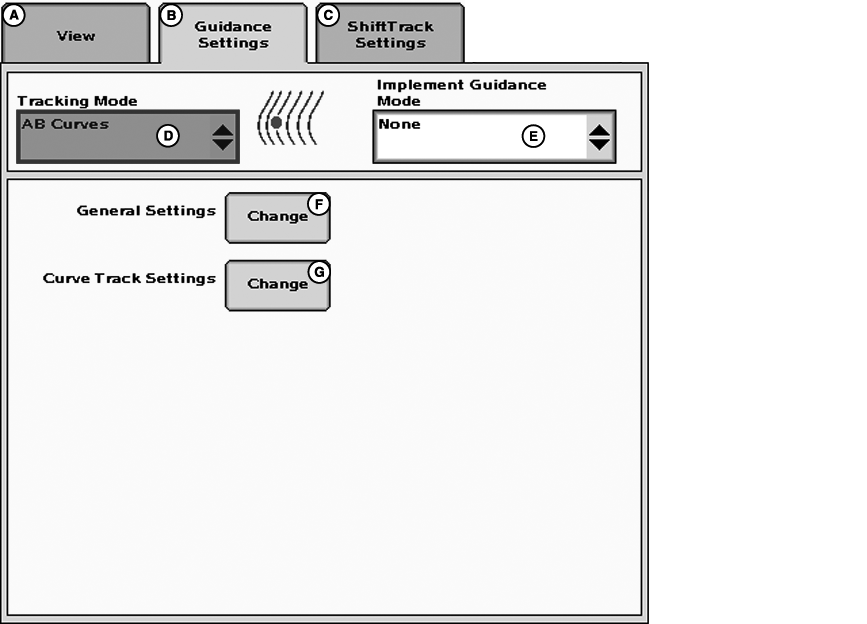
GreenStar 3 Pro - Guidance Screen
A - View
B - Guidance Settings
C - ShiftTrack Settings
D - Set AB Curve
- GUIDANCE SETTINGS tab >> TRACKING MODE drop-down box >> AB CURVE
IMPORTANT: AB Curve must be selected in order to operate AB Curve Guidance.
Creating an AB Curve
PC12591CC-19-24OCT13
GreenStar 3 Pro - Guidance
A - View
B - Guidance Settings
C - ShiftTrack Settings
D - Tracking Mode
E - Implement Guidance Mode
F - General Settings button
G - Curve Track Settings button
Creating AB Curves
NOTE: Track 0 and AB Curve are two terms used interchangeably, we will use term Track 0.
Track 0 is the reference point from which subsequent curve passes in the field are based. Use the following procedure to setup Track 0 and Track Spacing.
NOTE: Multiple AB Curves may be recorded per field. They will need to be named and recorded separately.
-
Guidance View tab >> Set AB Curve button (lower left corner)
-
Press NEW button below the Current AB Curve drop-down box.
-
Enter a name for Track 0 using the alpha/numeric keypad.
-
Press Enter button
-
5. Set Track Spacing
-
Press the track spacing entry box
-
Enter implement width
-
Enter desired track spacing
NOTE: A higher degree of precision can be achieved for track spacing when track spacing is entered in by rows instead of feet. More decimal places are used in the track spacing calculation when entered in rows versus the three decimal places allowed when entered by feet. Select (ft/rows) button to change to rows.
-
-
Press the AB Curve record button to start recording.
-
Drive the initial pass.
-
Press the AB Curve record button to stop recording.
-
Press the Enter button
NOTE: If GPS signal is lost while recording, recording is stopped and the AB curve that was recorded to that point will be saved. If the AB Curve is not what the operator intended, it may be deleted by using the REMOVE button.
Pause Recording Feature
![]()
PC12637-UN-09JUN10
AB Curves Pause button
This feature allows the user to PAUSE the recording of a vehicle's path. When recording is UN-PAUSED, curve track will resume recording and connect the space between where it was PAUSED and UN-PAUSED with a straight line. This can be helpful when there is a long straight section of path or when navigating around obstacles.
NOTE: The longest bridge segment (line segment created between PAUSED and UN-PAUSED) that can be created is a distance of 0.5 miles (2,640ft). If the distance between the points is greater than 0.8 km (0.5 miles) (2,640 ft) the line segment will not connect resulting in a gap in the path.
Operating Pause Recording
When the pause button is selected, “Paused” is displayed below the RECORD button. To un-pause select the PAUSE button again.
PC9297-UN-29JUL06
Straight Path starting from the Field's Edge
A - Recording Turned ON then PAUSED
B - Bridge segment is generated to connect points
C - Recording UN-PAUSED
Recording a Straight Path within a Curved Path
Straight Path starts from Field Edge:
- Drive the vehicle to the designated starting spot in the field. Turn curve track recording on and press the PAUSE button.
- “Paused” is displayed below the button.
- Start driving the first pass. When the spot in the field is reached where the pass starts to curve, select the pause button again and curve track will start recording again.
- Drive to the end of the first pass.
- The straight path (B) will be created when the recording is un-paused.
PC9298-UN-29JUL06
Straight Path between Two Curves
A - Recording PAUSED
B - Bridge segment is generated to connect points
C - Recording UN-PAUSED
Recording a Straight Path within a Curved Path
Straight Path is between Two Curves:
- Drive the vehicle to the designated starting spot in the field and turn curve track recording on.
- Start driving the curve path.
- When you want to start creating a straight path, select the pause button.
- Recording indicator will turn black. “Paused” is displayed below the button.
- Drive the straight path.
- When you are at the point where the straight path should end, select the pause button again and curve track will start recording again.
- The straight path (B) will be created when the recording is un-paused.
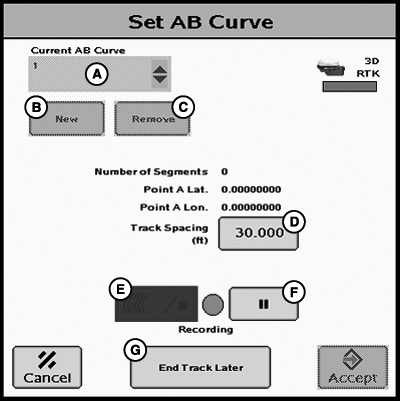
Saving AB Curves Data
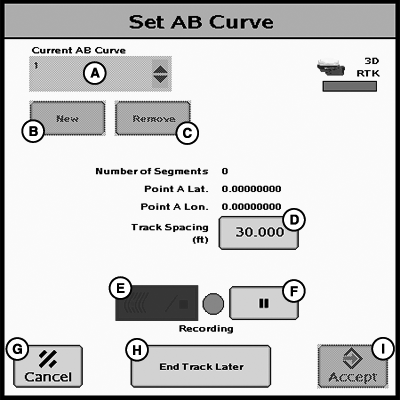
PC12592CC-19-24OCT13
Set AB Curve
A - Current AB Curve
B - New
C - Remove
D - Track Spacing
E - Record/Stop Button
F - Pause Button
G - Cancel Button
H - End Track Later Button
I - Accept Button
The stored AB Curve Track data is assigned to a Client, Farm, Field name that is setup in the RESOURCES/CONDITIONS softkey >> RESOURCES tab.
NOTE: Setup of Client, Farm, and Field is not required for Curve Track operation but is required for the track to be saved and repeated.
The recorded AB Curve Track data is saved to the USB drive. This data can be transferred into desktop software and saved to the USB drive or additional USB drives for use in future field applications. The USB drive can also be taken from one GS3 display to another and recall the AB Curve Track data for use.
Recalling Saved AB Curve Data
IMPORTANT: Make sure the USB drive contains the Curve Track data for this field.
- RESOURCES/CONDITIONS softkey >> RESOURCES tab (Select the Client, Farm, Field name to which the stored Curve Track data was assigned.)
- GUIDANCE SETTINGS tab >> TRACKING drop-down box >>AB CURVE TRACK
-
Select the AB Curve Name from the Current AB Curve drop down box.
-
Press Enter button
Smooth Tight Turns

PC9527CC-19-24OCT13
Curve Track Settings
A - Curve Track Settings
B - Smooth Tight Turns
C - Implement In-Ground Turn Radius (ft)
GreenStar 3 Pro - GUIDANCE >> GUIDANCE SETTINGS tab >> CURVE TRACK SETTINGS CHANGE button
Curve Track Settings
Smooth Tight Turns—When box is checked the system will automatically smooth a propagated path that was becoming tight.
Implement In-Ground Turning Radius (ft)—This is the value of how tight of a turn radius the implement can turn while in the ground. For a drawn implement, this measurement should be no less than the physical width of the implement. A higher Implement In-Ground Turn Radius will result in smoother turns. A lower Implement In-Ground Turn Radius will result in tighter turns. This setting is only used for generating curve tracks.
NOTE: Be sure Implement In-Ground Turn Radius is set to a realistic value for the size of implement being used.
PC9529-UN-27OCT06
Smoothing Tight Turns OFF

PC9530-UN-27OCT06
Smoothing Tight Turns ON
A - Previous Pass
B - Next Pass—Smoothing Tight Turns Off
C - Next Pass—Smoothing Tight Turns On
D - In-Ground Turn Radius
With Smoothing Tight Turns On the path is generated based on user's turn radius.
Remove AB Curve Track Data
PC12630CC-19-24OCT13
Set AB Curve
A - Current AB Curve
B - New Button
C - Remove Button
D - Track Spacing Button
E - Record/Stop Button
F - Pause Button
G - End Track Later Button
GUIDANCE VIEW tab >> SET AB CURVE button
To remove curve track data:
-
Select the AB Curve name that is to be deleted from the Current AB Curve drop-down box.
-
Press the remove button.
-
Confirm the removal of the AB Curve.
Guiding around Obstacles in a Field
PC9030B-UN-24OCT06
Original Path will not be Altered
As the operator manually drives around the obstacle the AB curve path will remain on the screen. The original path will not be altered.
|
HC94949,000034B-19-20131024 |