Calibrate Flowmeter — Liquid Catch Test
IMPORTANT: Always fill solution tank with clean water to perform calibration test.
![]()
PC8663-UN-29APR15
Menu Button

PC22295-UN-21MAR16
John Deere Rate Controller 2000 Button

PC22296-UN-21MAR16
Setup Softkey
PC22369-UN-31MAR16
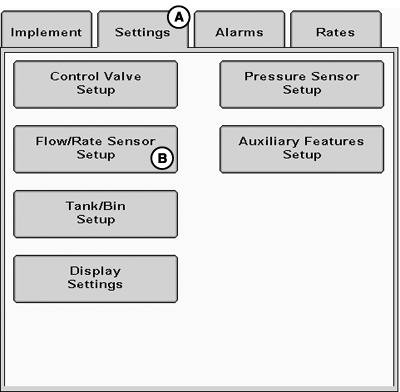
A - Settings Tab
B - Flow / Rate Sensor Setup Button
Catch Test allows operator to collect product from up to seven samples and enter exact amounts collected to calibrate flowmeter. Place containers (such as calibration containers) under nozzles to capture product sprayed during test. Flowmeter Calibration may be repeated as many times as needed if all nozzles require testing. By measuring these samples and entering values into system, an accurate flowmeter calibration value is determined.
-
Select Menu button.
-
Select John Deere Rate Controller 2000 button.
-
Select Setup softkey.
-
Select Settings tab (A).
-
Select Flow / Rate Sensor Setup button (B).
-
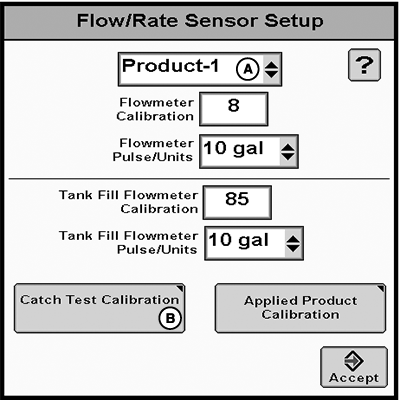
PC22714-UN-01JUN16A - Product Drop-down Menu
B - Catch Test Calibration Button
Select Product for drop-down menu (A). -
Select Catch Test Calibration button (B).
-
NOTE:
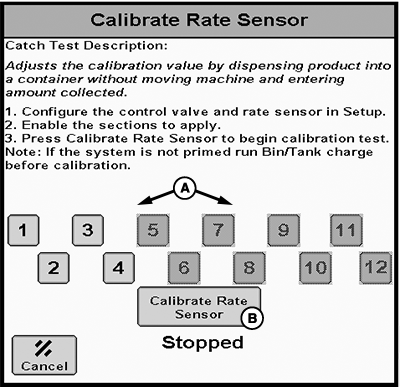
PC22713-UN-01JUN16A - Sections
B - Calibrate Rate Sensor Button
If system is not primed, charge tank or bin before calibration.(Reference Tank / Bin Charging for more information.)
Configure control valve and rate sensor.
-
NOTE: In multiple product configurations, only sections assigned to selected product may be selected. Repeat Flowmeter Calibration as many times as needed for all product and sections that requires testing.
Enable sections (A) to apply.
-
Select Calibrate Rate Sensor (B).
-
NOTE:
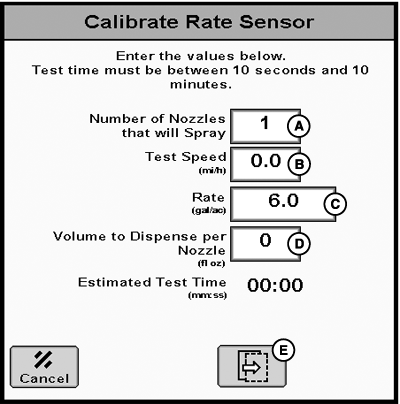
PC22371-UN-31MAR16A - Number of Nozzles that will Spray
B - Test Speed
C - Rate
D - Volume to Dispense per Nozzle
E - Next Page Button
Enter conditions that are comparable to normal operation. Larger dispense volumes result in longer, but more accurate, calibration tests.Enter calibration test parameters (A—D).
-
Select Next Page button (E).
-

PC22372-UN-31MAR16A - Start button
Turn master switch on. -
Select Start button (A) to begin test.
-
NOTE:
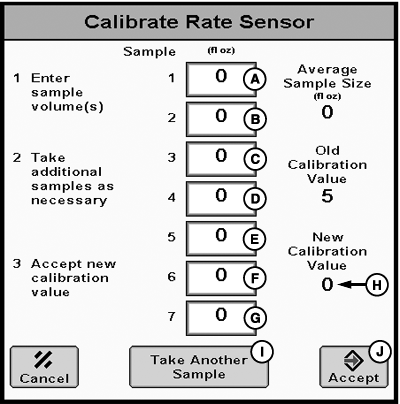
PC22373-UN-08APR16A - Sample 1
B - Sample 2
C - Sample 3
D - Sample 4
E - Sample 5
F - Sample 6
G - Sample 7
H - New Calibration Value
I - Take Another Sample Button
J - Accept Button
Turn master switch off at any time to cancel test.If fewer than seven samples are collected, leave remaining values set to 0.
Enter sample volume(s) (A—G). New Calibration Value (H) is calculated as samples are entered.
-
Select Take Another Sample (I) if necessary.
-
Select Accept button (J).
|
RW00482,00006B7-19-20160602 |