Attach Loader When Equipped with Parking Kit (300E Loader)
-
Attach the ballast box to the tractor. (See Attach Ballast Box to Tractor Hitch in Prepare Tractor section.)
-
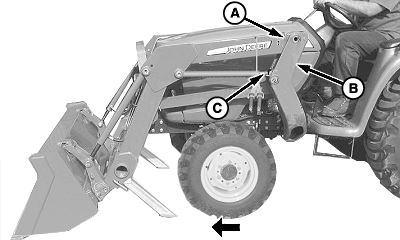
W28145-UN-07JUL17Left-Hand Side Shown
A - Loader Boom (1 each side)
B - Mounting Frame (1 each side)
C - Cylinder (1 each side)
Center the tractor between the loader booms (A) so that cylinders (C) are positioned inside mounting frames (B). -
Shut off engine and remove ignition key.
-

Escaping fluid under pressure can penetrate the skin, causing serious injury. Avoid the hazard by relieving pressure before disconnecting hydraulic or other lines. Protect hands and body from high-pressure fluids. (See additional information, Avoid High-Pressure Fluids, in Safety section.)
X9811-UN-23AUG88Relieve the hydraulic pressure. (See Relieve Hydraulic Pressure in Controls section.)
-
Prevent possible injury caused by unexpected loader
movement. Hose connections must be correct for the loader to respond
as expected when the control lever is moved.
Before connecting the hoses, ensure that couplers are free of dirt and debris.
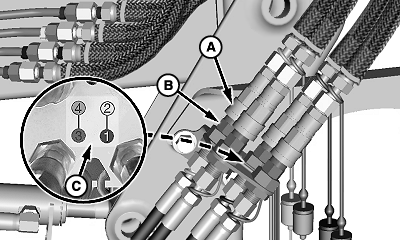
W20560-UN-12NOV09A - Coupler, Female
B - Coupler, Male
C - Label, Color-Coded
Identify hose connections using color codes on couplers (A), (B), and label (C).Connect couplers (A and B).
-
Start the engine.
-

W20683-UN-17FEB10
W28146-UN-10JUL17Left-Hand Side Shown
A - Cylinder Support (1 each side)
B - Pivot Pin (2 each side)
C - Bushing, Boom (1 each side)
D - Bushing, Mounting Frame (1 each side)
E - Bushing, Lift Cylinder (1 each side)
F - Quick-Lock Pin (2 each side)
Prevent possible injury. DO NOT insert fingers into holes while aligning components.To align bushings (C and D), pivot the bucket.
-
Engage the tractor park brake and place the transmission in PARK.
-
Shut off engine and remove ignition key.
-
To align bushings and install the pivot pin, insert a tapered pin or drift through the back of the mounting frame.
Install the pivot pin (B) through the mounting frame bushing (D) and boom bushing (C). Fasten with the quick-lock pin (F).
-
Move the multi-function lever into the FLOAT position.
-
Remove the cylinder support (A) and place it in the tractor storage compartment.
-
Align the lift cylinder bushing (E) with the mounting frame bushing (D).
-
Install the pivot pin (B) and fasten with the quick-lock pin (F).
-
Repeat on the opposite side.
-
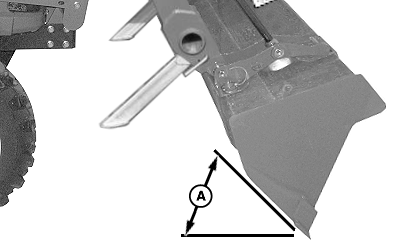
W22667-UN-12JUN12Bucket Position
A - Angle, 45°
Start the engine, raise the boom slightly, and dump the bucket to a 45° angle (A) as shown. -
Lower the bucket to the ground and apply slight down-pressure. Do not raise the front tires off the ground.
-
Shut off engine and remove ignition key.
-
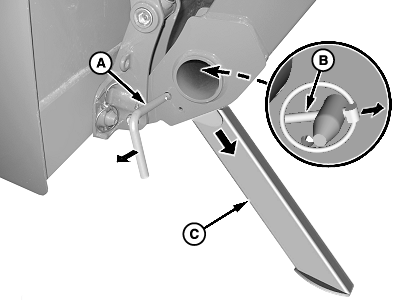
W20487-UN-30JUL09A - Pin (1 each side)
B - Quick-Lock Pin (1 each side)
C - Parking Stand (1 each side)
Remove quick-lock pins (B), pins (A), and parking stands (C). -
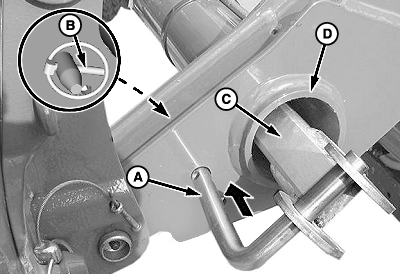
W20483-UN-30JUL09A - Pin (1 each side)
B - Quick-Lock Pin (1 each side)
C - Parking Stand (1 each side)
D - Storage Tube
Place parking stands (C) in ends of the storage tube (D). Fasten using pins (A) and quick-lock pins (B). -
Check for proper loader operation in response to the control lever. (See Operate Loader with Multi-Function Lever in Controls section.)
|
OUO6064,0001B40-19-20180829 |