Inspecting Tracks and Track Alignment
RXA0093259-UN-30MAR07
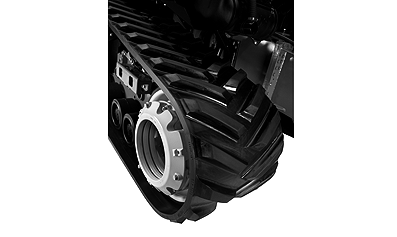
Track Undercarriage
RXA0093256-UN-30MAR07
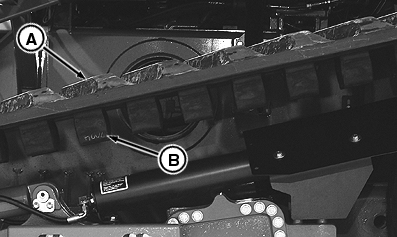
Inspect Tracks
A - Tread Lugs
B - Guide Lugs
SERVICE INTERVAL — DAILY OR 10 HOURS |
NOTE: Track treads will show increased wear rates, compared to machines running on tires, when operated on hard surface roads. Tracks, however, show much reduced wear rates (and slippage) when operating in the field.
IMPORTANT: Avoid roading at high speeds with a new set of tracks and wheels especially during the first 50-100 hours, as damage to guide lugs and wheels may result.
Break-in of new and or extremely clean or washed track belts and related components require application of a dry lubricate before roading.
Initial “break-in” and “alignment” should be performed before any high speed transport of tractor. Clean frictional track components such as belts, drive wheels, front idlers and mid-rollers can generate significant amount of heat if run in a non-lubricated condition. This heat is capable of damaging components and preventative measures should be taken to properly “break in” and “align” new components as follows:
Initial Break-In
- After installation of new and/or extremely cleaned track belts and/or other frictional components such as track belts, drive wheels, mid-rollers and front idlers it is important to expose clean components to materials that will lubricate and break them in.
- Work tractor in field in loose soil for at least 15 minutes.
- • If tractor cannot be exposed to loose soil a “clay based” granular material such as clay based lubricant, kitty litter, oil-dry absorbent or talc powder are all acceptable to be substituted. When used this material should be introduced to “joint” area between the drive wheels and belts continuously for at least 15 minutes.
Track Belt Alignment
- After initial break-in procedure is completed track alignment should be performed. Follow guide lug temperature check method described in this section.
NOTE: After initial break-in and alignment have been completed, a long term break-in process will likely occur for up to 400 hours following new component installation. During this time frame it is best to maximize exposure of the tractor to soft soil and minimize exposure to high speed heavily loaded transport conditions. It is also advisable for operator to periodically check alignment of belts during this time.
Inspect tread lugs (A) and guide lugs (B) for wear or cuts. Even in routine operating conditions, tread lugs and guide lugs will exhibit some wear or cuts, especially during the break-in period. Wear and cuts can also be caused by these components coming in contact with sharp objects (such as rocks, stumps, fencing materials, etc).
Tracks normally will encounter some chipping and minor chunking during operation, as well as some “break-in” wear of the guide lugs for the first few hundred hours of operation.
If unusual chunking, chipping, or cracking of lugs exists, see your local John Deere dealer.
If misalignment is seen, refer to TRACK ALIGNMENT in this section to adjust alignment of the track.
If wear rates do not decrease after break-in or have recently accelerated, see your local John Deere Dealer.
IMPORTANT: Avoid operating track in grease, oil, or other petroleum chemicals. Avoid spilling these materials on tracks during servicing of tractor.
Avoid trash buildup in any of the frame area. Clean as necessary.
Rubberized Wheel Inspection
Wheels typically see rubber wear from the edges. Significant edge wear may be evident, but the wheels will still perform as intended. Typical wear patterns in the rubber are numerous small nicks and chunks, some small sections with rubber loss, and slight amount of rubber separation at the edges.
Wheels should not be replaced unless they meet the following replacement criteria.
- Check rubberized wheels for embedded rocks, nails, or other sharp objects. Remove if found. Embedded objects can cause internal damage to the track if left in place.
- Inspect wheel bolts for signs of being loose. Wheels are subjected to very high track tension loads and bolts can become loose if not correctly torqued.
Item Measurement Specification Track Undercarriage Torque Front Idler Cap Screws 1050 Nm (774 lb-ft) - Wheels should not be replaced until such time that one of the following conditions occurs:
- More than 1/3 of the rubber width from either side is lost
- Rubber loss extends across entire wheel width in any area
- Wheel no longer turns freely (midroller)
- Less than 5/16” of tread depth remains (drivewheel)
- Rubberized wheel face begins to build-up with dirt due to lack of rubber thickness
NOTE: Replace midrollers in sets if significant thickness wear is seen on the opposite side wheel.
IMPORTANT: Inner and outer mid-rollers must be within 30 mm circumference of each other.
Do not pair significantly worn wheels with new wheels on the same axle, as overloading of the opposite side wheel may occur (midrollers), and track alignment could be affected (idlers, drivewheels).
Undercarriage Inspection and Maintenance
- Remove any debris or material buildup on top of the side weights (if equipped) or on the frame reaction arms. This buildup can wear down the rubber on the drivewheels and reduce their ability to transfer power to the track.
- Check for material buildup between the drivewheels and the front idler wheels. Material buildup can damage or crush guide lugs and can increase the chances of derailing the track. If guide lug tip damage is seen, it may be due to material buildup.
- Look over drivewheels and idlers for visible cracks around the bolt pattern or the rim. If seen, consult your John Deere dealer for the best recommendation for repair or replacements.
TRACK USE RECOMMENDATIONS:
Minimize both transport weight and turning on hard surfaces to reduce track wear during road transport.
Lowering maximum travel speed especially during high ambient conditions whenever possible can promote lower wear rates, as can the following guidelines:
- Using correct operational techniques (minimize skidding on hard surfaces, etc)
Treadbar scrubbing on hard surfaces can also increase tread wear – avoid or minimize spot turns - Use proper amounts of ballast and in the right locations
Both “front heavy” and “rear heavy” configurations increase the amount of treadbar compression (and wear) as the tread respectively contacts or leaves the ground. The least amount of wear will occur with a balanced machine.
Maximizing Track Life
Roading of tracks can increase tread wear up to 15 times the field wear rates. Excessive roading can greatly reduce treadbar life. In addition, track carcasses are designed to exceed tread wear out, so long as the integrity of the carcass is maintained. It is critical to keep moisture out of the steel carcass and to avoid situations where localized cable overloading could occur. It is recommended that track machine owners follow these procedures in order to achieve maximum track life and avoid operational problems, all of which will result in lower cost per hour of operation:
- Maintain correct track tension
Too low will cause more rapid wear on the wheels and the inside surface of the belt due to slippage and potentially cause material buildup.
Too high will add additional load and stress to undercarriage bearings, internal track cables and track frame. - Keep irregular material out of track such as rocks
Sharp hard material inside the track is the primary reason for localized track tears and subsequent entry points for moisture into the track carcass. - Use care when crossing ditches or transitions while making turns
Diagonal crossing of ditches causes the track to become unsupported in the center and in combination with the idler hitting the opposite embankment, can cause momentary loss of tension that can drop the center section down and outside wheels, making derailing a much higher risk if in a turn. - Use ratchet turn technique
When turning at the end of the field, the best steering performance can be gained by using a bump or ratchet steer technique - turning in several small turns, returning to the neutral position between each ratchet steer. This helps gain more traction and complete the turn more efficiently and with less ground disturbance than by attempting to power and spin through the turn.
RW29387,0000181-19-20100409 |