Remove and Install VARI-COOL Fan Belt
-
NOTE: Tier 2/Stage II engines have driven portion of fan drive mounted on the right-hand side of engine. Although procedure is the same regardless of engine type, the graphics in this OM will appear to be a mirror image to those performing fan drive replacement on Tier2/Stage II engine.
RXA0107862-UN-28MAY10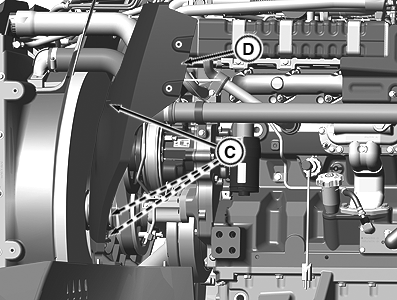
RXA0107863-UN-28MAY10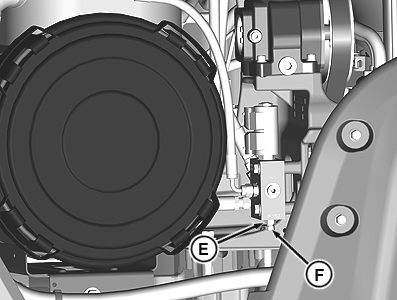
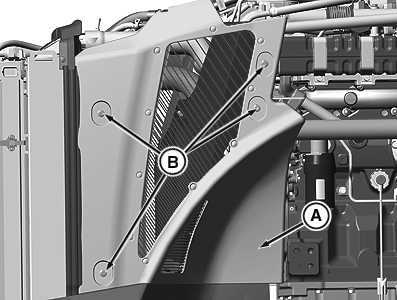
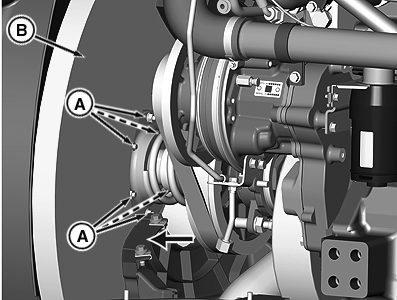
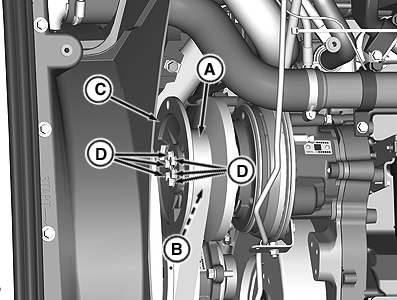
RXA0107865-UN-28MAY10A - Side Panel
B - Cap Screws 4 used
C - Cap Screws 3 used
D - Diverter Panel
E - Jam Nut
F - Bleed Screw
Raise hood.
-
For tractors equipped with Tier 2/Stage II engines, remove cap screws (B) and left-hand front side panel (A). Remove right-hand front side panel.
For tractors equipped with IT4/Stage IIIB engines, remove cap screws and left-hand front side panel.
-
Remove cap screws (C) and diverter panel (D).
-
IMPORTANT: Removing bleed screw will drain oil. Loosen bleed screw only enough so the oil flows back into reservoir (a maximum of two full turns).
Loosen jam nut (E) and bleed screw (F).
-
RXA0107867-UN-28MAY10A - Vent Adapter
B - Cap Screw
C - Piston Plate
D - Inner Sheave
E - Cap Screws (6 used)
F - Front Pulley
Remove vent adapter (A) from housing. -
Remove cap screw (B) and install into vent adapter hole in piston plate (C).
-
Tighten cap screw (B) to pull inner sheave (D) inward.
-
Hold front pulley (F) and remove cap screws (E).
-
Pull front pulley evenly off shaft.
-
RXA0107868-UN-28MAY10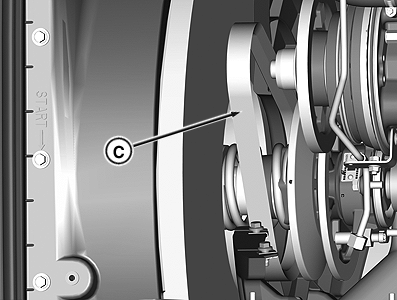
RXA0107869-UN-28MAY10A - Nuts (6 used)
B - Fan
C - Belt
Remove six nuts (A) and carefully position fan (B) against radiator. -
Remove belt (C) through opening between fan and hub.
-
Discard old belt.
-
Install new fan belt between fan and hub so that it is positioned between lower pulley halves.
RXA0107915-UN-28MAY10A - Belt
B - Drive Shaft
C - Front Pulley
D - Cap Screw (6 used)
-
Slide fan into place, install nuts and torque to specification.
Item Measurement Specification Fan-to-Drive Assembly Nut Torque 25 N·m (221 lb-in.) -
Pull belt (A) onto drive shaft (B) and against rear pulley.
IMPORTANT: When installing front pulley (C), make sure that belt remains loose and is not pinched between pulleys.
Clean mating surfaces of front pulley and shaft.
-
Install front pulley (C).
-
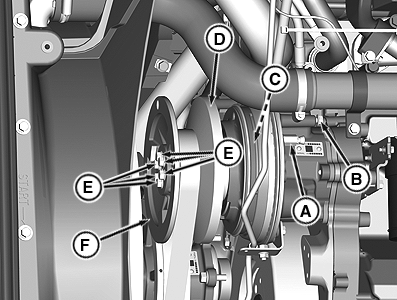
Hold front drive pulley and tighten cap screws (D) to specification.
Item Measurement Specification Drive Pulley-to-Drive Cap Screw Torque 37 N·m (27 lb-ft) -
Remove cap screw and install vent adapter, then reinstall cap screw to original position.
Item Measurement Specification Vent Adapter And Cap Screw Vent Adapter Torque 24 N·m (212 lb-in.) Cap Screw Torque 13 N·m (115 lb-in.) -
NOTE: Bleed screw must be closed for proper tension to be applied to belt once tractor is started.
Close bleed screw and tighten to specification and tighten jam nut to make sure it is closed and belt is loose between pulleys.
Item Measurement Specification Bleed Screw Torque 25 N·m (221 lb-in.) Jam Nut Torque 25 N·m (221 lb-in.) -
For Tier2/Stage II engines, install diverter panel, torque to specifications, then install right-hand side front shield.
For IT4/Stage IIIB, install diverter panel, torque to specifications, then install both side front shields.
Item Measurement Specification Diverter Panel Cap Screws Cap Screw Torque 20 N·m (177 lb.-in.) -
NOTE: Starting engine with belt loose between pulleys allows belt to climb out of groove between pulleys. Belt will correctly position itself within a few seconds after engine is started.
Start engine and run at idle for 15 seconds. Turn off engine.
-
Remove right-hand side front shield and make sure that belt is correctly positioned between pulleys.
 CAUTION: Keep hands away from exposed fan blades. Blades have
sharp edges which may result in personal injury.
CAUTION: Keep hands away from exposed fan blades. Blades have
sharp edges which may result in personal injury. -
Install right-hand side front shield.
|
OURX935,00004B4-19-20110713 |