Replacing VARI-COOL™ Fan Belt—9410R-9460R-9510R-9560R - 13.5 L Engine
-

RXA0108491-UN-12JUL10
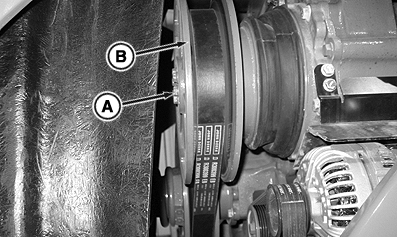
RXA0111788-UN-28OCT10Control Valve-Located Under Left Rear Of Cab
A - Side Panel
B - Cap Screws
C - Jam Nut
D - Bleed Screw
To replace fan belt perform following steps:Raise hood.
-
Remove cap screws (B) and front right-hand side panel (A).
-
Locate control valve under left rear of cab on main chassis frame.
-
Loosen jam nut (C) and loosen bleed screw (D).
-
IMPORTANT: Removing bleed screw will drain oil. Loosen bleed screw only enough to bleed oil back into reservoir (a maximum of two full turns).
Close bleed screw (D) and tighten to specification.
Item Measurement Specification Bleed Screw Torque 25 N·m (221 lb-in.) Bleed Screw Jam Nut Torque 25 N·m (221 lb-in.) -
IMPORTANT: Be careful not to damage sheave or belt when forcing outer sheave outward.
RXA0111790-UN-28OCT10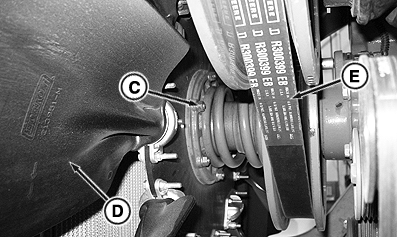
RXA0111792-UN-28OCT10A - Cap Screws (6 used)
B - Front Pulley
C - Cap Screws (6 used)
D - Engine Fan
E - Fan Drive Belt
Remove cap screws (A) from front pulley and remove front pulley (B). -
Remove cap screws (C) and slide engine fan (D) forward.
-
Remove fan drive belt (E).
-
IMPORTANT: Mating surfaces of sheave and shaft must be clean and free of oil or lubricant when installing driven sheave on shaft.
For reassembly perform the following: Install belt (E) in reverse order on driven assembly. Replace fan (D) and tighten cap screws (C) to specifications labeled on the driven sheave.
Item Measurement Specification Fan-to-Drive Assembly Nut Torque 25 N˙m (18 lb-ft) IMPORTANT: When tightening cap screws, ensure belt is not pinched as sheaves come together.
-
NOTE: Belt will be loose on the drives until engine is started and run.
-
Install belt (E) onto drive shaft. Belt should appear loose in drive assembly. Install front pulley (B) and tighten cap screws (A) to specification.
Item Measurement Specification Fan hub-to-Driven Sheave Assembly Nut Torque 35 N˙m (26 lb-ft) -
IMPORTANT: Internal bleed screw must be closed for proper tension to be applied to the belt once tractor is started.
Close bleed screw and tighten to specification and tighten jam nut to make sure it is closed and belt is loose between pulleys.
Item Measurement Specification Bleed Screw Torque 25 N˙m (18 lb-ft) Jam Nut Torque 25 N˙m (18 lb-ft) -
Install left-hand panel.
-
Start engine and verify correct fan operation.
|
RW29387,00005D5-19-20110629 |