Service Engine Air Filter Precleaner System
IMPORTANT: Do not remove engine air filters while servicing precleaner system.
NOTE: Service interval may vary due to operating conditions. If engine air filters clog prematurely, intake precleaner components may be dirty. Inspect and clean or replace precleaner components.
-
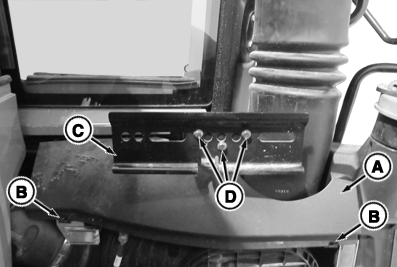
RXA0134280-UN-20AUG13A - Aspirator Hose Cover
B - Aspirator Hose Cover Screws
C - Tool Box Support Bracket
D - Tool Box Support Bracket Cap Screws
Disconnect battery ground (-) cable. -
Remove battery compartment cover.
-
Remove two screws (B) holding aspirator hose cover (A). Remove aspirator hose cover.
-
Remove three screws (D) holding tool box support bracket (C). Remove tool box support bracket.
-
RXA0134281-UN-20AUG13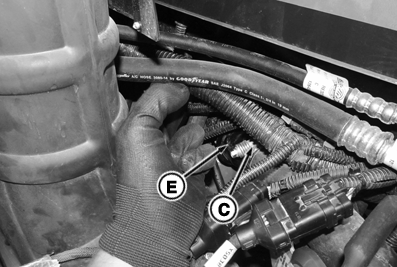
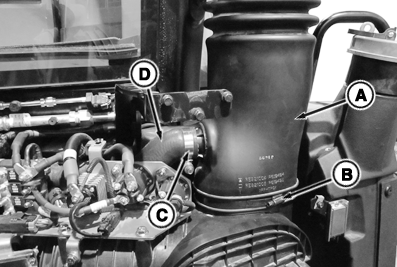
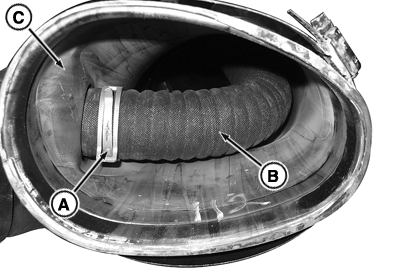
RXA0134282-UN-20AUG13A - Precleaner Assembly
B - Precleaner Clamp
C - Aspirator Hose Clamps
D - Aspirator Hose
E - Aspirator Check Valve
Loosen clamp (B) holding precleaner assembly (A) to air cleaner canister. -
Loosen clamps (C) securing aspirator hose (D) to aspirator check valve (E) and aspirator hose to precleaner assembly (A).
-
Remove aspirator hose (D).
-
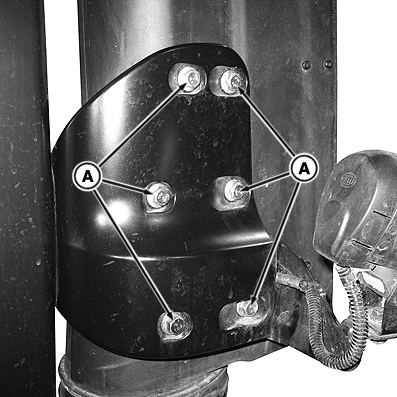
RXA0134283-UN-21AUG13A - Precleaner Mounting Cap Screws
Remove six cap screws (A) holding precleaner to support bracket and lift precleaner assembly from air cleaner canister. -
RXA0134284-UN-21AUG13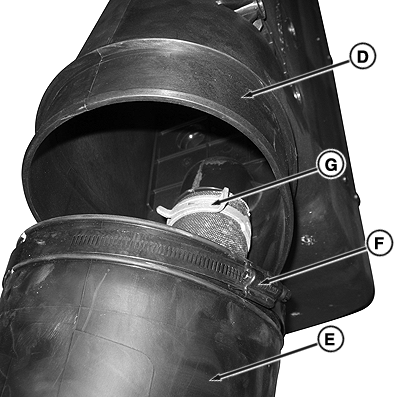
RXA0134285-UN-21AUG13A - Lower Aspirator Hose Clamp
B - Aspirator Hose
C - Precleaner Extension Tube
D - Precleaner
E - Precleaner Extension Tube
F - Precleaner to Extension Tube Hose Clamp
G - Upper Aspirator Hose Clamp
Remove lower aspirator hose clamp (A) to remove aspirator hose (B) from precleaner extension tube (C). -
Loosen clamp (F) holding precleaner (D) to extension tube (E).
-
Remove upper aspirator hose clamp (G) to separate aspirator hose from precleaner. Remove precleaner from extension tube.
-
Inspect components for damage. Replace as necessary.
-
Clean dust from aspirator tubes using compressed air, not to exceed 500 kPa (5 bar) (75 psi).
-
Thoroughly wash precleaner and precleaner extension tube in warm [maximum 65.5 °C (150 °F)] water mixed with a small amount of commercially available non-detergent car wash product. Rinse in clean water. Thoroughly dry before reinstallation.
-
Check aspirator check valve internal flap for freedom of movement. If flap does not move easily, remove check valve assembly and clean or replace as necessary.
-
Inspect aspirator hoses for damage or cracking. Replace as necessary.
-
Reassemble all components in reverse order of disassembly. Tighten according to specifications:
| Item | Measurement | Specification |
| Precleaner Mounting Cap Screws (H) | Torque | 25 N·m (18.5 lb.-ft.) |
| Aspirator Hose Clamps (C) | Torque | 10 N·m (7.4 lb.-ft.) |
| Precleaner Clamp (D) | Torque | 6.5 N·m (4.8 lb.-ft.) |
| Precleaner to Extension Tube Hose Clamp (N) | Torque | 6.5 N·m (4.8 lb.-ft.) |
|
TO84419,0000079-19-20130903 |