Sequence Step Status
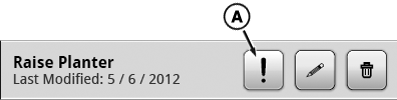
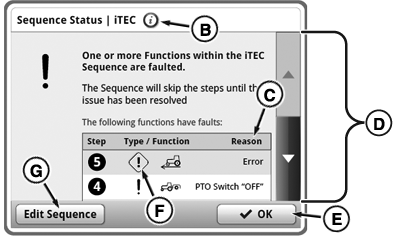
Whenever execution of a sequence step is not possible or is interrupted, iTEC™ system informs operator about new issue by displaying Information Alert (A) or Fault Alert (F) next to sequence or sequence step. Press Alert Symbol next to a sequence (in assignment area or sequence assignment tab) to access the sequence status page to read the steps with errors. Use scroll bars (D) to scroll up and down list. Select edit sequence button (G) if you want to edit this certain sequence. Press Alert Symbol next to a sequence step (while in EDIT) for information about the issue just for that step. Both views will show a short reason (C) for issue.
RXA0131170-UN-05MAR13
Sequence Bar
RXA0131609-UN-25JUL13
Sequence Status Page
A - Information Alert
B - Information Button
C - Text Description
D - Scroll Bar
E - OK Button
F - Fault Alert
G - Edit Sequence Button
NOTE: Press Information Button (B) on any iTEC™ page to access a general status page. General status page will list all functions that are part of the sequences of current selected implement (assignment set).
Edit Page:
![]()
RXA0127531-UN-15AUG12
Manage Sequences Button → Sequence Tab → Edit Button
RXA0131144-UN-25JUL13
Edit Sequence Page
RXA0131281-UN-25JUL13
Name & Assignment Page
RXA0131280-UN-25JUL13
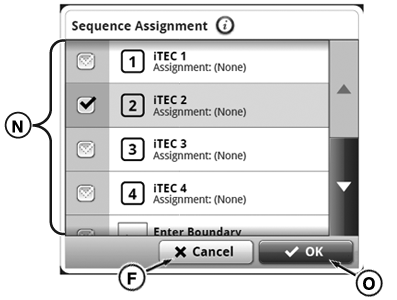
Sequence Assignment Page
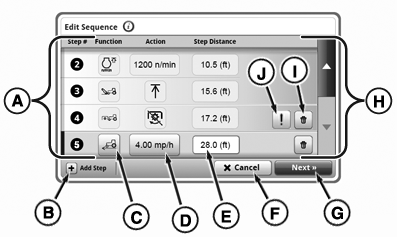
From iTEC™ main page, follow guidelines listed below:
- Select Manage Sequences button.
- Select Sequences tab.
- Select desired sequence.
- Select Edit button.
- A — Sequence Step List: List of steps in selected sequence.
-
B— Add Step Button: Add new
step to sequence.
NOTE: Insert new step by selecting step in sequence. Press ‘Add
Step’ button to insert new step. Distance field will be auto-filled
with previous distance. If distance is changed, step will be sorted
accordingly.
- C— Step Function Input Box: Change selected sequence step function.
- D— Step Action Input Box: Change selected sequence step action.
- E— Step Distance Input Box: Access number pad to adjust selected sequence step distance.
- F— Cancel Button: Exit without saving changes.
- G— Next Button: Access next page.
- H — Scroll Bar: Scroll up or down.
- I— Delete Step Button: Delete step.
- J— Notification Button: View issue for a particular step.
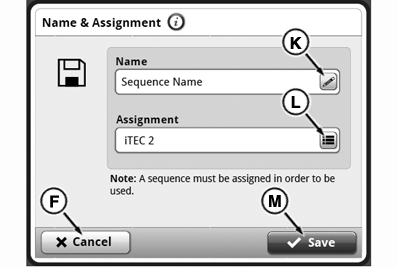
- K — Sequence Name Input Box: Access keypad to rename sequence.
- L— Assignment Button: Assign sequence to an iTEC™ button.
- M— Save Button: Save changes.
- N — Sequence Assignment List: Select button to which assign sequence.
- O — OK Button: Accept changes.
Keyboard
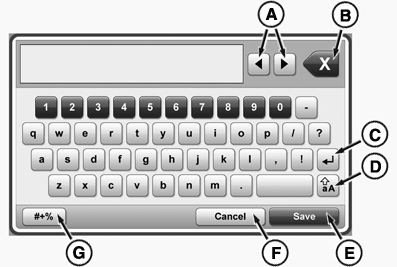
RXA0131300-UN-14MAR13
Keyboard
Select Sequence Name Input button on Name & Assignment page will display a keyboard for name input.
- A — Left and Right Arrow Buttons: Move curser right or left in input box.
- B — Backspace Button: Delete individual characters left of cursor in input box.
- C — Return Button: Move cursor to next line.
- D — Caps Lock Button: Toggle between capital and lower case letters.
- E — Save Button: Save changes.
- F — Cancel Button: Discard changes without saving.
- G — Symbol Button: Choose symbols.
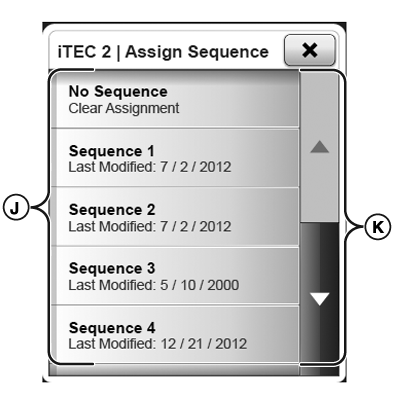
Sequence Assignments Page:
![]()
RXA0131627-UN-09APR13
RXA0131606-UN-26MAR13
RXA0131607-UN-27MAR13
RXA0131283-UN-07MAR13
- Select Menu.
- Select Tractor Settings tab.
- Select iTEC™ Icon.
- Select Manage Sequences button.
- Select Sequence Assignments tab (A).
- A — Sequence Assignment Tab: View or change sequences assigned to buttons.
- B — Sequence Assignment List: List of assignments or openings for potential assignments to buttons.
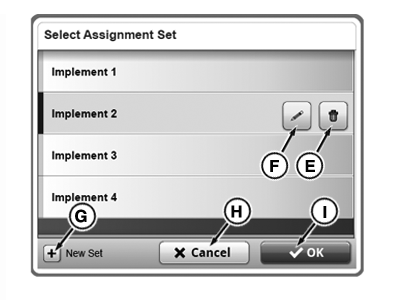
- C — Active Assignment Set Button: Change selected assignment set from list.
- D — Edit Button: Change selected button assignment and assignment set.
- E — Delete Assignment Set Button: Delete assignment set.
- F — Edit Assignment Button: Change and set assignment name.
- G — New Assignment Set Button: Add a new assignment set.
- H — Cancel Button: Exit without saving changes.
- I — OK Button: Select a previously highlighted assignment set.
- J — Available Sequence List: Available sequences to assign.
- K — Scroll Bar: Scroll list up or down.
NOTE: Assignment Set: A set of button-assigned sequences for one implement. With assignment sets relating to different implements (e.g. planter and plow) it is easy to switch from one set (implement) to another.
Available Options:
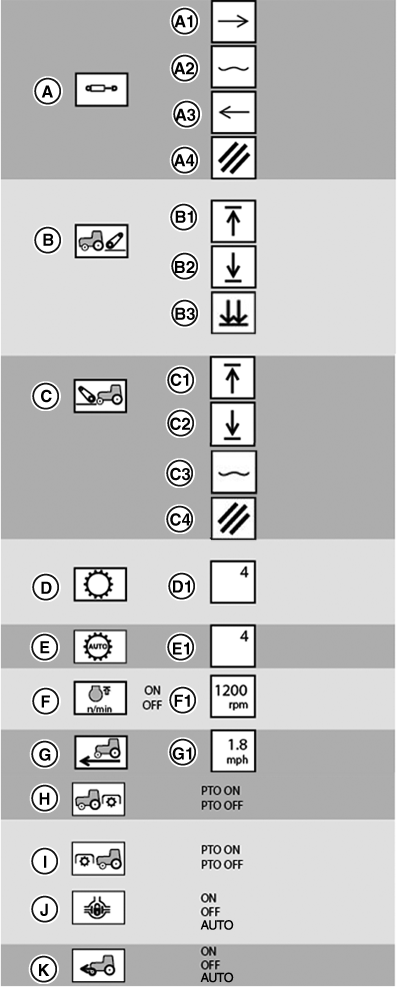
List and diagram name and illustrate icons for all available iTEC™ function, operation and distance options.
RXA0134396-UN-06AUG13
First Column: Function, Second Column: Action, Third Column: Distance
-
A—SCV's (I through XV)
- A-1 Extend
- A-2 Float
- A-3 Retract
- A-4 Cancel
-
B—Rear Hitch (If Equipped)
- B-1 Raise to height limit
- B-2 Lower to setpoint
- B-3 Fast Lower
-
C—Front Hitch (If Equipped)
- C-1 Raise
- C-2 Lower
- C-3 Float
- C-4 Cancel
-
D—Transmission
- D-1 Gear-Preselect gear
-
E—AUTO Transmission1
- E-1 Automatic gear-shift up to highest selected gear; with maximum gear or just resume based on transmission capabilities.
-
F—FieldCruise™ On/Off
- F-1 set engine to maximum rpm
-
G—IVT™ /AutoPowr™ Set Speed
- G-1 Speed-Set to maximum ground speed
- H—Rear PTO On/Off (If Equipped)
- I—Front PTO On/Off (If Equipped)
- J—Differential Lock On/Off/Auto
- K—MFWD On/Off/Auto
|
iTEC is a trademark of Deere & Company FieldCruise is a trademark of Deere & Company IVT is a trademark of Deere & Company AutoPowr is a trademark of Deere & Company 1 If CommandQuad™ Transmission is in AUTO mode, this function can change gears within a range but cannot change ranges. |
TO84419,00000F7-19-20131001 |