Drain, Flush and Refill Cooling System—13.5 L Engine
IMPORTANT:
TS281-UN-15APR13
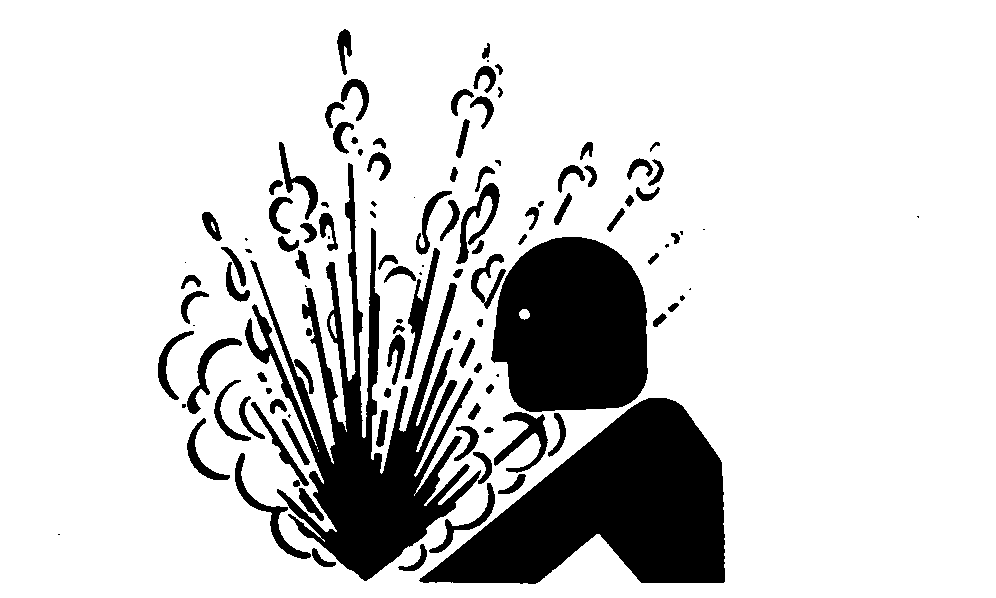
Safety—Explosive Release of Fluids

RXA0141883-UN-04JUN14
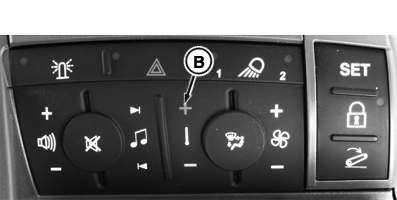
Turn Key To Run
RXA0141884-UN-06OCT14
Cab Temperature Setting To Highest Setting
RXA0141887-UN-09JUN14
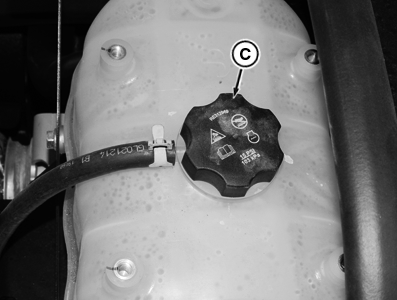
Remove De-aeration Cap
A - Run
B - Temperature knob
C - De-aeration Cap
READ ENTIRE PROCEDURE BEFORE BEGINNING. Special tools and other products are needed to complete procedure.Thermostat, thermostat gasket, and de-aeration tank cap should be replaced whenever system is flushed.
INITIAL change interval is 6 years or 6000 hours, provided cooling system is topped off using only John Deere™ Cool-Gard II™ and premix and coolant is tested at recommended intervals. After initial service, the SCHEDULED interval (2 years or 2000 hours) can be extended up to 6 years or 6000 hours depending on coolant used and if coolant is tested at recommended intervals. Follow recommendations in ”Drain Intervals for Diesel Engine Coolant” in Fuels, Lubricants and Coolant section of this manual.
NOTE: When service is performed on cooling system, make sure to check coolant daily for the next three days of operation. The most effective way to check coolant level is when tractor engine is cool. If coolant is low, fill de-aeration tank to mark on tank.
 CAUTION: Explosive release of fluids from pressurized cooling
system can cause serious burns.
CAUTION: Explosive release of fluids from pressurized cooling
system can cause serious burns.
Shut off engine. Only remove cap when cool enough to touch with bare hands. Slowly loosen cap to first stop to relieve pressure before removing completely.
-
Park tractor, turn key switch to OFF and allow radiator to cool.
NOTE: Throughout the draining, flushing and filling procedure, turn temperature knob to highest setting (B) and leave set to the highest setting to ensure that fluids are drained from heating/Air conditioning unit. If either temperature knob is not set to highest setting or key switch is not turned to RUN, system will not completely drain.
See your John Deere™ dealer for recommendations on cleaning solutions.
-
Turn key to RUN (A), then turn temperature knob (B) to highest setting.
-
Open hood and remove de-aeration tank cap (C).
-
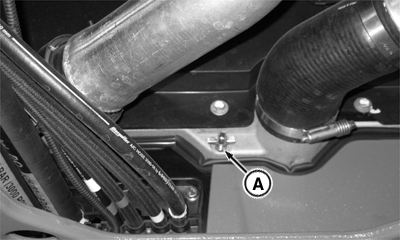
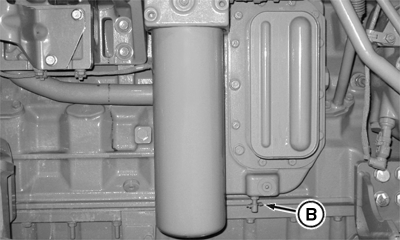
Place catch pan under radiator drain valve (A).
TS281-UN-15APR13Safety—Explosive Release of Fluids
RXA0115315-UN-10MAY11Open Radiator Drain Valve And Drain
RXA0115307-UN-10MAY11Open Engine Valve And Drain
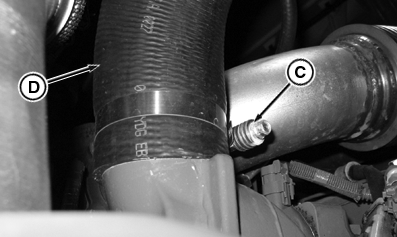
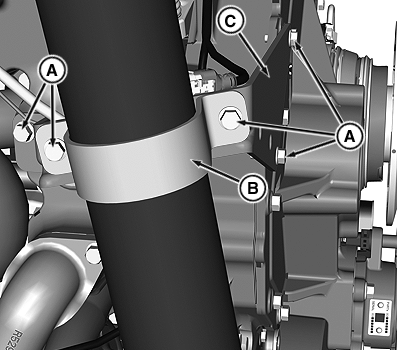
RXA0111547-UN-20OCT10A - Radiator Drain Valve
B - Engine Drain Valve
C - Hose Clamp
D - Hose
-
Open radiator drain valve and drain coolant into catch pan.
-
Place catch pan under engine drain valve.
-
Open engine drain valve (B) and drain coolant into catch pan.
-
Allow radiator and engine to drain.
-
Loosen hose clamp (C) and slide hose (D) off of thermostat housing.
-
RXA0111551-UN-03NOV10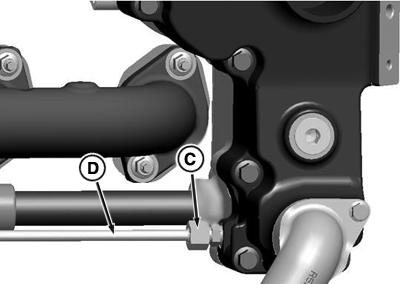
RXA0111555-UN-18NOV10A - Cap Screws
B - Coolant By-pass Tube Assembly
C - Fitting on Thermostat Housing
D - Coolant Return Line
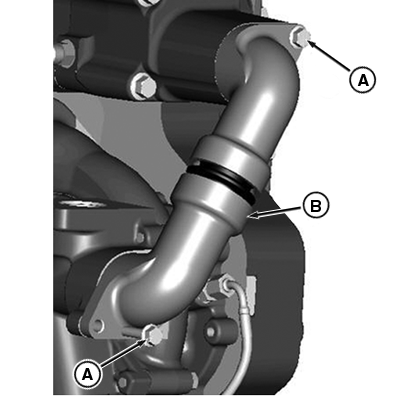
Remove cap screws (A) and remove coolant by-pass tube assembly (B).NOTE: Coolant by-pass tube assembly does not need to be taken apart.
-
Remove coolant return line (D) by removing fitting on thermostat housing (C) and rear top liner cooling fitting with O-ring.
-
RXA0111809-UN-03NOV10
RXA0111545-UN-18NOV10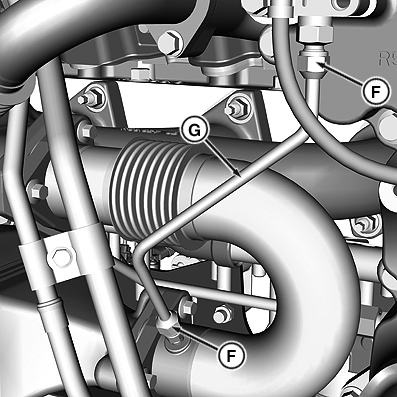
RXA0111810-UN-03NOV10A - Cap Screws
B - Bracket
C - Brace
D - Pressure Sensor
E - Cap Screw
F - Fitting
G - Line
H - Electrical hardware
Remove cap screws (A), bracket (B), and brace (C). -
Remove cap screw (E).
-
Loosen fittings (F) and rotate hard line (G) enough to remove housing.
IMPORTANT: Handle pressure line (G) with caution. Line is easily damaged and can cause engine problems.
-
Remove pressure sensor (D) and electrical hardware (H).
-
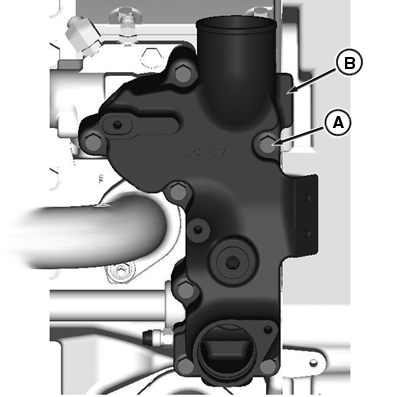
RXA0111553-UN-03NOV10A - Cap Screws
B - Thermostat Housing
Remove six 85 mm cap screws, one 100 mm cap screw (A), and thermostat housing (B). -
Remove old thermostats and clean sealing area.
TS281-UN-15APR13Safety—Explosive Release of Fluids
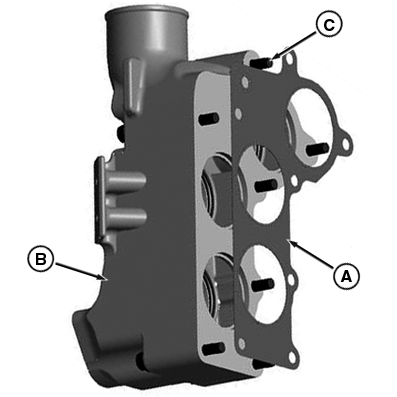
RXA0111552-UN-03NOV10A - Gasket
B - Thermostat Housing
C - Cap Screws
NOTE: During draining, filling, and flushing, coolant system will not have thermostat installed.
-
Replace gasket and housing.
-
Replace previously removed coolant return line assembly, coolant by-pass hose assembly, hard line, electrical hardware, bracket, brace, cap screws, radiator hose and clamp.
-
Close engine drain valve, and radiator drain valve.
-
Dispose of old coolant in accordance with local laws and ordinances.
IMPORTANT: Never pour cold water or coolant into hot engine.
NOTE: See your John Deere™ dealer for recommendations on cleaning solutions.
-
Fill high pressure coolant system at de-aeration tank with cooling system cleaning solution.
-
Install de-aeration cap and close hood.
CAUTION: Make sure hood is closed before starting engine. -
Start engine and run at a minimum of 1500 rpm for 15 minutes.
-
Shut off engine and allow cleaning solution to cool.
-
Make sure temperature knob is turned to highest setting, then turn key switch to Run position.
CAUTION: Explosive release of fluids from pressurized cooling
system can cause serious burns.Only remove cap when cool enough to touch with bare hands. Slowly loosen cap to first stop to relieve pressure before removing completely.
-
Open hood, remove de-aeration cap, put drain pans in place, then open radiator and engine drain valves.
-
Allow cooling system to completely drain.
-
Close engine drain valve, and radiator drain valve.
-
Dispose of cleaning solution in accordance with local laws and ordinances.
-
Fill high pressure coolant system at de-aeration tank with clean water.
IMPORTANT: Never pour cold water or coolant into hot engine.
-
Install de-aeration cap and close hood.
CAUTION: Make sure hood is closed before starting engine. -
Start engine and run at a minimum of 1500 rpm for 15 minutes.
-
Shut off engine and allow water to cool.
-
Make sure temperature knob is turned to highest setting. then turn key to Run.
CAUTION: Explosive release of fluids from pressurized cooling
system can cause serious burns.Only remove cap when cool enough to touch with bare hands. Slowly loosen cap to first stop to relieve pressure before removing completely.
TS281-UN-15APR13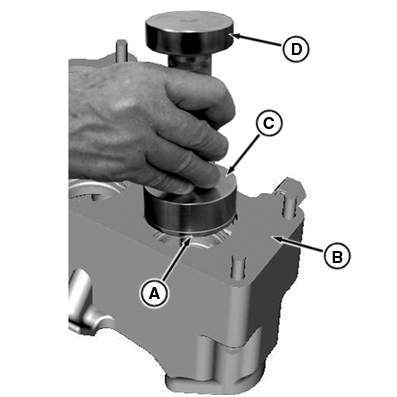
RXA0111811-UN-08NOV10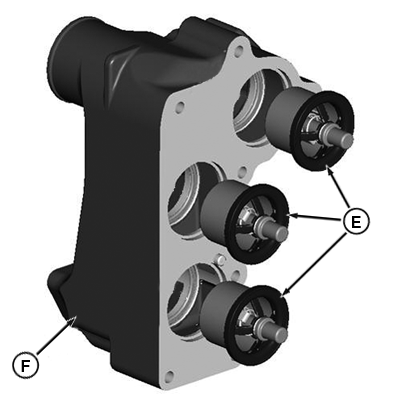
RXA0111556-UN-03NOV10A - Lip Seal
B - Thermostat Housing
C - Seal Installer JDG11202
D - Handle JDG8092
E - Thermostats
F - Housing
-
Open hood, remove de-aeration cap, put drain pans in place, then open radiator and engine drain valves.
-
Allow radiator to drain.
-
Remove radiator hose and clamp, bracket, brace, cap screws, electrical hardware, coolant return assembly, coolant bypass assembly, thermostat housing and gasket.
-
Install lip seals (A) using handle JDG8092 (D) and seal installer JDG11202 (C).
-
Apply light coat of RTV silicone sealant to new gasket.
-
Install new thermostats (E), new gasket and reinstall housing (F).
-
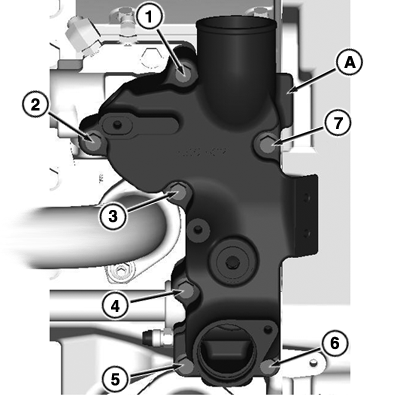
RXA0112136-UN-18NOV10A - Thermostat Housing
Tighten cap screws to specifications in order from 1 to 7.Item Measurement Specification Thermostat Housing Cap Screws Torque 50 N·m (39 lb·ft) -
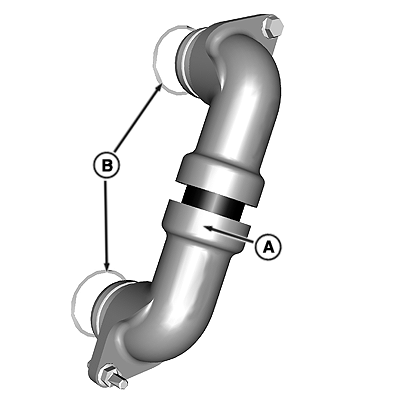
Replace previously removed by-pass tube assembly (A) and new O-rings (B) according specifications.
RXA0112137-UN-18NOV10
RXA0111555-UN-18NOV10A - By-pass Tube Assembly
B - O-Rings
C - Fitting on Thermostat Housing
D - Return Line
Item Measurement Specification Coolant Bypass Cap Screws Torque 37 N·m (27 lb·ft) -
Replace previously removed return line (D) with fitting (C) and rear top liner cooling fitting with O-ring.
IMPORTANT: When installing rear top liner cooling fitting, apply Loctite® 242 thread locker to fitting threads and tighten fitting to specification. Apply AR54749 soap solution to O-ring when installing return line to thermostat housing.
Item Measurement Specification Rear Top Liner Cooling Fitting Cap Screws Torque 13.5 N·m (10 lb·ft) -
Replace hard line and tighten fittings to specification.
Item Measurement Specification Fittings Torque 19 N·m (14 lb·ft) -
Replace cap screw and electrical hardware.
Item Measurement Specification Housing Cap Screw Torque 20 N·m (15 lb·ft) -
Replace bracket and brace, tight cap screws to specification.
Item Measurement Specification Cap Screws Torque 30 N·m (22 lb·ft) -
Replace previously removed hose and clamp.
-
Close engine drain valve and radiator drain valve.
-
Dispose of drain clean water in accordance with local laws and ordinances.
-
Fill high pressure coolant system at de-aeration tank with new coolant solution.
Cooling System Capacity:
Final Tier 4/Stage IV PowerTech™ PSS1.............. 56.5 L (14.9 gal)
Tier 2/EU Stage II2.............. 56 L (14.7 gal)
CAUTION: Make sure hood is closed before starting engine.IMPORTANT: Never pour cold water or coolant into hot engine.
-
Install de-aeration cap, close hood, start engine, and run for a minimum of 1500 rpm for 15 minutes.
NOTE: Coolant may seep out of the de-aeration tank overflow vent as air is purged from the coolant system.
Level may change when tractor is running or during the next few cycles.
It is highly recommended the cooling system is checked for leaks after draining, flushing and refilling to ensure tractor performance. Consult your John Deere Dealer for procedure and appropriate tools.
|
John Deere is a trademark of Deere & Company Loctite is a trademark of Henkel Corporation PowerTech is a trademark of Deere & Company 1 Engines are identified by letter “U” in the engine serial number. An example is RG6135UXXXXXX 2 Engines are identified by letter “G” in the engine serial number. An example is RG6135GXXXXXX |
KT81203,0000296-19-20160902 |