Change Engine Oil and Filter—15 L Engine
RXA0147883-UN-20APR15
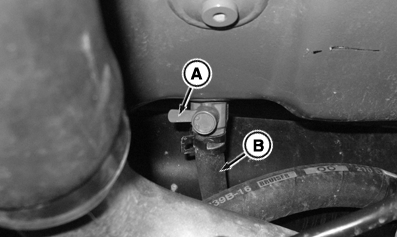
Engine Oil Drain Valve (Inside Right-Hand Engine Side Frame)
RXA0147884-UN-20APR15
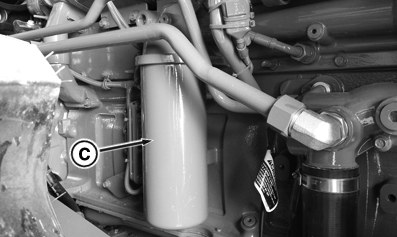
Engine Oil Filter
A - Engine Oil Drain Valve
B - Engine Oil Drain Hose
C - Oil Filter
IMPORTANT: Fuel sulfur content should not exceed 0.10%. Fuel sulfur content less than 0.10% is preferred. Refer to Fuel, Lubricants, and Coolant section for more information on oil change intervals.
NOTE: No initial break-in service required for new or rebuilt engines. The maximum service interval is the same as the service interval recommendations listed in Engine Oil and Filter Service Intervals for your engine. To confirm which engine your tractor is equipped with, see Identification Numbers Section - Record Engine Serial Number in this Operator's Manual.
For subsequent oil changes, see Engine Oil and Filter Service Intervals for your engine located in the Fuel, Lubricants, and Coolant Section of this Operator's Manual.
-
Operate engine approximately 5 minutes to warm oil.
-
Stop engine.
-
Locate engine drain valve (A) located inside right-hand engine side frame.
-
Turn crankcase drain valve (A) to drain engine oil. Use enough containers for 75.7 L (20 gal) capacity and direct oil flow with engine oil drain hose (B).
-
Close drain valve after all oil has been drained.
-
Remove filter (C) and old gasket. Clean filter mounting surface with clean dry cloth.
-
Apply thin film of oil to new gasket.
-
Fill filter with clean engine oil, approximately 1.9 L (0.5 gal).
-
Install gasket and filter.
-
Hand-tighten filter element until gasket contacts filter head surface. Use filter wrench to tighten an extra 3/4 to 1 turn after gasket contact. Refer to instructions on filter. Do not overtighten.
Crankcase Capacity with Filter
15 L Engine..............43.5 L (11.5 gal)
-
IMPORTANT: Do not overfill engine. Excess oil can cause loss of efficiency.
RXA0141925-UN-03JUN14Fill Tube
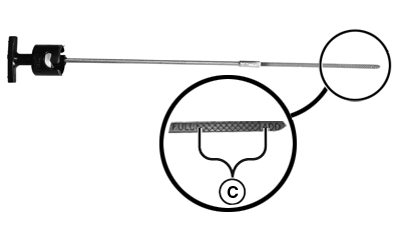
RXA0141926-UN-03JUN14Dipstick
A - Fill Cap
B - Dipstick
C - Crosshatch Area
Remove engine oil fill cap (A) and fill crankcase using fill tube. Use seasonal viscosity grade oil as specified in Fuel, Lubricants, and Coolant section of this Operator’s Manual. -
Check oil level with dipstick (B), to ensure that oil level is in crosshatched “safe” area (C).
-
Start and run engine for two minutes. Then stop engine and check for oil leaks.
-
NOTE: Engine oil level indicator is a dipstick with a "crosshatched" area with a "safe" zone. Anywhere in the dipstick crosshatched safe zone is considered full.
Recheck oil level with dipstick (B), to ensure that oil level is in crosshatched “safe” zone area (C).
|
Cummins is a trademark of Cummins Inc. |
SV81855,000027B-19-20160907 |