Remove and Install Vari-Cool™ Fan Belt—13.5 L Final Tier 4 and Stage IV Engine
-
IMPORTANT:
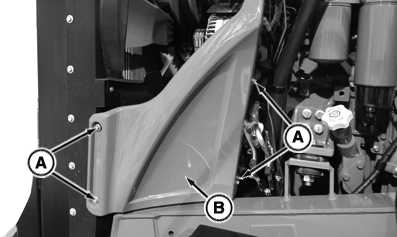
RXA0142201-UN-06JUN14Left-Hand Guard
A - Cap Screws
B - Side Panel
When engine is stopped, fan drive oil pressure is released and oil flows back to the reservoir.Disconnect negative (-) battery cable.
-
Raise hood.
-
Remove cap screws (A) and left-hand side panel (B).
-
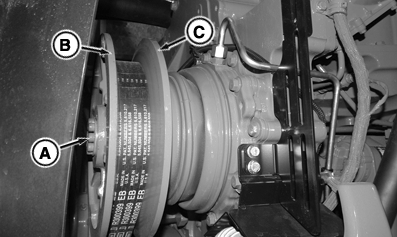
RXA0142535-UN-13JUN14A - Cap Screws (8 used)
B - Front Sheave
C - Inner Sheave
Hold front sheave (B) and remove cap screws (A). -
Remove front sheave evenly off shaft.
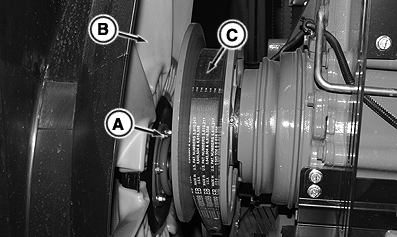
RXA0142536-UN-13JUN14A - Cap Screws and Nuts (6 used)
B - Fan
C - Belt
-
Belt and inner sheave (C) should stay on shaft. Remove six cap screws and nuts (A) and carefully position fan (B) against radiator.
-
Remove belt (C) through opening between fan and hub.
-
Discard old belt.
-
Install new fan belt between fan and hub so that it is positioned between lower sheave halves.
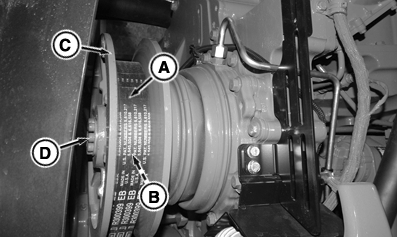
RXA0142537-UN-13JUN14A - Belt
B - Drive Shaft
C - Front Sheave
D - Cap Screw (6 used)
-
Slide fan into place, install cap screws and nuts and tighten to specification.
Item Measurement Specification Fan-to-Drive Assembly Nut Torque 35 N·m (26 lb·ft) -
Pull belt (A) onto drive shaft (B) and against rear sheave.
IMPORTANT: When installing front sheave (C), make sure that belt remains loose and is not pinched between sheaves.
Clean mating surfaces of front sheave and shaft.
-
Install front sheave (C).
-
Hold front drive sheave and tighten cap screws (D) to specification.
Item Measurement Specification Drive Sheave-to-Drive Cap Screw Torque 37 N·m (27 lb·ft) -
Reinstall diverter panel and cap screws. Tighten to specification.
Item Measurement Specification Diverter Panel Cap Screws Cap Screw Torque 21 N·m (15 lb·ft) -
NOTE: Starting engine with belt loose between sheaves allows belt to climb out of groove between sheaves. Belt will correctly position itself within a few seconds after engine is started.
Start engine and run at idle for 15 seconds. Turn off engine.
-
 CAUTION: Keep hands away from exposed fan blades. Blades have
sharp edges which may result in personal injury.
CAUTION: Keep hands away from exposed fan blades. Blades have
sharp edges which may result in personal injury. Remove right-hand side front shield and make sure that belt is correctly positioned between sheaves.
-
Reinstall side panel and tighten cap screws.
|
SV81855,00002A4-19-20160830 |