Replacing Axial Seal Air Cleaner Filter Element
IMPORTANT:
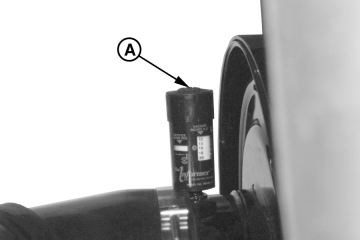
RG8719B-UN-03SEP99
Air restriction Indicator
ALWAYS REPLACE primary air cleaner element when air restriction indicator (A) shows a vacuum of 625 mm (25 in.) H2O, is torn, or visibly dirty.NOTE: This procedure applies to John Deere 2-stage axial seal air cleaner kits. Refer to manufacturers' instructions for servicing air cleaners not supplied by John Deere.
-

RG4686-UN-20DEC88Wing Nut and Primary Element

RG4687-UN-20DEC88Dust Unloader Valve and Restriction Indicator

RG11068-UN-26JUN00Retaining Nut and Secondary Element
A - Wing Nut
B - Primary Element
C - Dust Unloader Valve
D - Retaining Nut
E - Secondary Element
Remove wing nut and remove canister cover shown in small illustration inset. -
Remove wing nut (A) and remove primary element (B) from canister.
-
Thoroughly clean all dirt from inside canister.
-
NOTE: Some engines may have a dust unloader valve (C) on the air cleaner. If equipped, squeeze valve tip to release any trapped dirt particles.
IMPORTANT: Remove secondary (safety) element (E) ONLY for replacement. DO NOT attempt to clean, wash, or reuse secondary element. Replacement of secondary element is usually necessary ONLY when primary element has a hole in it.
To replace secondary element, remove retaining nut (D) and secondary element (E). Immediately replace secondary element with new element to prevent dust from entering air intake system.
Item Measurement Specification Retaining Nut Torque 20 N·m (177 lb.-in.) -
Install new primary element and tighten wing nut securely. Install cover assembly and tighten retaining wing nut securely.
-
IMPORTANT: Whenever the air cleaner has been serviced or had cover removed, ALWAYS fully depress the air restriction indicator reset button (if equipped) to assure accurate readings.
If equipped, fully depress air restriction indicator reset button and release to reset indicator.
|
OURGP11,000013A-19-20140924 |