Inspect and Repair Sea Water Pump (Except 6068SFM50/75 and 6068AFM75)
RG9852-UN-05JAN99
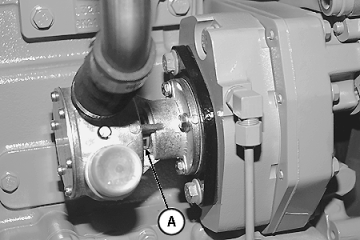
Inspect Sea Water Pump
A - Weep Hole (Earlier Engines Only)
• Inspect pump housing for seal leakage
1. Inspect the sea water pump housing weep hole (A), if equipped, for evidence of water or oil indicating seal leakage.
If water leakage is evident, order a RE49490 Impeller Repair Kit and replace impeller and front housing/shaft seal.
If oil leakage is evident, order a RE49491 Major Repair Kit and replace all internal components except shaft. An arbor press and drivers are needed to install this kit. Have an experienced technician install this kit.
Remove and Inspect Impeller
RG9853-UN-05JAN99
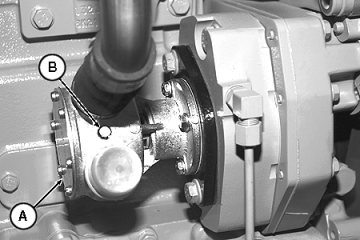
Remove Cover Plate
RG6243-UN-23MAR92
Inspect Sea Water Pump Impeller
A - Cover Plate
B - Cam Screw
1. Close sea cock and drain sea water system if not previously done.
2. Remove six cover plate cap screws with washers and remove cover plate (A) with O-ring. Remove impeller end cap from end of impeller bore.
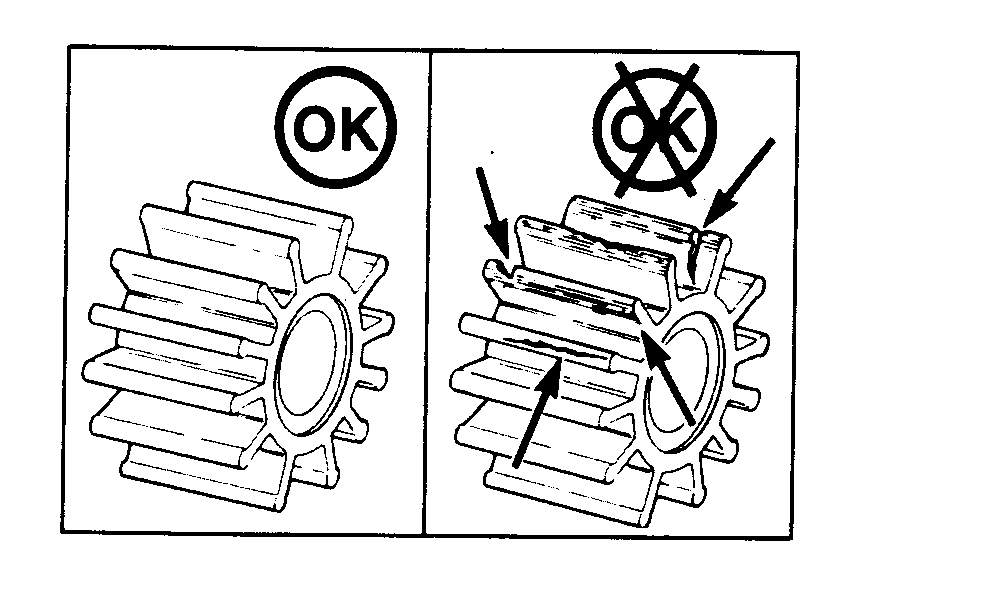
NOTE: Normally the impeller can be removed by using two pair of pliers to grip impeller vanes on opposite sides of impeller. Rotating the pump shaft by hand may help free the impeller. Petroleum based lubricants can cause the impeller to swell, and are not recommended to free a stuck impeller.
3. Carefully remove impeller with cam plate. Be careful not to damage impeller if in reusable condition. Remove key from shaft keyway.
The impeller must be installed in the same direction as removed. Mark the impeller to ensure installation in proper direction of rotation if impeller is reused.
4. Inspect impeller for damages such as tears, stress cracks, excess abrasions on vane ends, or chunks of material missing. Impellers that are run dry will overheat and fail the impeller blades at the root. Impellers that swell and stick, fail the impeller in the middle of the blade. If impeller replacement is necessary, order an impeller repair kit.
IMPORTANT: If impeller has chunks of material missing, the heat exchanger, marine gear oil cooler and any other circuit that are cooled by raw water should be thoroughly cleaned and flushed.
5. Remove cam screw (B) holding cam plate to impeller housing bore.
6. Thoroughly clean impeller housing bore and cam plate (if cam plate is reused).
Install Impeller
RG9853-UN-05JAN99
Install Cover Plate
A - Cover Plate
B - Cam Screw
1. Apply LOCTITE® 242 (Deere Part No. TY9370) to curved side of cam plate near threaded hole and install cam plate into impeller housing bore, be sure holes in cam plate and housing are aligned. Apply LOCTITE® 242 to cam screw (B), install, and tighten.The cam plate should be inspected to insure that none of the cam fingers are protruding which could cause impeller damage. The cam screw should also be inspected to insure that it does not protrude below the cam plate. Replace cam plate and cam screw or grind screw flush as needed.
IMPORTANT: Petroleum based lubricants can cause the impeller to swell, and are not recommended to lubricate the impeller before installation.
2. Lubricate impeller blades with a non-petroleum based lubricant such as silicone or soapy water. Install impeller using a twisting motion and be sure the impeller blades are bent in the same direction as they were upon removal.
Be sure impeller is installed in same direction as removed if reusing existing impeller.
3. Rotate impeller to align keyway and slide the key in place. Install impeller end cap in end of impeller bore.
4. Using a new O-ring, install cover plate (A) onto impeller housing. Install six screws with washers. Tighten screws evenly.
5. Reconnect all water piping, if disconnected.
6. Open sea cock and prime sea water pump with water. Start engine and check for leaks.
|
LOCTITE is a registered trademark of Loctite Corp. |
OURGP12,00001F7-19-20091210 |