Replacing Fuel Filter and Dosing Elements (Jet Fuel Capable Engines)
X9811-UN-23AUG88
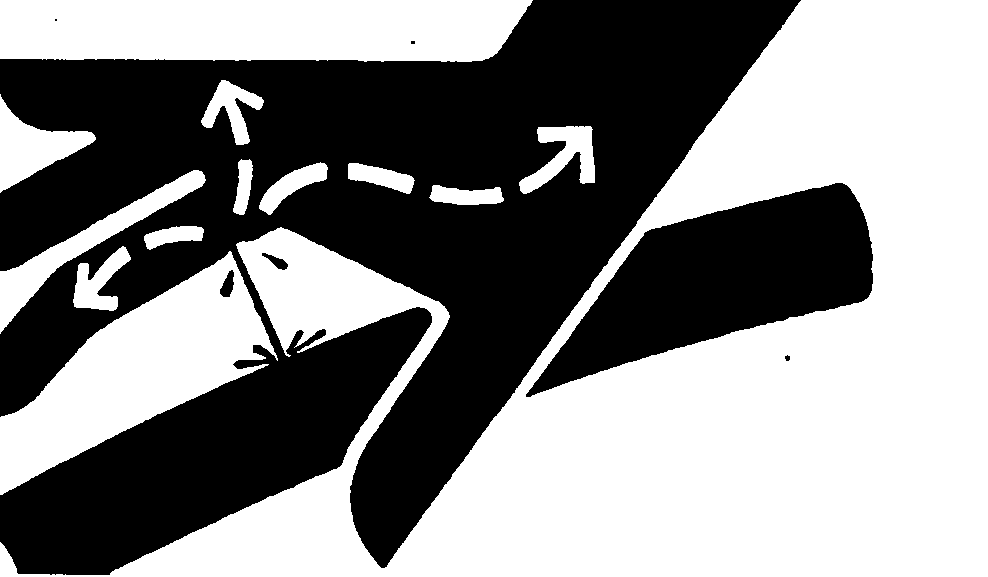
High-Pressure Fluids
 CAUTION: Before performing any maintenance to fuel system related
components, be sure that machine is in the Key OFF position AND that
the electric fuel transfer (lift) pump or battery is disconnected.
Whenever the machine is in the Key ON position, power is applied to
the electric fuel transfer (lift) pump.
CAUTION: Escaping fluid under pressure can penetrate the skin
causing serious injury. Relieve pressure before disconnecting fuel
or other lines. Tighten all connections before applying pressure.
Keep hands and body away from pinholes and nozzles which eject fluids
under high pressure. Use a piece of cardboard or paper to search for
leaks. Do not use your hand.
If any fluid is injected into the skin, it must be surgically removed within a few hours by a doctor familiar with this type injury or gangrene may result. Doctors unfamiliar with this type of injury may call the Deere & Company Medical Department in Moline, Illinois, or other knowledgeable medical source.
IMPORTANT: Replace fuel filter elements anytime audible alarm sounds and trouble codes indicate plugged fuel filters (low fuel pressure). If no alarm sounds during the 12 month service interval, replace elements at that time, or after 250 hours operation, whichever comes first.
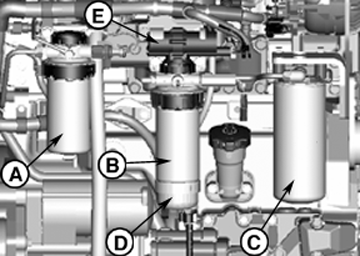
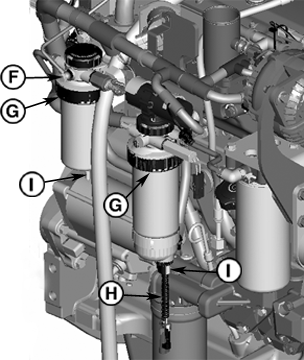
Engines are equipped with dual fuel filters: a primary filter with water separator bowl , and a final filter. Both filters and the dosing element are replaced at the same 250-hour interval or every 12 months.
RG15342-UN-29JUN07
RG15405-UN-29JUN07
A - Final Fuel Filter Element
B - Primary Fuel Filter Element
C - Dosing Element
D - Water Separator Bowl
E - Electric Fuel Transfer (Lift) Pump
F - Constant Air Bleed
G - Retaining Ring
H - Water in Fuel Sensor
I - Drain Plug
-
Close fuel shut-off valve, if equipped.
-
Thoroughly clean fuel filter assemblies and surrounding areas.
-
Disconnect water in fuel sensor (H) wiring from primary fuel filter (B).
-
Loosen drain plugs (I) and drain fuel into a suitable container.
-
NOTE: Lifting up on retaining rings (G) as they are rotated helps to get them past raised locators.
Firmly grasp the retaining rings (G) and rotate them clockwise 1/4 turn (when viewed from the top). Remove ring with final fuel filter element (A) and with primary fuel filter element (B).
-
Loosen ring and remove water separator bowl (D) with primary fuel filter element. Drain and clean bowl. Dry bowl with compressed air.
-
Inspect filter mounting base for cleanliness. Clean as required.
-
NOTE: Raised locators on fuel filter canisters must be indexed properly with slots in mounting base for correct installation.
Install new filter elements onto mounting bases. Be sure elements are properly indexed and firmly seated on bases. It may be necessary to rotate filters for correct alignment.
-
Align keys on filter element with slots in filter base.
-
Install retaining ring onto mounting base making certain dust seal is in place on filter base. Hand tighten ring counterclockwise (about 1/3 turn) until it “snaps” into the detent. DO NOT overtighten retaining ring.
-
NOTE: The proper installation is indicated when a "click" is heard and a release of the retaining ring is felt.
A plug is provided with the new element for plugging the used element.
Install water separator bowl on primary fuel filter and tighten ring.
-
Turn dosing element (C) using a suitable filter or strap wrench to remove. Discard dosing element.
-
NOTE: New dosing element canister should come approximately 3/4 full of lubricating additive. Be sure that when removing cap, that the canister is held right side up so as not to spill the fluid.
Remove cap from new dosing element canister.
-
Wipe the sealing surfaces of the header with a clean rag.
-
Install and tighten dosing element by hand until firmly against the header. Apply an extra 3/4 turn after gasket contact is made.
-
Reconnect water in fuel sensor wiring.
-
Open fuel shut-off valve, if equipped.
-
NOTE: The electric fuel transfer (lift) pump (E) and constant air bleed (F) enables the fuel system to self prime.
Key on for 30 seconds to prime fuel system, then start engine and check for possible leaks.
|
AS60879,00000E5-19-20080925 |