Checking and Adjusting Valve Clearance

RG13749-UN-11NOV04
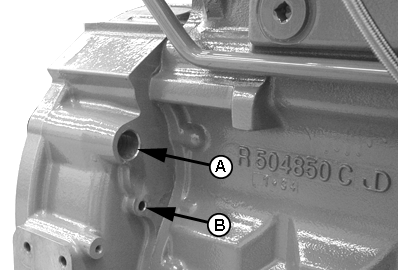
Flywheel Housing Timing Holes
A - Timing/Rotation Hole
B - Timing Pin Hole
 CAUTION: To prevent accidental starting of engine while performing
valve adjustments, always disconnect NEGATIVE (—) battery terminal.
IMPORTANT: Valve clearance MUST BE checked and adjusted with engine COLD.
-
Remove rocker arm cover and crankcase ventilator tube.
-
IMPORTANT: Visually inspect contact surfaces of valve tips, bridges and rocker arm wear pads. Check all parts for excessive wear, breakage, or cracks. Replace parts that show visible damage.
Rocker arms that exhibit excessive valve clearance should be inspected more thoroughly to identify damaged parts.
Remove plastic plugs or cover plate from engine timing/rotation hole (A) and timing pin hole (B).
-
NOTE: Some engines are equipped with flywheel housings which do not allow use of an engine flywheel rotation tool. These engines with straight nose crankshafts may be rotated from front nose of engine, using JDG966 Crankshaft Front/Rear Rotation Adapter.
Using JDE83 or JDG820 Flywheel Turning Tool, rotate engine flywheel in running direction (clockwise viewed from front) until No. 1 (front) cylinder is at TDC compression stroke. Insert JDG1571 or JDE81-4 Timing Pin in flywheel.
If No. 1 cylinder rocker arms are loose, the engine is at No. 1 TDC compression.
If No. 1 cylinder rocker arms are not loose, rotate engine one full revolution (360°) to No. 1 TDC compression.
-

RG13809-UN-07DEC04Adjusting Valves
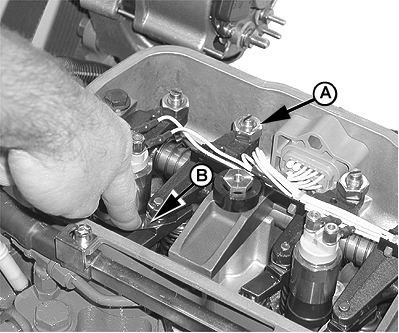
A - Adjusting Screw Jam Nut
B - Feeler Gauge
Adjust valves to specifications below using the appropriate valve clearance adjustment procedure as outlined in the following below. Loosen the jam nut (A) on rocker arm adjusting screw. Turn adjusting screw until feeler gauge (B) slips with a slight drag. Hold the adjusting screw from turning with screwdriver and tighten jam nut to specifications. Recheck clearance again after tightening jam nut. Readjust clearance as necessary.Item Measurement Specification Intake Valve Clearance Adjustment (Rocker Arm-to-Bridge) (Engine Cold) Clearance 0.46 mm (0.018 in.) Exhaust Valve Clearance Adjustment (Rocker Arm-to-Bridge) (Engine Cold) Clearance 0.53 (0.021 in.) Rocker Arm Adjusting Screw Jam Nut Torque 27 N·m (20 lb-ft) NOTE: While rocker arm cover is removed, test glow plugs. (See following procedure.)
-
Install rocker arm cover and crankcase ventilator tube.
-
Reconnect battery terminal.
6-Cylinder Engine:

RG17725-UN-04OCT10
Valve Adjustment
A - Front of Engine
B - No. 1 Piston TDC Compression
C - No. 6 Piston TDC Compression
E - Exhaust Valve
I - Intake Valve
NOTE: Firing order is 1-5-3-6-2-4.
-
Lock No. 1 piston at TDC compression stroke (B).
-
Adjust valve clearance on No. 1, 3 and 5 exhaust valves and No. 1, 2, and 4 intake valves.
-
Turn crankshaft 360°. Lock No. 6 piston at TDC compression stroke (C).
-
Adjust valve clearance on No. 2, 4 and 6 exhaust valves and No. 3, 5, and 6 intake valves.
|
JR74534,0000262-19-20130724 |