Diesel Exhaust Fluid (DEF) Tank Fill Cap — Installation and Removal
There are locking and non-locking DEF tank fill caps. Use the appropriate procedure.
 CAUTION: Avoid contact with eyes. In case of contact, immediately
flush eyes with large amounts of water for a minimum of 15 minutes.
Reference the Materials Safety Data Sheet (MSDS) for additional information.
CAUTION: Avoid contact with eyes. In case of contact, immediately
flush eyes with large amounts of water for a minimum of 15 minutes.
Reference the Materials Safety Data Sheet (MSDS) for additional information.
Do not ingest DEF. In the event DEF is ingested, contact a physician immediately. Reference the Materials Safety Data Sheet (MSDS) for additional information.
TS1731-UN-23AUG13
IMPORTANT: Thoroughly clean the DEF filler cap and the area around the tank fill neck.
Use only distilled water to rinse components that are used to deliver DEF. Tap water can contaminate DEF. If distilled water is not available, rinse with clean tap water, then thoroughly rinse with ample amounts of DEF.
If DEF is spilled or contacts any surface other than the storage tank, immediately clean the surface with clear water. DEF is corrosive to painted and unpainted metallic surfaces and can distort some plastic and rubber components.
IMPORTANT: Avoid damage to components. DO NOT use excessive force. Improper installation will result in damage to the DEF tank fill cap.
Reasonable care should be taken when opening the DEF tank. Ensure that the DEF tank cap area is free of debris before removing the cap. Close the tank and any containers of DEF between use to prevent contamination and evaporation.
Non-Locking DEF Tank Fill Cap
Cap Removal
-
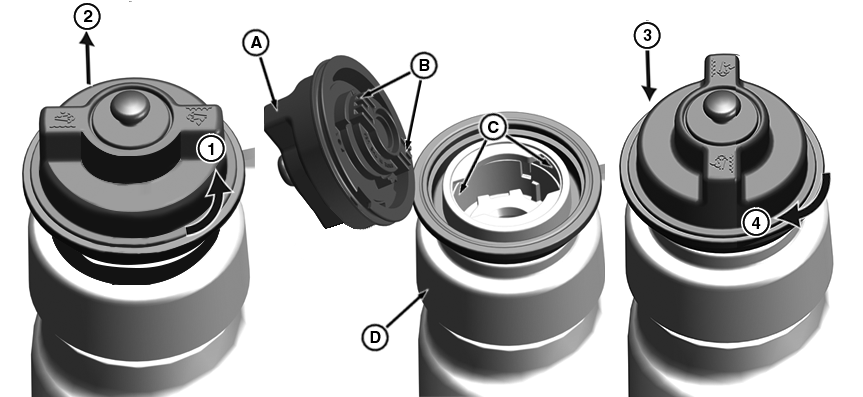
RG33544-UN-01MAR21Non-Locking DEF Fill Cap
1 - Counterclockwise Rotation (¼ turn, 90°)
2 - Straight Up
3 - Straight Down
4 - Clockwise Rotation (¼ turn, 90°)
A - Non-Locking Fill Cap
B - Alignment Tab (2 used)
C - Slot (2 used)
D - Filler Neck
Rotate non-locking fill cap (A) counterclockwise, one quarter turn 90° (1). -
Lift non-locking fill cap (A) straight up (2) and out of the DEF filler neck (D).
Cap Installation
-
IMPORTANT: Avoid damage to components. DO NOT use excessive force. ENSURE alignment tabs (B) are properly aligned with the slots (C) in filler neck (D). DO NOT use excessive force or overtighten. If resistance is felt, then realign the cap before tightening.
Align tabs (B) of the non-locking fill cap (A) with the slots (C) of the DEF filler neck (D).
-
Install non-locking fill cap (A) straight down (3) into the DEF filler neck (D) until it is completely seated.
-
Hold non-locking fill cap (A) straight down (3) while rotating clockwise one quarter turn 90° (4). DO NOT use excessive force or overtighten fill cap.
Locking DEF Tank Fill Cap
Cap Removal
-
IMPORTANT: Avoid damage to components. DO NOT use excessive force. ENSURE locking tab is fully disengaged before attempting to rotate. DO NOT use excessive force to remove fill cap.
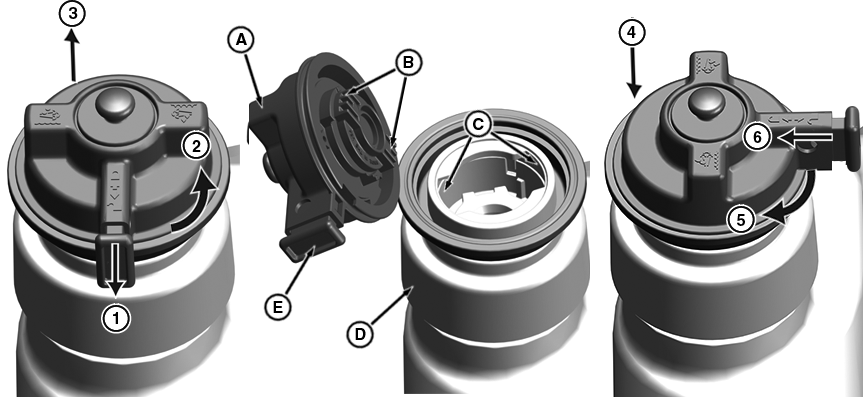
RG33526-UN-08MAR21Locking Fill Cap
1 - Locking Tab Disengagement
2 - Counterclockwise Rotation (¼ turn, 90°)
3 - Straight Up
4 - Straight Down
5 - Clockwise Rotation (¼ turn, 90°)
6 - Locking Tab Engagement
A - Locking Fill Cap
B - Alignment Tab (2 used)
C - Slot (2 used)
D - Filler Neck
E - Locking Tab
Slide locking tab (E) out as shown to disengage (1) the locking tab. -
Rotate locking fill cap (A) counterclockwise one quarter turn 90° (2).
-
Lift locking fill cap (A) straight up (3) and out of the DEF filler neck (D).
Cap Installation
-
Align tabs (B) of the locking fill cap (A) with the slots (C) of the DEF filler neck (D).
-
Install locking fill cap (A) straight down (4) into the DEF filler neck (D) until it is completely seated.
-
IMPORTANT: Avoid damage to components. DO NOT use excessive force. ENSURE alignment tabs (B) are properly aligned with the slots (C) in filler neck (D). DO NOT use excessive force or overtighten. If resistance is felt, then realign the cap before tightening.
Hold locking fill cap (A) straight down (4) while rotating clockwise one quarter turn 90° (5). DO NOT use excessive force or overtighten fill cap.
-
Slide locking tab (E) inward to engage (6) as shown to lock fill cap.
|
MH42591,00000A5-19-20210311 |