Testing Thermostats
Removing Thermostats
 CAUTION: Explosive release of fluids from pressurized cooling
system can cause serious burns. DO NOT drain coolant until it has
cooled below operating temperature. Always loosen radiator pressure
cap or drain valve slowly to relieve pressure.
CAUTION: Explosive release of fluids from pressurized cooling
system can cause serious burns. DO NOT drain coolant until it has
cooled below operating temperature. Always loosen radiator pressure
cap or drain valve slowly to relieve pressure.
-
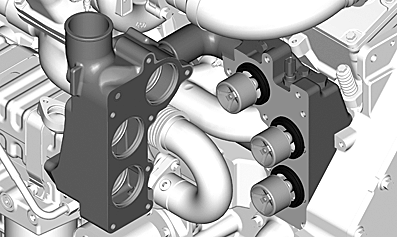
RG18087-UN-25FEB10Remove Thermostat Cover
RG18089-UN-25FEB10Remove Thermostat Gasket and Thermostats
Visually inspect area around thermostat cover for leaks. -
Remove radiator pressure cap and partially drain cooling system.
-
Remove bypass tube from coolant pump and thermostat cover.
-
Remove coolant return line from thermostat cover.
-
Remove seven cap screws from thermostat cover and remove cover (if not previously done).
-
Remove gasket and remove thermostats.
-
Test each thermostat for proper opening temperature.
Testing Thermostats Opening Temperature
-
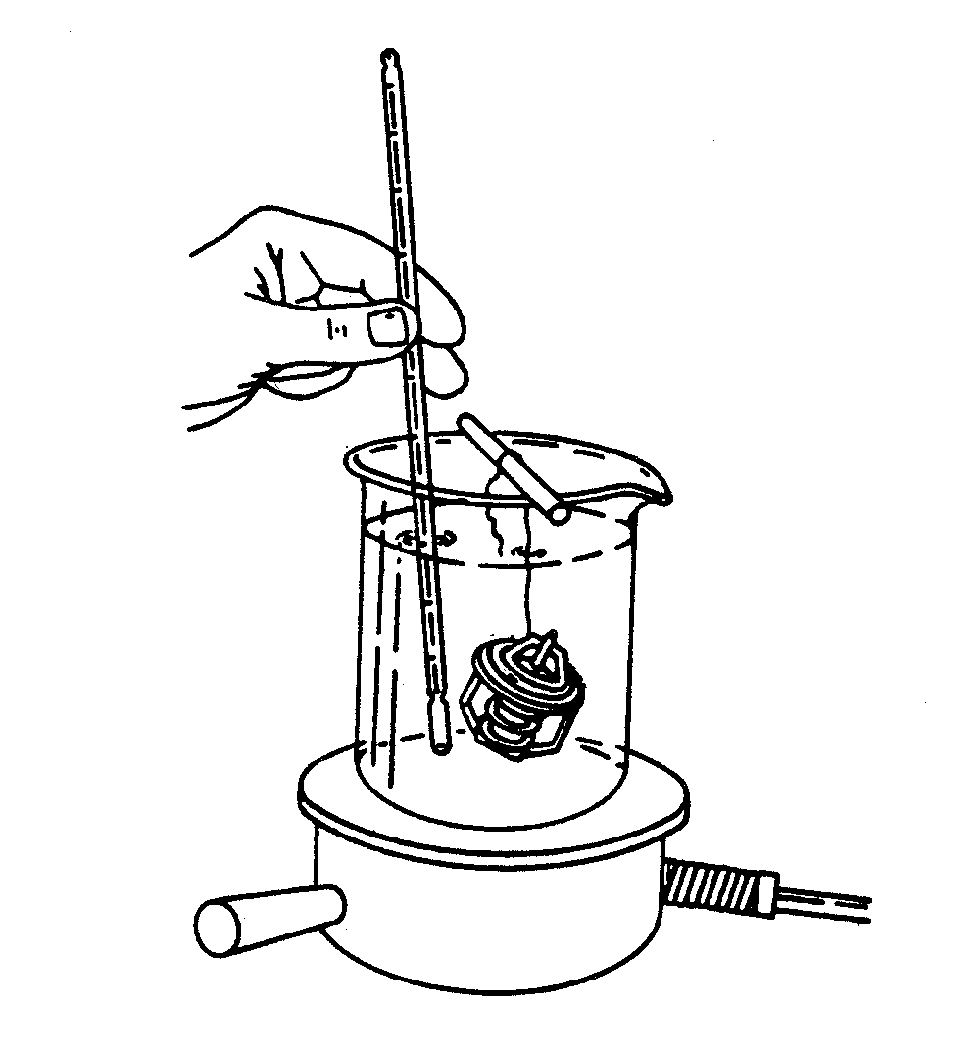
RG5971-UN-23NOV97Thermostat and Thermometer in Water
Visually inspect thermostats for corrosion or damage. Replace thermostats as a matched set as necessary. -
Inspect thermostat ball valve in vent notch. If ball valve movement is restricted, and cleaning does not free ball valve, replace thermostat.
-
CAUTION: DO NOT allow thermostat or thermometer to rest against
the side or bottom of container when heating water. Either may rupture
if overheated.
Suspend thermostat and a thermometer in a container of water.
-
Stir the water as it heats. Observe opening action of thermostat and compare temperatures with specifications.
Item Measurement Specification Thermostat Start to Open 85 °C (185 °F) -
Remove thermostat and observe its closing action as it cools. In ambient air the thermostat should close completely. Closing action should be smooth and slow.
-
If any one thermostat is defective, replace all thermostats.
Installing Thermostats
IMPORTANT: Top thermostat has a vent notch with ball valve for air bleeding. Ball valve MUST BE installed at 12 o’clock position.
-
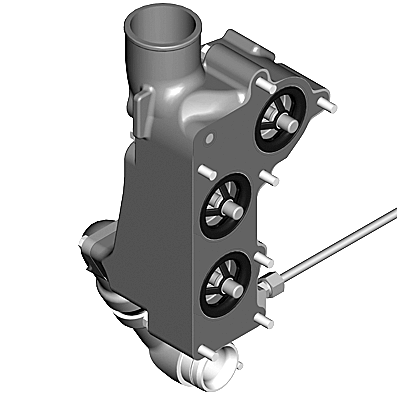
RG18089-UN-25FEB10Install Thermostats
RG18087-UN-25FEB10Install Thermostat Cover
Clean all gasket material from thermostat cover and mounting surfaces. -
Install thermostats in cover.
NOTE: Thermostats are identical and can be placed in any arrangement.
-
Install a new gasket on thermostat cover.
-
Install thermostat cover using seven cap screws and tighten to specifications.
Item Measurement Specification Thermostat Cover Cap Screws Torque 50 N·m (37 lb.-ft.) Item Measurement Specification Coolant Bypass Tube Cap Screws Torque 37 N·m (27 lb.-ft.) -
Install coolant return line from rear of cylinder head. Tighten fitting to specifications.
Item Measurement Specification Coolant Return Line Fitting Torque 14 N·m (124 lb.-in.) -
Pressure test the cooling system a second time to be sure that thermostat cover gasket is sealing properly. (See Pressure Testing Cooling System in the Lubrication & Maintenance — 500 Hours/12 Months Section).
|
ZE59858,0000198-19-20131004 |