Leveling the Hitch
-
PY49474-UN-16MAY18
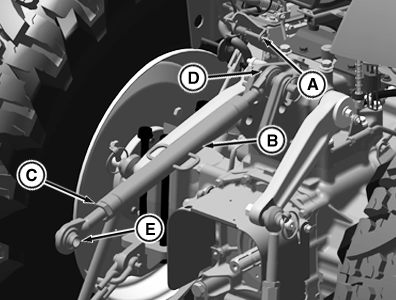
PY49475-UN-21DEC17A - Self-Locking Spring
B - Center Link Body
C - Counter Nut
D - Eye Bolt
E - Eye Bolt
F - Grease Nipple
G - Pin
H - Turnbuckle
Lower implement to take weight off hitch.IMPORTANT: DO NOT attempt to over-extend the center link beyond limits of locking clip or lift links past the stops. Link body threads could be damaged.
NOTE: Maximum adjustment range of the center link can be only obtained if the ends are positioned equally within the body when attached to an implement.
-
Adjust center link to level implement front-to-rear. Unlatch self-locking spring (A). Rotate center link body (B) clockwise to lengthen center link or counterclockwise to shorten it. Be sure to latch the self-locking spring.
NOTE: Unlock center link with the help of counter-nut (C) to shorten or lengthen center link body (B) and lock once the center link body length adjusted.
-
The right-hand lift link is also adjustable in length to accommodate different tire sizes.
To change the right-hand lift link length, loose the nut and rotate the turnbuckle (H) assembly clockwise to shorten or counterclockwise to lengthen, and then tighten the nut.
NOTE: Pin position should be always vertically downwards.
-
Adjust left and right lift links to accommodate various tire sizes. Set the lift links to have fully lowered draft link balls approximately seven inches off the ground for greatest range of usable hitch motion.
|
MD36154,0000308-19-20180213 |