Attach Implement to Rear Hitch - Ball End
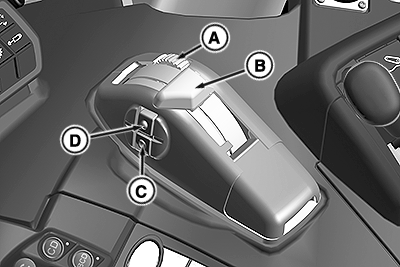
RXA0153750-UN-08SEP16
A - Position Control Lever Stop
B - Position Control Lever
C - Quick Lower Button
D - Quick Raise Button
 CAUTION: Hitch movement can cause injury or death.
To prevent unexpected movement of rear hitch, set load depth to position control (setting “0”) before attaching implement to hitch.
IMPORTANT: Ensure center link and lift link adjustments DO NOT cause implement contact with fenders.
NOTE: Engine must be running for 3-point hitch control to work.
-
Back machine up to implement to be attached. Engine must be running to operate the rear hitch.
-
Use position control lever (B) to raise or lower draft links near the attachment points. DO NOT use rear quick raise/lower buttons (C and D).
-
Set desired depth with the position control lever stop (A)
-
Be sure that drawbar does not interfere. If necessary, move the drawbar to fully retracted position or remove it. Check for any other potential interference.
Telescopic Draft Links
LV22036-UN-09JUN14
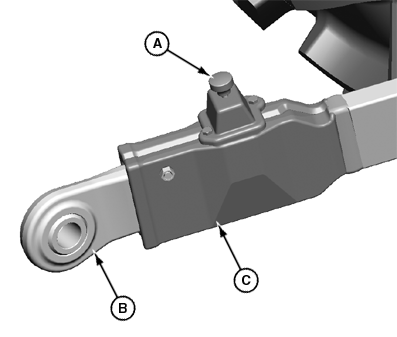
Heavy-Duty Draft Link
A - Button or Lock Pin
B - Draft Link End
C - Draft Arm
-
Move button or lock pin (A) toward center of machine and pull out draft link end (B). Slip draft link end over the implement hitch pin. Retain with a quick-lock pin. Repeat on the other side.
-
Raise or lower draft arms (C) to align draft link ends (B) with implement, slowly back up the machine to lock ends in place.
-
Back machine up to implement so hitch points align. Place transmission in PARK and stop engine.
-
Slip draft link ends (B) over the implement hitch pins and retain with quick-lock pins.
Center Link
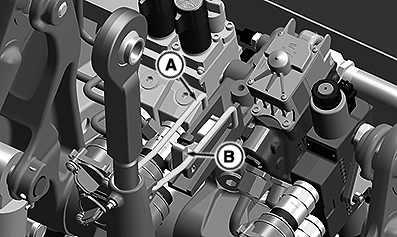
RXA0153758-UN-12SEP16
A - Center Link Locking Clip
B - Release Tab
-
Pull release tab (B) back and remove center link locking clip (A) to release center link from the transport hook.
-
Attach center link to implement top mast. Use SCV IV to extend hydraulic center link if equipped.
Adjust and Check Clearance

M47177-UN-31JAN92
A - Clearance
IMPORTANT: Whenever an implement, quick coupler, or attachment is connected to the hitch, check full range of operation for interference, binding, or PTO separation.
When large diameter rear tires are installed, a quick coupler or similar device is required to provide adequate implement-to-tire clearance.
-
Adjust center link and lift links as necessary. See “Level Hitch” in this section.
-
Adjust sway as necessary. See “Adjust Hitch Side Sway” in this section.
-
Start engine.
-
Slowly raise and lower implement with hitch fender switch or position control lever.
-
Watch for interference points and adjust hitch setting as required.
-
Check for adequate clearance (A) between outside diameter of the tire and implement with hitch in raised position.
|
BH38674,0000559-19-20161215 |