Exchangeable 540/1000 rpm PTO Shaft
LV14632-UN-11AUG11
LV12604-UN-26APR05
A - Snap Ring
B - PTO Shaft
C - Bore
 Ensure that PTO is OFF, has come to a complete stop
and allowed too cool before attaching or detaching implements.
Ensure that PTO is OFF, has come to a complete stop
and allowed too cool before attaching or detaching implements.
Make sure to select either 540 rpm or 1000 rpm mode after changing PTO shaft. PTO disengages if speed does not match shaft size. See “Select Correct PTO Speeds” in this section.
When exchanging the PTO shaft, hydraulic oil does not leak out due to a dry socket design.
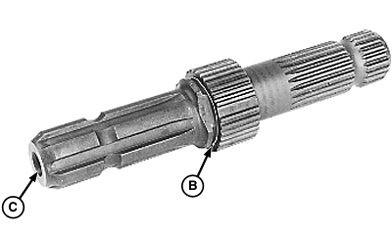
PTO stub shaft has six splines for operating 540 rpm implements and 21 splines for 1000 rpm implements.
-
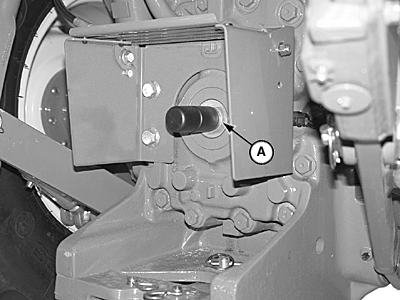
Locate flattened area on the stub shaft which facilitates snap ring removal and installation.
-
Align snap ring ends with flattened area. Remove snap ring (A) and pull out PTO shaft (B).
-
Clean PTO shaft thoroughly and lightly coat with grease. Be sure the end bore (C) is clean if installing shaft for 1000 rpm operation.
-
Turn PTO shaft end-for-end and insert in the PTO housing until snap ring groove is visible.
-
540 rpm shaft—Rotate the shaft back and forth while installing. Ensure that the shaft is properly seated in housing; continue to push shaft in when installing snap ring.
-
1000 rpm shaft—Rotate the shaft back and forth while installing until engagement is felt.
-
-
Install snap ring in the groove to retain PTO stub shaft. Align ends of the snap ring with flat surface of shaft.
|
DP51502,0002C6C-19-20170517 |