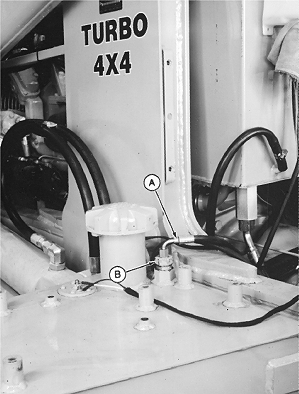
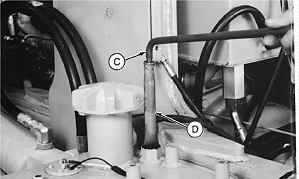
Cleaning Fuel StrainerNOTE: If fuel strainer is plugged, contaminated fuel and debris must be removed and strainer cleaned. It is not necessary to drain fuel tank if you are merely checking the fuel strainer. 1. Loosen fuel tank drain plug and connect hose to plug.2. Remove fuel tank cap. NOTE: Approximate capacity of fuel tank is 166 L (44 gal). 3. Drain fuel from tank. 4. Disconnect fuel line (A) from fitting (B). 5. Remove fitting, fuel sump tube (C), and fuel strainer (D) from tank. 6. Clean debris from strainer using solvent or diesel fuel. Check strainer for large holes or torn fabric. If necessary, install a new strainer. 7. If necessary, flush debris from fuel tank. 8. Clean fitting threads and threads in fuel tank using cure primer. IMPORTANT: When cure primer is used, wait 30 minutes before filling fuel tank to give flexible sealant time to cure. (See manufacturer instruction for more information on cure times of sealant.) 9. Apply a bead of flexible sealant to threads of fitting. 10. Install strainer, sump tube, and fitting into fuel tank. Strainer needs to be routed between tangs on bottom of tank. 11. Connect fuel line. 12. Fill fuel tank. Specification
|
|
TX,90,RR2618 -19-15MAR93-1/2 |
| 13. Check for leaks. |
TX,90,RR2618 -19-15MAR93-2/2 |

