Operational Checkout Procedure
Use this procedure to check all systems and functions on the machine. It is designed so you can make a quick check of machine operation while doing both a walk around inspection and performing specific checks from the operator’s seat.
Should you experience a problem with your machine, you will find helpful diagnostic information in this checkout that will pinpoint the cause. Use the table of contents to help find adjustment procedures. This information may allow you to perform simple repairs yourself, reducing machine down time.
The information obtained after completing the operational checkout will allow you or your authorized dealer to pinpoint a specific test or repair needed to restore the machine to specifications.
A location will be required which is level and has adequate space to complete the checks. No tools or equipment are needed to perform this checkout.
Complete the necessary visual checks (oil levels, oil condition, external leaks, loose hardware, linkage, wiring, etc.) prior to doing the checkout. The machine must be at operating temperature for many of the checks.
Locate the check to be performed at the top of the left column and read completely down the column before performing the check. Follow this sequence from left to right. In the far right column, if no problem is found, you will be instructed to go to next check. If a problem is indicated, you will be referred to either a group in this manual or to your authorized dealer for repair.
1 Gauge and Indicator Check With Engine Off
1A Monitor Indicator Lights and Alarm Checks
Action:
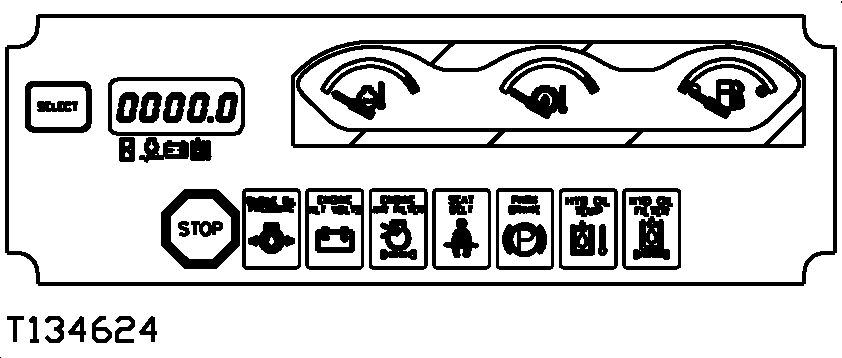
T134624-UN-19OCT00
Turn key switch to ON position and hold.
ENGLISH Are all monitor indicator lights on? Is STOP light ON and does alarm sound?
NOTE: Starting motor MUST NOT operate.
Result:
YES: Go to next check.
NO: Check monitor/gauge fuse. Go to Group 9015-15, Display Monitor Checks. If motor starts and bulb check position is OK, key switch is failed or there is a short in wiring. Go to Group 9015-15, Start Circuit.
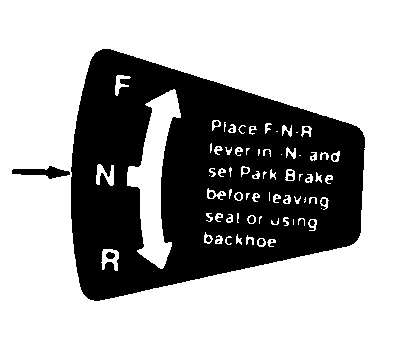
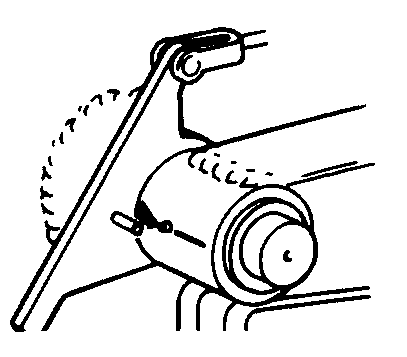
2 FNR, Neutral Start Circuit and Reverse Warning Alarm Checks
2A FNR Switch Check
Action:
T7447AH-UN-04JAN91
Engine off.
Move FNR lever to forward (F), reverse (R), then neutral (N) position.
ENGLISH Observe and feel forward, neutral and reverse detents.
Turn key switch to ON position. Move FNR lever into forward and reverse.
ENGLISH Did you hear a "click" from the front console neutral start relay when the key switch was turned ON?
Result:
YES: Go to next check.
NO: If no "click", inspect neutral start relay. Go to Group 9015-15, Start Circuit.
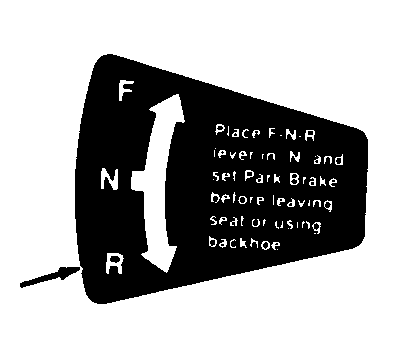
2B Neutral Start Check
Action:Move FNR lever to forward (F) position and turn key switch to start position.
Move FNR lever to reverse (R) position and turn key switch to start position.
ENGLISH Did starting motor operate?
Result:
YES: Go to next check.
NO: Go to Group 9015-15, Start Circuit.
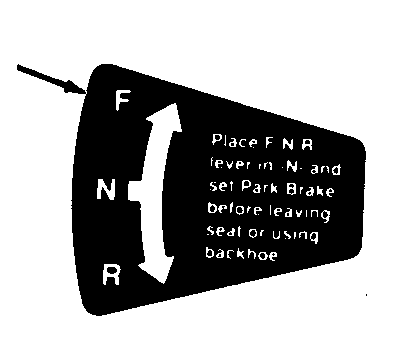
2C Start Circuit Check
Action:
T7447AH-UN-04JAN91
Move FNR lever to neutral (N) position and turn key switch to START position.
Observe and listen to monitor as engine is cranking.
ENGLISH Did starting motor operate?
ENGLISH Did alarm sound?
ENGLISH During engine cranking, were all indicator lights ON? Is STOP indicator ON?
Result:
YES: Go to next check.
NO: If engine turns but does not start, check fuel shut-off/start aid/reverse alarm fuse. If starting motor does not operate check start fuse. Go to Group 9015-15, Start Circuit. If indicator lights are NOT ON, check monitor/gauge fuse. Go to Group 9015-15, Display Monitor Checks.
2D Reverse Warning Alarm Check
Action:
T7447AI-UN-04JAN91
Key switch ON.
Move FNR lever to reverse (R) position.
ENGLISH Does reverse warning alarm sound?
Result:
YES: Go to next check.
NO: See Reverse Alarm Circuit. Go to Group 9015-10.
3 Park Brake, Charge Indicator Light, Tachometer/Hour Meter Circuit and Engine Speed Control Linkage Checks
3A Park Brake Indicator Check
Action:
T7447AG-UN-04JAN91
T134624-UN-19OCT00
IMPORTANT: If engine oil pressure indicator light stays ON, STOP ENGINE IMMEDIATELY, check oil level.
Engage park brake.
Put FNR lever in neutral (N) and start the engine.
Put FNR lever in forward (F) position.
ENGLISH Is STOP indicator ON? Does alarm sound? Are all other indicator lights out?
Release park brake.
ENGLISH Is park brake indicator and STOP light out? Alarm will not sound.
Result:
YES: Go to next check.
NO: If engine low oil pressure indicator light stays ON, STOP ENGINE IMMEDIATELY and check oil level. Go to Group 9010-15, Engine Low Oil Pressure. If alternator indicator light is ON, increase engine speed to 1200 rpm and alternator light MUST go out. Go to Group 9015-15, .
3B Seat Position Sensor Check
Action:Engine speed at low idle.
| Item | Measurement | Specification |
| Seat Position Sensor Check | Engine Speed | Low idle |
Lower all equipment to ground.
Release park brake.
Transmission gear shift lever in neutral, FNR in forward or reverse.
Operators seat in backhoe position.
ENGLISH Does monitor alarm sound and is STOP indicator ON?
Result:
YES: Go to next check.
NO: Go to indicator circuit in Group 9015-15.
3C Tachometer/
Hourmeter Circuit Check
T7447AH-UN-04JAN91
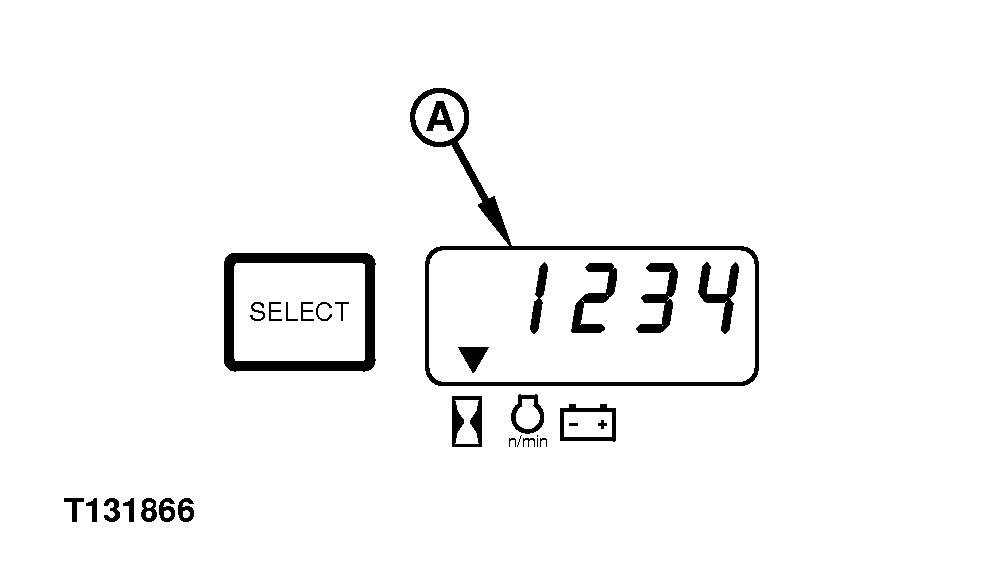
T131866-UN-22JUN00
IMPORTANT: If engine low oil pressure indicator light stays ON, STOP ENGINE IMMEDIATELY and check oil level.
Engage park brake.
Put FNR lever in neutral and start the engine.
ENGLISH Is hourmeter indicator changing? Does tachometer indicate rpm?
Result:
YES: Go to next check.
NO: If park brake indicator light is not ON, go to Group 9015-15, Park Brake Circuit. If no hour meter or tachometer movement, go to Group 9015-10, Gauge and Hour Meter Circuit.
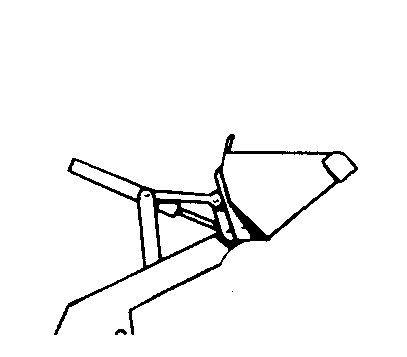
3D Engine Speed Control Lever Linkage Check
Action:
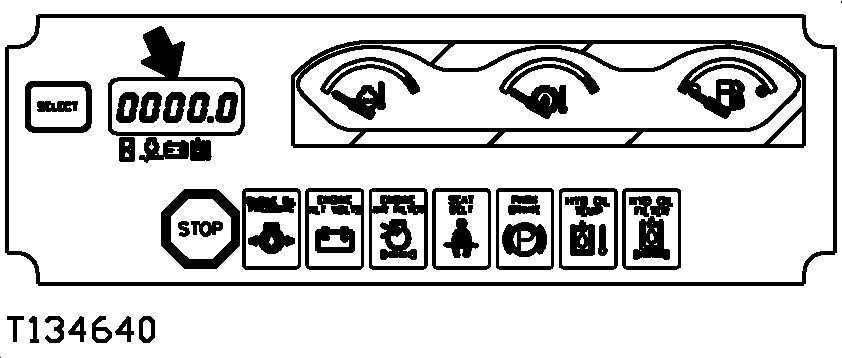
T134640-UN-19OCT00
Engage park brake.
Put FNR lever in neutral and start engine.
Note rpm on tachometer.
Move speed control lever to fast idle position.
ENGLISH Does tachometer read 900 + 25 — 0 rpm (slow idle) or 2400 + 25 — 0 rpm (fast idle)?
| Item | Measurement | Specification |
| Slow Idle | Speed | 900 + 25 — 0 rpm |
| Fast Idle | Speed | 2400 + 25 — 0 rpm |
ENGLISH Does speed control lever remain at selected position?
Result:
NO: Tighten friction lock. Go to Group 9010-20. Check engine speed. Go to Group 9010-20.
YES: Go to next check.
3E Engine Speed Control Pedal Linkage Check
Action:
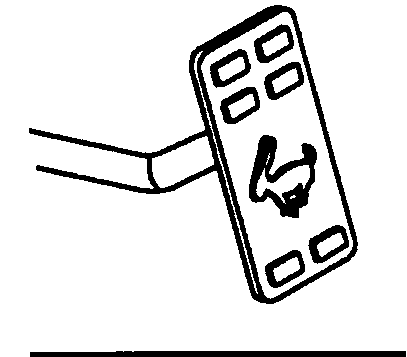
T7394BF-UN-06JAN92
Depress speed control pedal
ENGLISH Does engine speed stay the same as with speed control lever in fast idle position?
Result:
YES: Yes: Go to next check.
NO: Adjust Speed Control Linkage. Go to Group 9010-20.
4 Brake System Checks
4A Pedal Stop Check
Action:

T134625-UN-19OCT00
Lift left and right brake pedals.
ENGLISH Are brake pedals against pedal stop screws?
NOTE: This ensures that brake check valves are opened and brakes released.
Result:
YES: Go to next check.
NO: Adjust brake pedal stops. Go to Group 9020-20.
4B Brake System Leakage Check
Action:
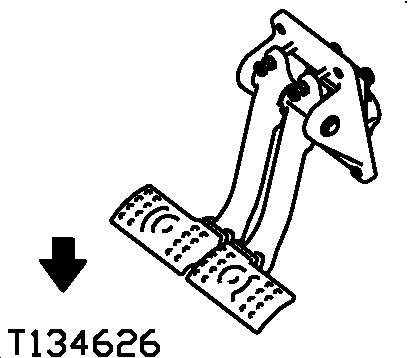
T134626-UN-19OCT00
Depress and hold left brake pedal, then right brake pedal using approximately 267 N (60 lb. force).
ENGLISH Brake pedal must NOT feel spongy (caused by air in system). Does pedal settle more than 25 mm (1.0 in.) per minute?
| Item | Measurement | Specification |
| Brake System | Maximum Leakage | 25 mm (1.0 in.) per minute with approximately 267 N (60 lb. force) applied |
Result:
NO: Go to next check.
YES: Bleed brake system. Go to Group 9020-20.
4C Brake Drag/Park Brake Check
Action:
T6171AL-UN-09DEC88
Position machine on a gradual slope with front of machine downhill.
Lift bucket so it clears ground.
Shift FNR lever to neutral, differential lock control up, disengage park brake and release service brakes.
Let machine coast freely for several feet. Apply park brake.
ENGLISH Did machine stop?
Release park brake.
ENGLISH Did machine move or coast freely?
NOTE: If machine does not move freely on slope, drive the machine for five minutes. Feel axle housing area to locate which brake is dragging.
Result:
YES: Go to next check.
NO: Go to Group 9020-25, Brake Valve Leakage Test or Park Brake Release Pressure Test.
4D Park Brake Function Check
Action:Start machine, move throttle to 1200 rpm.
Leave park brake ON.
Put FNR lever in forward position.
Shift transmission starting with 1st. gear through 4th. gear, pausing for 5 seconds in each gear.
Move FNR lever to reverse position.
Shift transmission starting with 1st. gear through 4th. gear, pausing for 5 seconds in each gear.
Move FNR lever back to neutral position.
Move throttle back to slow idle and shut the machine off.
ENGLISH The machine MUST NOT move in any gear.
ENGLISH Park Brake indicators MUST be lit.
ENGLISH Stop light MUST be flashing.
ENGLISH An audible beeping alarm MUST be heard.
ENGLISH With the FNR In the reverse position, the reverse audible alarm MUST be heard.
Result:
YES: If the machine moves in any gear, see your authorized dealer.
YES: If the indicators do not work, see your authorized dealer.
NO: Go to next check.
5 Steering System Checks
5A Steering Check
Action:Raise loader bucket above ground level.
Raise rear of machine off ground using stabilizers.
Operate engine at approximately 1000 rpm.
| Item | Measurement | Specification |
| Steering Check | Approximate Engine Speed | 1000 rpm |
Turn steering wheel from full left to full right several times.
ENGLISH Did front wheels move smoothly in both directions?
ENGLISH When steering wheel was stopped, did front wheels stop moving?
NOTE: Internal leakage or a sticking steering valve spool can cause wheels to continue to move after steering wheel is stopped.
Result:
YES: Go to next check.
NO: Go to Group 9025-15, Steering Valve Does Not Return to Neutral.
5B Steering System Leakage Check
Action:NOTE: Hydraulic oil must be at operating temperature.
Run engine at slow idle.
| Item | Measurement | Specification |
| Steering System Leakage Check | Engine Speed | Slow idle |
| Hydraulic Oil | Temperature | Operating temperature |
Turn steering wheel until wheels are in maximum right turn position (against stop) and then continue turning steering wheel.
Repeat leakage check turning steering wheel to the left.
ENGLISH Did steering wheel turn with much greater effort to the left or right?
Result:
YES: Go to next check.
NO: If steering wheel turns with same effort after the wheels stop moving, verify whether valve or cylinder is leaking. See your authorized dealer.Steering System Leakage Test.
5C Steering Priority Valve Check
Action:Operate engine at slow idle.
| Item | Measurement | Specification |
| Steering Priority Valve Check | Engine Speed | Slow idle |
Turn steering wheel to stop left and right. Note effort required to turn wheel.
Turn wheel to stop and apply constant pressure.
ENGLISH Does wheel stop at both axle stops and require normal steering wheel effort?
ENGLISH Does tachometer (if equipped) decrease in rpm or does engine rpm decrease when steering wheel is held against stop?
Result:
YES: Go to next check.
NO: Steers hard and no decrease in engine rpm. Go to Group 9025-25, Steering Priority Valve Test.
6 Transmission Neutral Disconnect Circuit Check
6A Neutral Disconnect Circuit Check
Action:
 CAUTION: Machine will move forward as FNR lever is moved.
Start engine, set idle speed at approximately 1500 rpm.
| Item | Measurement | Specification |
| Neutral Disconnect Circuit Check | Approximate Engine Idle Speed | 1500 rpm |
Put transmission in fourth gear.
Release park brake.
Shift FNR lever to forward (F) position.
ENGLISH When FNR lever is shifted to forward (F) position, can a noticeable drop in engine speed should be heard?
Press button on gear shift lever (manual shift only) or loader control lever individually and note sound of engine.
ENGLISH Does engine rpm increase when the neutral solenoid switches are depressed?
Result:
YES: Go to next check.
NO: Check switch. Go to Group 9015-15, Park Brake/Neutral Disconnect Circuit.
7 Driving Checks
7A Transmission Noise Check
Action:IMPORTANT: Press button on gear shift lever when shifting gears (manual shift only).
Run engine at approximately 1500 rpm with FNR lever in forward (F) position.
| Item | Measurement | Specification |
| Transmission Noise Check | Approximate Engine Speed | 1500 rpm with FNR lever in forward (F) position |
Shift transmission into each gear and drive for a short distance.
ENGLISH Can excessive gear noise be heard when shifting between gears?
Result:
NO: Go to next check.
YES: Go to Group 9020-15, Excessive Power Train Noise or Excessive Gear Clash When Shiftingfor manual shift or power shift.
7B Differential Lock Check
Action:
T6295AD-UN-19OCT88
Raise wheels off ground with stabilizers and loader bucket.
Unlock brake pedals. Turn MFWD switch OFF (if equipped).
Operate machine at approximately 1500 rpm in 1st forward.
| Item | Measurement | Specification |
| Differential Lock Check | Approximate Engine Speed | 1500 rpm in 1st forward |
Depress differential lock control.
Apply one brake pedal.
ENGLISH Both wheels must stop.
Result:
YES: Go to next check.
NO: Check differential lock switch and solenoid. Go to Group 9020-25, Differential Lock Pressure test.
7C Differential Gear and Pinion Check
Action:Shift transmission to first gear and operate engine at approximately 1500 rpm.
| Item | Measurement | Specification |
| Differential Gear and Pinion Check | Approximate Engine Speed | 1500 rpm in 1st gear |
Move FNR lever to forward (F) position.
Steer machine in a maximum left turn and depress left brake pedal to stop the left wheel.
Steer machine in a maximum right turn and depress right brake pedal to stop the right wheel.
ENGLISH Can excessive gear noise be heard in the differential or pinion gear area?
Result:
NO: Go to next check.
YES: Go to Group 9020-15, Diagnose Rear Axle Malfunctions.
7D Front Wheel Alignment (Toe-In) Check
Action:
T6264AI-UN-22OCT91
Drive machine in fourth gear forward on a surface with loose material.
ENGLISH Is material from behind front wheels thrown excessively inward or outward?
Result:
NO: Go to next check.
YES: If material is thrown, excessive tire wear will result. Go to Group 9020-20, Adjust Toe-In.
7E Engine and Torque Converter Check (Without MFWD)
Action:
T6171AM-UN-09DEC88
Position machine with loader bucket at ground level against dirt bank or immovable object.
Shift transmission into first gear.
Move FNR lever to forward (F) position.
Engage differential lock.
Increase engine speed to fast idle.
ENGLISH Do rear wheels stall?
NOTE: This test will give a general indication of engine, transmission and torque converter performance.
Result:
NO: Go to next check.
YES: If the wheels can be easily stalled, go to Group 9020-15, Power Train—Machine Lacks Power or Moves Slow.
7F Transmission Hydraulic System Check
Action:Run engine at approximately 1500 rpm.
| Item | Measurement | Specification |
| Transmission Hydraulic System Check | Approximate Engine Speed | 1500 rpm |
Shift transmission into third gear.
Move FNR lever to forward (F) position.
Make several shifts from third forward to third reverse. Start counting the number of seconds when FNR lever is moved to opposite direction.
ENGLISH Is shift from one direction to the other completed in three seconds.
NOTE: If bad in one direction ONLY, check direction pack.
Result:
YES: Go to next check.
NO: Check torque converter or modulation valve. Go to Group 9020-25.
8 Ride Control Operational Checks (If Equipped)
8A Electrical Checks
Action:Turn key switch on (do not start engine).
Turn ride control switch on.
ENGLISH Does ride control switch light turn on?
Turn ride control switch off.
ENGLISH Does ride control switch light turn off?
Turn ride control switch on.
Turn key switch off.
ENGLISH Does ride control switch light turn off?
Result:
YES: Go to next check.
NO: Check and replace ride control switch light.
IF OK: Check wiring.
8B Hydraulic Checks
NOTE: Make sure park brake is off during hydraulic checks.
Action:Start tractor and set throttle about 1000 - 1500 rpm.
Turn ride control on.
Try to lift front end of tractor off ground using loader boom lever.
Release loader boom lever.
ENGLISH Will front end of tractor lift off of ground and hold?
Result:
NO: Continue check.
YES: Check ride control hydraulics.
Action:
Turn ride control off.
Try to lift front end of tractor off ground using loader boom lever.
Release loader boom lever.
ENGLISH Will front end of tractor lift off of ground and hold?
Result:
YES: Go to next check.
NO: Check ride control hydraulics.
8C Ride Control Check
CAUTION: Boom will jump upward during this check. Make sure
area around bucket is clear.
Start engine.
Push Ride Control Switch to OFF position.
Raise boom to maximum height and hold control lever over relief for 2 seconds.
Lower boom and bucket to ground and stop engine. Put boom control lever in neutral.
Turn key switch on. Turn ride control switch on.
Does boom jump up?
Result:
YES: Check complete.
NO: Check accumulator charge.
9 Mechanical Front Wheel Drive (MFWD) Driving Check
9A MFWD Switch Check
Action:
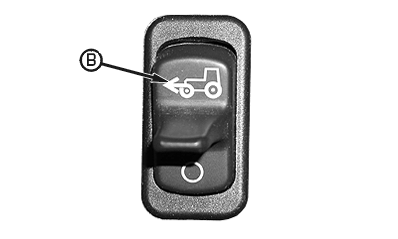
T131717B-UN-15JUN00
Turn key switch to ON.
Push switch and engage MFWD.
ENGLISH Does MFWD light (B) display in switch come ON when switch is pressed?
Push switch to disengage MFWD.
ENGLISH Is MFWD light in switch OFF with MFWD disengaged?
NOTE: Indicator light in MFWD switch will remain ON while MFWD is engaged. If MFWD is turned OFF while operating, light will go out but MFWD could stay on until load on drive train is released.
Result:
YES: Go to next check.
NO: Check electrical circuit. Go Group 9015-10, MFWD circuit. Go to Group 9020-25, MFWD Pressure Test.
9B MFWD Differential Check
Action:Start engine and run at low idle.
| Item | Measurement | Specification |
| MFWD Differential Check | Engine Speed | Low idle |
Raise machine off ground with stabilizers and loader.
Release park brake.
Shift transmission to first gear and put FNR in forward.
Engage MFWD.
Lower front wheels to just contact ground.
ENGLISH Does at least one front wheel turn?
Result:
YES: Go to next check.
NO: If at least one front wheel does not turn with MFWD applied, go to group 9020-25 MFWD pressure test. Check electrical circuit, go to Group 9015-10 MFWD circuit.
9C Engine and Torque Converter Check (With MFWD)
Action:
T6171AN-UN-09DEC88
With loader bucket level and cutting edge at the centerline of front wheels, put machine against a dirt bank or immovable object.
Engage MFWD and differential lock.
Shift transmission to first forward.
Increase engine speed to fast idle
ENGLISH Do both rear wheels and both front wheels turn?
Result:
YES: Go to next check.
NO: If all wheels stop, a torque converter or transmission control valve problem is indicated. If the front wheels stop, MFWD problem is indicated. Go to Group 9020-15, Machine Lacks Power or Moves Slow.
9D MFWD Gear and Pinion Check
Action:Drive machine at transport speed with MFWD engaged, then disengaged.
ENGLISH Does MFWD “whine” when disengaged.
NOTE: It is normal for MFWD to “whine” when engaged.
Result:
NO: Go to next check.
YES: If MFWD whines, check oil levels and fill to correct levels. Go to Diagnose MFWD Malfunctions in Group 9020-15.
10 Hydraulic System Checks
10A Hydraulic Pump Performance Check
Action:NOTE: If hydraulic oil is not at operating temperature, heat oil to 38—52° C (100—125°F).
Put loader bucket flat on ground.
| Item | Measurement | Specification |
| Hydraulic Oil | Temperature | 38—52° C (100—125°F) |
Transmission in neutral, FNR in Forward.
Run engine at slow idle.
| Item | Measurement | Specification |
| Main Hydraulic Pump Performance Check | Engine Speed | Slow idle |
Measure cycle time of loader raise to maximum height (including bucket leveling).
ENGLISH Does loader raise to maximum height in 15 seconds or less?
| Item | Measurement | Specification |
| Loader Raise to Maximum Height (Including Bucket Leveling) | Maximum Cycle Time | 15 seconds |
NOTE: Take the average cycle time for at least three cycles. This time will give a general indication of main hydraulic pump performance.
Result:
YES: Go to next check.
NO: If cycle time slow, go to 9025-15, Slow Hydraulic Functions.
10B Cylinder Cushion Check
Action:Raise wheels off ground with stabilizers.
Boom MUST be lowered from the transport position.
Run engine at high idle.
| Item | Measurement | Specification |
| Cylinder Cushion Check | Engine Speed | High idle |
Note sound and speed as cylinders near end of their stroke.
ENGLISH Does speed of cylinder rod decrease near the end of its stroke?
ENGLISH Can hydraulic oil be heard flowing through orifice as cylinder rod nears the end of its stroke?
Repeat check using backhoe boom raise function.
NOTE: Crowd cylinder does not have cylinder cushion.
Result:
YES: Go to next check.
NO: Remove and repair cylinder cushion. Go to repair manual.
10C Stabilizer Cylinder and Valve Check
Action:Operate machine at approximately 1500 rpm.
| Item | Measurement | Specification |
| Stabilizer Cylinder and Valve Check | Approximate Engine Speed | 1500 rpm |
Position loader bucket above ground.
Lower each stabilizer cylinder and raise rear of machine off ground.
ENGLISH Do cylinders extend smoothly and hold machine up?
Retract each stabilizer cylinder.
ENGLISH Do cylinders retract smoothly and remain up?
Result:
YES: Go to next check.
NO: Cylinders drift up or down. Inspect lock outs. Go to repair manual. Cylinders drift down rapidly. Go to Group 9025-25, Cylinder Leakage Test.
10D Backhoe and Loader Function Drift Check
Action:
T7374CI-UN-04OCT90
NOTE: Feel backhoe cylinders. Cylinder must be warm to touch (38—52°C [100—125°F]). If cylinders are not warm, heat oil to specifications.
With backhoe fully extended, put backhoe bucket at a 45° angle to ground.
| Item | Measurement | Specification |
| Hydraulic Oil | Temperature | 38—52°C (100—125°F) (Cylinders warm to touch) |
Position loader bucket same distance off ground as backhoe bucket.
Run engine at slow idle and observe bucket cutting edge.
| Item | Measurement | Specification |
| Backhoe and Loader Function Drift Check | Engine Speed | Slow idle |
ENGLISH Do cutting edges touch ground within one minute?
| Item | Measurement | Specification |
| Backhoe and Loader Function | Maximum Drift | 50 mm (2.0 in.) in one minute |
Result:
NO: Go to next check.
YES: Verify which function is drifting. Go to Group 9025-25, Drift Test.
10E Hydraulic Control Valve Lift Check Test
Action:NOTE: Husco valves have one lift check for both work ports, and therefore only need to be checked in one direction.
Raise loader bucket 1 m (3.0 ft.) off the ground with the bucket level.
Position backhoe at maximum reach with bucket in dump position, 1 m (3.0 ft.) off the ground.
Stop the engine.
Activate each function one at a time.
- Loader boom raise
- Loader bucket rollback
- Backhoe boom up
- Dipperstick extend
- Backhoe bucket dump
ENGLISH Do functions move when the control lever is activated?
Result:
NO: Go to next check.
YES: Inspect control valve lift check. Go to repair manual. Do cylinder leakage test, go to group 9025-25.
10F Loader Boom Float Check
Action:Put loader bucket at maximum height position with bucket dumped.
Run engine at approximately 1500 rpm.
| Item | Measurement | Specification |
| Loader Boom Float Check | Approximate Engine Speed | 1500 rpm |
Move the loader control lever forward into boom float detent position, and at the same time into bucket rollback detent position. Remove hand from control lever.
ENGLISH Does loader control lever remain in the boom float detent position?
Result:
YES: Go to next check.
NO: If it jumps out of detent, check detent spring and detent balls. Go to repair manual.
10G Loader Return-to-Dig Check
Action:
T6171AT-UN-09DEC88
T7374CH-UN-04OCT90
Put loader bucket at maximum height position with bucket dumped.
Run engine at approximately 2000 rpm.
| Item | Measurement | Specification |
| Loader Return-to-Dig Check | Approximate Engine Speed | 2000 rpm |
Move the loader control lever forward into boom float detent position, and at the same time into bucket rollback detent position. Remove hand from control lever.
ENGLISH Does the loader control lever disengage from the bucket rollback detent when the bucket is level.
ENGLISH When the bucket is at ground level, bucket must be level and the bucket indicator pointer must be aligned with mark on the boom pivot.
NOTE: When return-to-dig is used with loader boom in full up position, the bucket leveling linkage will move the bucket control valve out of return-to-dig position before bucket is actually level.
Result:
YES: Go to next check.
NO: Adjust switch until it is activated in cam. Go to Group 9025-20, Loader Bucket Self-Leveling Indicator Linkage and Return-to-Dig Switch Adjustment.
10H Bucket Leveling Linkage Check
Action:
T7374CJ-UN-05OCT90
NOTE: The loader bucket leveling feature functions during the boom raise cycle only. When bucket is lowered, the operator can manually level the bucket or use the return-to-dig.
Put loader bucket in the rollback position with the boom near ground level.
Raise the loader and at the same time hold the control lever in the bucket rollback position.
Observe bucket and loader control lever as the loader raises.
ENGLISH Does loader control lever move into the bucket dump position and the bucket dump function slowly activate? When the loader control lever moves to activate the bucket dump function, does the bucket position remain stationary the remainder of the loader boom raise cycle?
Result:
YES: Go to next check.
NO: Adjust switch until it is activated in cam. Go to Group 9025-20, Loader Bucket Self-Leveling Indicator Linkage and Return-to-Dig Switch Adjustment.
11 Check Operation Of Accessories (Engine Stopped)
11A Front Light Switch Check
Action:Turn key switch to ON position.
Push front light rocker switch to middle position.
ENGLISH Are two front lights, two red tail lights and gauge lights ON?
Push front light rocker switch in completely.
ENGLISH Are four front lights (if equipped), two red tail lights and gauge lights ON?
Result:
YES: Go to next check.
NO: Check fuse and bulbs. Check wiring. Go to Group 9015-10, Front Work and Drive Light Circuit.
11B Rear Light Switch Check
Action:Turn key switch to ON position.
Push side console rear light rocker switch in.
ENGLISH Are rear lights ON?
Result:
YES: Go to next check.
NO: Check fuse and bulbs. Check wiring. Go to Group 9015-10, Front Work and Drive Light Circuit.
11C Turn Signal Check
Action:Turn key switch to ON position.
Push right side of turn signal rocker switch down.
ENGLISH Are right front and rear amber lights flashing? Does right indicator light on top of steering column flash?
Push left side of turn signal rocker switch down.
ENGLISH Are left front and rear amber lights flashing? Does left indicator light on top of steering column flash?
Result:
YES: Go to next check.
NO: Check fuses and wiring. Go to Group 9015-10, Turn Signal, Flasher and Brake Light Circuit.
11D Brake Light Switch Check
Action:Key switch in the ON position.
Depress and hold left brake pedal, then right brake pedal.
ENGLISH Rear brake light must come ON when either pedal is depressed with key switch in ON position.
Result:
YES: Go to next check.
NO: Check fuse and bulbs. Check wiring. Go to Group 9015-10, Turn Signal, Flasher and Brake Light Circuit.
11E Warning Light Check
Action:Key switch ON.
Push bottom of warning light rocker switch in.
ENGLISH Are both front and rear amber lights ON? Are both turn signal indicators and light in warning light rocker switch flashing?
Result:
YES: Go to next check.
NO: Check fuses and wiring. Go to Group 9015-10, Turn Signal, Flasher and Brake Light Circuit.
11F Horn Check
Action:Turn key switch to ON position.
Push horn button
ENGLISH Did horn sound?
Result:
YES: Go to next check.
NO: Check fuses and wiring. Go to Group 9015-10, Horn Circuit.
12 Cab Component Checks
12A Seat Linkage Check
Action:
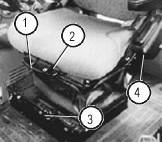
T103194-UN-20AUG96
Lift lever (1).
Move seat forward and rearward and release lever.
ENGLISH Does lever move freely and lock seat in desired position?
Result:
YES: Go to next check.
NO: Repair linkage. Go to repair manual.
12B Seat Height Adjustment Check
Action:
T103194-UN-20AUG96
Turn knob (3) to raise or lower seat to desired position.
ENGLISH Does seat move up or down and remain in desired position?
Result:
YES: Go to next check.
12C Seat Swivel Linkage Check
Action:
T103194-UN-20AUG96
Lift lever (2) up.
Move seat from loader to backhoe position and engage latch.
ENGLISH Does seat latch move freely and hold seat in desired position?
ENGLISH Does lever move freely and hold seat in loader and backhoe positions?
Result:
YES: Go to next check.
NO: Lubricate or repair linkage. Go to repair manual.
12D Seat Back Linkage Check
Action:
T103194-UN-20AUG96
Lift lever (4) up.
Position seat back as desired and engage latch.
ENGLISH Does lever move freely and hold seat in desired positions?
Result:
YES: Go to next check.
NO: Lubricate or repair linkage. Go to repair manual.
12E Left Cab Door Latch and Opener Check
Action:Unlatch door.
Observe door as it opens.
Pull door closed and latch it.
ENGLISH Does cab door latch work freely?
ENGLISH Will door cylinder push door open?
ENGLISH Does cab door contact door stop bumper before door cylinder bottoms?
Result:
YES: Go to next check.
NO: Adjust cab door. Go to repair manual.
12F Right Door Latch and Opener Check (If Equipped)
Action:Unlatch door and pull door open.
Close and latch door.
ENGLISH Does cab door latch work freely?
Result:
YES: Go to next check.
NO: Adjust door. Go repair manual.
12G Rear Windows Latch and Opener Checks
Action:Squeeze latches on both sides of upper rear window. Lower window to rubber bumpers.
Observe window as it opens.
Push window up and into window catches and note fit.
Squeeze latches on both sides of middle rear window. Raise window to catches.
ENGLISH Do window latched
ENGLISH Do window catches hold and not bow the windows in the up and down position?
Result:
YES: Go to next check.
NO: Check for obstructions. Go to repair manual.
12H Side Window Checks
Action:
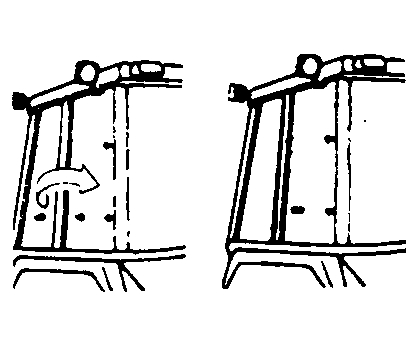
T6171DF-UN-09DEC88
Open front and rear side windows.
Fasten rear window against front window.
Fasten front window against rear window
Fasten windows with latches
ENGLISH Do hinges move freely? Are locking latches equally loaded when closed?
Result:
YES: Go to next check.
NO: Adjust windows. Go to repair manual.
12I Blower Motor Check
Action:
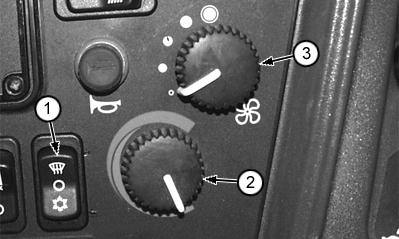
T134376B-UN-07OCT00
Engine OFF key switch ON.
Turn blower switch (3) to detent positions.
ENGLISH Does blower fan have four speeds?
Does air exit from ducts?
Result:
YES: Go to next check.
NO: Check wiring harness. See Group 9015-10, Blower Circuit.
12J Heater
Action:
T134376B-UN-07OCT00
Start engine and run at fast idle.
| Item | Measurement | Specification |
| Heater Check | Engine Speed | Fast idle |
Wait two minutes.
Turn heater temperature switch (1) ON. Turn temperature switch (2) to maximum heat. Turn blower switch (3) to high speed.
ENGLISH Is air from ducts warm?
Result:
YES: Go to next check.
NO: See to Group 9015-10, Blower Circuit.
12K Air Conditioner (If Equipped)
Action:
T134376B-UN-07OCT00
Start engine and run at fast idle.
| Item | Measurement | Specification |
| Air Conditioner Check | Engine Speed | Fast idle |
Turn air conditioner switch (1) to ON position turn knob (2) to a high cold setting.
Turn blower switch (3) to high speed.
Wait for any warm air in duct system to be exhausted.
ENGLISH Is air from ducts cool?
Result:
YES: Go to next check.
NO: Go to Air Conditioning, Group 9031-10. See Charging the system in Group 9031-20.
12L Rear Windshield Wiper Check
Action:Turn key to ON position.
Push rear wiper rocker switch to ON position.
Push rear wiper rocker switch all the way in.
Push rear wiper switch to OFF position.
ENGLISH Rear wiper must operate.
ENGLISH Wipers must return to park position.
Result:
YES: Go to next check.
NO: Check fuse. Check rear wiper. Go to Group 9015-10, Wiper/Washer Circuit.
12M Front Windshield Wiper Check
Action:Turn key switch to ON position.
Push front wiper rocker switch to first detent, middle position.
Push front wiper switch all the way in.
Push front wiper switch to OFF position.
ENGLISH Does wiper operate and have two speeds?
ENGLISH Do wipers return to the park position?
Result:
YES: Go to next check.
NO: Check fuse. Check front wiper. Go to Group 9015-10, Wiper/Washer Circuit.
12N Front Windshield Washer Check
Action:Turn key switch to ON position.
Push windshield washer rocker switch in.
ENGLISH Fluid must spray on front window. Rocker switch must return to OFF position.
Result:
YES: Go to next check.
NO: Check fluid level, and fluid lines for blockage. Check wiring. Go to Group 9015-10, Wiper/Washer Circuit.
12O Cab Dome Light Check
Action:Turn key switch to ON position.
Push dome light switch to ON position.
ENGLISH Does lights come ON?
Result:
YES: Go to next check.
NO: Check fuse and bulbs. Check wiring. Go to Group 9015-10, Dome Light Circuit.
13 Miscellaneous Checks
13A Vandal Protection Check
Action:Lock cab door (s) using ignition key.
ENGLISH Does lock operate freely and key not stick in lock?
Result:
YES: Go to next check.
NO: Lubricate or repair lock. Go to repair manual.
13B Check Periodic Maintenance Decal
Action:Check periodic maintenance decals on inside of access door to the tool box and on the left side of machine cowl.
ENGLISH Are periodic maintenance decals legible?
Result:
YES: Go to next check.
NO: Replace decal. Go to John Deere Dealer for part.
13C Backhoe Transport Pin Check
Action:Raise boom into transport position.
Remove swing lock pin from holder in cab and install through top and bottom holes of swing frame and through main frame.
ENGLISH Does swing lock pin install freely?
Result:
YES: Operational Checkout completed.
NO: Repair or replace swing lock pin. Check pin bore for burrs or obstruction.
|
TX,9005,YY2037-19-19960808 |