Operational Checkout
|
Use this procedure to check all systems and functions on the machine. It is designed so you can make a quick check of the operation of the machine while doing a walk around inspection and performing specific checks from the operator's seat. Should you experience a problem with your machine, you will find helpful diagnostic information in this checkout that will pinpoint the cause. This information may allow you to perform a simple adjustment which will reduce the downtime of your machine. Use the table of contents to help find adjustment procedures. The information you provide after completing the operational checkout will allow you or your authorized dealer to pinpoint the specific test or repair work needed to restore the machine to design specifications. A location will be required which is level and has adequate space to complete the checks. No tools or equipment are needed to perform the checkout. |
Complete the necessary visual checks (oil levels, oil condition, external leaks, loose hardware, linkage, wiring, etc.) prior to doing the checkout. The machine must be at operating temperature for many of the checks. Before starting this operational checkout, check diagnostic Service codes in monitor. These service codes must be corrected or cleared before starting this checkout. Start at the top of the left column and read completely down column before performing check, follow this sequence from left to right. In the far right column, if no problem is found (YES), you will be instructed to go to next check. If a problem is indicated (NO) or (NOT OK), you will be referred to either a section in this manual or to your authorized dealer. |
CED,OUOE035,4 -19-16JUN00-1/1 |
1 Checking and Clearing Diagnostic Service Codes From Monitor
- - -1/1 |
Check Service Codes |
|
YES: Go to first step of operational checkout. NO: Go next check. |
||||||
- - -1/1 |
Clear Service Codes |
|
YES: Start operational checkout. NO: See your authorized dealer. |
||||||

- - -1/1 |
2 Monitor Indicator and Gauge Checks-Engine Off
- - -1/1 |
Battery Check |
|
YES: Go to next check. NO: Go to Monitor Display Unit-Menu Structure, Operator Station in Chapter 10. Check voltage on each battery before recharging. If one battery will not hold a charge, replace both batteries. |
|||
- - -1/1 |
Monitor Bulb and Gauge Check |
|
YES: Go to next check NO: Go to Monitor Display Unit-Menu Structure, Operator Station, Chapter 10. |
||||||||||||

- - -1/1 |
Monitor Indicator Circuit and Key Switch Check |
|
||||||
- - -1/1 |
Turn Signals and Hazard Warning Indicator ChecksKey switch ON. Press hazard warning switch (C) to ON position. Move turn signal lever left then right. LOOK: Do left, right, and then both turn signal indicators on monitor flash? Do front and rear lights (A and B) flash as indicated by monitor lights? Do hazard lights remain on and turn signal lights flash? Go to next check Check rocker switch restriction switch and radio 7.5A fuse and left and right flasher 7.5A fuse. See your authorized dealer. |
- - -1/1 |
3 Transmission Controls, Neutral Start and Reverse Warning Alarm Checks
- - -1/1 |
Transmission Control Lever and Neutral Lock Latch ChecksEngine OFF, key switch ON. Push automatic transmission switch to OFF position. Move transmission control lever to forward (F), neutral and reverse (R) positions. LOOK: Does lever move into forward, neutral and reverse positions easily? Does lever stay in detented positions? Put neutral lock in LOCKED position. Apply slight effort to move lever into forward (F) and reverse (R). LOOK: Does neutral lock stay engaged and lever stay in neutral? Twist lever to shift into each gear 1st, 2nd, 3rd and 4th. LOOK: Does gear number align with pointer in each detented position? Does twist handle remain in detented positions? Does Basic Display window indicate correct gear and "N" position? (1 N, 2 N, 3 N and 4 N) Go to next check See your authorized dealer. Repair or replace shift lever assembly. |
- - -1/1 |
Neutral Start and Reverse Warning Alarm Circuit ChecksEngine OFF, key switch ON. Move neutral lock to UNLOCKED position. Twist transmission control lever until 1st gear "N" is displayed. Move transmission control lever to 1st gear forward (1F), turn key switch to START.
NOTE: Gear display will not display "F" for forward or "R" for reverse until engine is started and park brake released. Move transmission control lever to 1st gear reverse (1R), turn key switch to START.
With transmission control lever in neutral (1N), turn key switch to START.
Go to next check Check neutral start fuse and and transmission controler switch fuse. See your authorized dealer. |
- - -1/1 |
Backup Alarm CheckEngine OFF, key switch ON. Move transmission control lever to reverse (R).
Go to next check. Check transmission controller switched 5A fuse, park brake and backup alarm 5A fuse. See your authorized dealer. |
- - -1/1 |
4 Monitor Indicator and Gauge Checks-Engine Running
- - -1/1 |
Engine Speed CheckStart engine and warm to normal operating temperature. LOOK: Does engine speed read 875-925? Press accelerator pedal down until it hits the stop bolt. LOOK: Does engine accelerate smoothy to fast idle speed of 2325-2375 rpm? FEEL: Does accelerator pedal contact stop bolt? Go to next check See your authorized dealer. |
- - -1/1 |
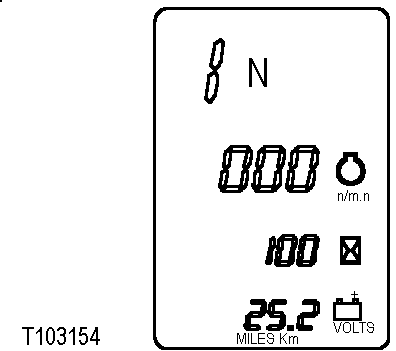
Monitor Basic Display, Alternator Output Check and Seat Belt Indicator CheckStop engine. 1. Turn key switch to ON and wait 10 seconds. LOOK: Does hour meter reading appear? LOOK: Is battery volts reading 25.2-27.6? LOOK: Does engine speed read 0? 2. Start engine and run at slow idle. Observe monitor display. LOOK: Does seat belt indicator go OFF 5 seconds after engine starts? LOOK: Is battery voltage higher after engine starts? NOTE: It is normal for engine oil pressure and brake pressure indicators to stay on 4 to 6 seconds after engine starts. LOOK: Do all indicator lights go OFF except for park brake? Park brake indicator light will go OFF when park brake is turned OFF. NOTE: If any indicators are ON check to see if machine is equipped with that option before doing diagnostics. If machine is not equipped with option it will have to be turned OFF in the Service Menu. See your authorized dealer. 3. Increase engine speed to fast idle and observe monitor display. LOOK: Is engine speed 2325-2375? LOOK: Is hour meter symbol flashing and hour meter reading displayed? Go to next check Check monitor and transmission controller unswitched 5A fuse and monitor switched power 7.5A fuse. See your authorized dealer. If engine speed is not correct, see your authorized dealer. If charging voltage is not normal, see your authorized dealer. |
- - -1/1 |
Park Brake Indicator CheckStart engine. Release park brake by pushing park brake switch (A) to OFF position and releasing back to the neutral position. LOOK: Does park brake indicator go off when brake is released? Will machine move if put into gear? Go to next check. If Park Brake will not release, go to Park Brake Switch, Driving the Machine in Chapter 30. |
- - -1/1 |
5 Brake System, Clutch Cut-Off, and Differential Lock Checks
- - -1/1 |
Park Brake Transmission Lockout Check
Engine running. Push park brake switch (A) to ON.
Place transmission in 3rd forward. Slowly increase engine speed to fast idle. LOOK: Does machine remain stationary? LOOK: Does transmission remain in neutral (N)? LOOK/LISTEN: Does STOP warning light flash and alarm sound, indicating park brake is ON? Go to next check See your authorized dealer. |
 CAUTION:
Machine may move during this check. Perform check in an open area.
CAUTION:
Machine may move during this check. Perform check in an open area.
- - -1/1 |
Park Brake Capacity Check
Engine running. Fasten seat belt. Release park brake and put transmission in 1st gear forward. Drive machine at 3 MPH and push park brake switch (A) to ON. LOOK/FEEL: Does machine come to a stop within 1 meter (3 feet) when park brake is engaged at 3 MPH? Does transmission shift to neutral? Go to next check. If park brake will not release, see Park Brake Switch, Driving the Machine in Chapter 30. If machine does not stop within specified distance, see your authorized dealer. |
- - -1/1 |
Service Brake Capacity CheckEngine running. Push clutch cut-off switch (C) to OFF position. Fully apply either (A or B) service brake pedal, push park brake switch to OFF and put transmission in 2nd forward. Increase engine speed to fast idle. LOOK: Does machine remain stationary or move very slowly? Repeat check three times to ensure accurate results. Go to next check Inspect for leaks from brake system or overfilling of standard axle. See your authorized dealer. If brakes will not hold machine stationary, inspect brake linings on brake disks. See External Service Brake Inspection, Maintenance, Chapter 90. |
- - -1/1 |
Service Brake Pressure Switch and Brake Accumulator PrechargeNOTE: Axles and hydraulic oil must be at operating temperature. Engine running, lower bucket to ground and put boom lever in float position. NOTE: The boom lower circuit is connected to brake valve inlet to provide oil for braking if engine quits and accumulator has discharged. Return oil is available as long as bucket is off the ground to apply the brakes. Lower bucket to the ground. Stop engine.
Hold pilot enable/boom down switch to BOOM DOWN and cycle control lever in all directions 20 times to bleed charge pressure from PRV/brake accumulator. Key switch ON.
|
- - -1/1 |
|
LOOK: Are at least 12 brake pedal applications needed before brake pressure indicator comes ON? LOOK: Are at least 30 brake pedal applications needed before brake lights fail to come ON? Go to next check. If fewer than 12 brake pedal applications are required to turn brake oil pressure indicator ON, accumulator charge pressure may be low. See your authorized dealer. If brake oil pressure indicator does not come ON, see your authorized dealer. |
-19- -1/1 |
Service Brake Linkage CheckEngine OFF. Move each pedal with hand to check "free travel". FEEL/LISTEN: Does each pedal have about 6 mm (1/4in.) free travel? Go to next check Inspect for debris under brake pedal. Inspect brake pedal linkage for damage. If linkage is OK, see your authorized dealer. |
- - -1/1 |
Service and Park Brake System Drag ChecksEngine running. Position machine on gradual slope with engine running in neutral. Lower bucket approximately 300 mm (12 in.) from ground. Push park brake switch to OFF position and remove foot from service brake pedal. LOOK: Does machine move or coast? NOTE: If machine does not move, check brake pedals to be sure they fully release with feet removed from them. Drive machine at high speed for about 5 minutes. Brake drag is indicated if brake areas in differential case are too hot to touch. FEEL: Are brake areas of both differentials cool? NOTE: If brake area of either differential is hot, service brake drag is indicated. FEEL: Is park brake housing cool? NOTE: If park brake is hot, park brake drag is indicated. Go to next check Inspect service brake disks. See External Service Brake Inspection, Maintenance, Chapter 90. See your authorized dealer. |
- - -1/1 |
Differential Lock CheckPark machine on a hard surface. Release brakes. Push differential lock switch and steer machine left and right. Release differential lock switch and steer machine left and right. LOOK: Do front wheels slide with differential lock ON? NOTE: It is normal to get a "clunk" sound when you release switch. LOOK: Do front wheels rotate in opposite directions with differential lock switch released? Go to next check See your authorized dealer. |
- - -1/1 |
Clutch Cut-Off CheckPlace clutch cut-off switch (C) in ON position. Release park brake. Drive machine at half speed in 1st forward. Push brake pedal (A or B). FEEL: Does transmission disengage when either brake pedal is pushed? NOTE: Clutch cut-off switch can be adjusted to operator preference to match your loading needs by selecting one of three operating functions in the monitor. Transmission does not totally disengage, some effort to move by the machine can be felt. See Monitor Display Unit, Operator Station in Chapter 10. Go to next check Check position of clutch cut-off switch. Switch must be ON. Check rocker, restriction, and radio 7.5A fuse. See Replacing Fuses, Maintenance, Chapter 90. See your authorized dealer. |
- - -1/1 |
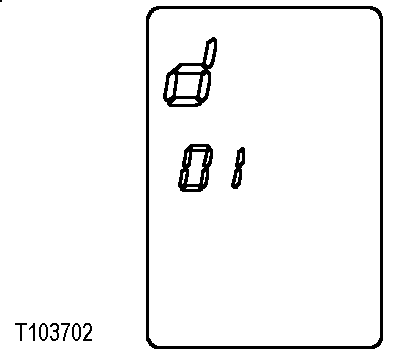
Clutch Cut-Off Sensor CheckKey switch ON. Press MENU on monitor until Diagnostic Menu (d) is displayed. Press SELECT to get (d 01) displayed, then press NEXT until (d 05) is displayed. Press SELECT to get (d 052) clutch cut-off sensor voltage displayed. LOOK: Without pushing brake pedals, is voltage 0.8-1.0 volt? Go to next check. See your authorized dealer. |
- - -1/1 |
Clutch Cut-Off Release Voltage Check
Press MENU on monitor until Accessory Menu (A) is displayed. Press SELECT to get (A 01) displayed, then press SELECT until (A11) (Level Ground) is displayed. Press SELECT again to enable Level Ground mode. Press MENU on monitor until Diagnostic Menu (d) is displayed. Press SELECT to get (d 01) displayed, then press NEXT until (d 05) is displayed. Press SELECT to get (d 052) clutch cut-off sensor voltage displayed. Operate machine in an open area away from other people or machinery. Operate machine in 1st gear about 1200 rpm, press brake pedal slowly while watching clutch cut-off voltage on the monitor. Record voltage when transmission disengages. Reset monitor to (Small Slope). Operate machine in 1st gear about 1200 rpm, press brake pedal slowly while watching clutch cut-off voltage on the monitor. Record voltage when transmission disengages. Reset monitor to (Steep Slope). Operate machine in 1st gear about 1200 rpm, press brake pedal slowly while watching Clutch Cut-Off Voltage on the monitor. Record voltage when transmission disengages. Clutch Cut-Off Voltage - Specification
Does transmission disengage when clutch cut-off voltage is within specification? See your authorized dealer. See your authorized dealer. |
- - -1/1 |
6 Driving Checks
- No. 1 fuel: 1975-2175 rpm
- No. 2 fuel: 2000-2200 rpm
- No. 1 fuel: 1960-2140 rpm
- No. 2 fuel: 1985-2170 rpm
NOTE: Transmission oil must be at operating temperature for these checks.
- - -1/1 |
Transmission Oil Warm-Up ProcedureEngine running Press MENU on monitor to get Diagnostic Menu (d) displayed. Press SELECT to get (d 01) displayed, then press NEXT until (d 05) is displayed. Press SELECT to get (d 051) transmission oil temperature. LOOK: Is transmission temperature in 120-150 °F (50-65 °C) range? Go to next check. Apply service brakes and release park brake. Push clutch cut-off switch to OFF position. Move transmission selector lever to 3rd speed. Increase engine speed to fast idle for 30 seconds. Move transmission control lever to neutral "N" position and run for 15 seconds. Repeat procedure until transmission temperature is in operating range. |
- - -1/1 |
Transmission Noise CheckEngine running. Run engine at approximately 1600 rpm. Drive machine with transmission in each forward and reverse speed.
LOOK/FEEL: Does engine speed remain almost constant as machine is shifted between gears? FEEL: Does transmission shift smoothly between gears and forward to reverse? Go to next check See your authorized dealer. See Transmission, Machine Will Not Shift Correctly, in Troubleshooting, Chapter 100. |
- - -1/1 |
Transmission Shift Mode CheckEngine running. Turn automatic transmission switch to OFF. Press MENU on monitor until Accessory (A) shows in Basic Display window, then press SELECT. Clutch Cut-Off will display in Message Display window. Press NEXT until A 02 is displayed. Press SELECT until Quick Shift 021 Down/Up displays, then press SELECT to enable Down/Up shift mode. Release park brake and shift to 3rd forward. Drive machine at approximately 1600 rpm and press quick shift switch once. LOOK/FEEL: Does transmission shift to and remain in 2nd gear? Press quick shift switch once more. LOOK/FEEL: Does transmission shift back to 3rd gear? NOTE: If quick shift switch is pressed twice, transmission will shift down one gear then immediately back up to where it was. Quick shift feature operates in all gears. In Basic Display window with Quick Shift 021 displayed press NEXT to get Down Only 022 to display. Press SELECT to enable Down Only shift mode. Release park brake and shift to 4th forward. Drive machine at approximately 1200 rpm and press quick shift switch once. LOOK/FEEL: Does transmission shift to and remain in 3rd gear? Press quick shift switch once more. LOOK/FEEL: Does transmission shift to and remain in 2nd gear? Press quick shift switch once more. LOOK/FEEL: Does transmission shift to and remain in 1st gear? |
- - -1/1 |
|
Press quick shift switch once more. LOOK/FEEL: Does transmission stay in 1st gear? NOTE: In DOWN ONLY mode pressing quick shift switch will not change gears once 1st gear is reached, unless a direction or gear change is made. Go to next check. Check rocker, restriction, and radio switches 7.5A fuse. See your authorized dealer. See your authorized dealer. |
-19- -1/1 |
Forward, Reverse Clutch Pack Drag CheckIMPORTANT: Transmission must be warmed up for this check. See Transmission Oil Warm-Up Procedure in this Chapter. Engine running. 1.
Press MENU on monitor to get Diagnostic Mode (d) displayed on Basic Display window.
Release park brake and service brakes. 5. Run engine at slow idle, do NOT put foot on accelerator. Observe Torque (converter) Output Speed and note rpm within 50m (50 yd) of machine travel. 6. Shift to 1st reverse and observe Torque (converter) Output Speed and highest rpm within 50 m (50 yd) of machine travel. 7. Repeat procedure in 2nd gear forward and reverse. LOOK/FEEL: Is Torque (converter) Output Speed within 400 rpm in each forward and reverse gear? NOTE: If output speed differential is greater than 400 rpm, drive the machine in the opposite direction across the test course to insure the surface is level. Some difference in rpm is normal. Machine has failed test only if rpm differential is excessive. Go to next check If Torque (converter) Output speed is excessively higher in one direction, opposite direction clutch pack drag is indicated. See your authorized dealer. |
- - -1/1 |
1st, 2nd, and 3rd Speed Clutch Pack Drag CheckEngine running. Stop machine on a level, hard surface. Push automatic transmission switch (A) to OFF position. Run engine at slow idle. Release park and service brakes. Put transmission in 1st forward, 2nd forward, then 3rd forward. Note machine movement. LOOK: Does machine roll ahead in each gear? NOTE: If machine rolls ahead in one gear but not the other two, drag is indicated in that clutch pack. Go to next check See your authorized dealer. |
- - -1/1 |
Transmission Shift Modulation CheckEngine running. Push clutch cut-off Switch to OFF position. Push automatic transmission switch (A) OFF.
Shift transmission to 1st forward, increase engine speed to fast idle, shift from forward to reverse and reverse to forward several times, allowing machine to reach full speed in forward and reverse before changing directions. Repeat check in 2nd gear. LOOK: Does machine slow down and change direction smoothly? Drive machine in 2nd gear at fast idle, apply service brakes to slow engine down to 1800 rpm, then while still holding service brakes, shift to 1st gear. LOOK/FEEL: Does transmission shift smoothly without jerking? Go to next check. See Transmission Shifts Too Slow or Transmission Shifts Too Fast, Troubleshooting, in Chapter 100. |
- - -1/1 |
Torque Converter CheckEngine running and park brake released. Turn clutch cut-off switch to OFF. Transmission oil must be warm before performing this check. See Transmission Oil Warm-up Procedure in this chapter. Warm tramsnission oil to at least 83 °C (180 °F). Apply service brakes so machine does not move. Shift transmission to 3rd forward. Push accelerator pedal until it touches stop bolt. Record engine speed in basic display window. LOOK: Is torque converter stall speed within following range: Standard Cooling System High Ambient Cooling System Move transmission control lever to neutral "N" position and run for 15 seconds to cool oil. Go to next check. If speed is outside range, see your authorized dealer. See your authorized dealer. |
- - -1/1 |
7 Hydraulic System Checks
- - -1/1 |
Pilot Controller CheckTurn key switch to OFF position. Move control lever to all positions and then release. LOOK: Does lever return to neutral when released from all positions? Go to next check. See your authorized dealer. |
- - -1/1 |
Pilot Controller Lock CheckNOTE: Perform check in an open area, boom will raise during check. Start engine. Push pilot enable/boom down switch to LOCKED position. Move boom control lever to boom raise and hold. Move pilot enable/boom down switch to UNLOCK and observe boom. LOOK/FEEL: Does boom raise when switch is UNLOCKED? Move pilot enable/boom down switch to LOCKED position and observe boom. LOOK/FEEL: Does boom stop when switch is LOCKED? Go to next check. See your authorized dealer. |
- - -1/1 |
Pilot Enable/Boom Down Solenoid (Key ON) CheckEngine running. Raise boom to full height and roll bucket back half way. Stop engine. Turn key to ON position. Move pilot enable/boom down switch to LOWER position and hold it. Move control lever to bucket dump position. Move control lever to boom lower position. LOOK: Does bucket dump and boom lower? Go to next check Check pilot enable 7.5A fuse. See your authorized dealer. |
- - -1/1 |
Pilot Enable/Boom Down Solenoid (Key OFF) CheckRaise boom to full height and roll bucket back half way. Stop engine. With key switch OFF, move pilot enable switch to lower position and hold it. Move control lever to bucket dump position. Move control lever to boom lower position. LOOK: Does bucket dump and boom lower? Go to next check Check unswitched, boom down, radio and dome light 5A fuse. See your authorized dealer. |
- - -1/1 |
Pilot Control Valve Boom Float CheckRun engine at slow idle. Push ride control switch OFF. Push return-to-carry switch OFF. With the bucket partially dumped, lower boom to raise front of machine. Push control lever to the float detent position and release lever. LOOK: Does front of machine lower to the ground and valve remain in float position when lever is released? Go to next check. See your authorized dealer. |
- - -1/1 |
Return-to-Dig CheckRun engine at slow idle. Position bucket fully dumped just above ground level. Move control lever to return-to-dig detent position and release. LOOK: Does bucket rollback to the level position and control lever return to neutral? Go to next check Check BHKO and RTD 5A fuse, pilot enable/boom down switch and pilot enable 7.5A fuse. See your authorized dealer. |
- - -1/1 |
Return-to-Carry CheckRun engine at slow idle. With bucket flat on the ground, raise boom to full height. Move return-to-carry switch (A) to ON position. Move control lever to "float down" detent position and release. LOOK: Does boom lower and stop at the set carry position? NOTE: If Return-to-Carry is adjusted too far down, bucket may contact ground before control lever comes out of float. See Return-to-Carry Switch, Chapter 35. NOTE: Control lever will not stay in "boom float" position when boom is below return-to-carry kickout height. Go to next check Check BHKO and RTD 7.5A fuse. See your authorized dealer. |
- - -1/1 |
Boom Height Kickout CheckRun engine at slow idle. Position bucket flat on ground. Move control lever to boom raise detent position and release. LOOK: Does boom raise to the set height and stop? Does control lever return to neutral? Go to next check Check BHKO and RTD 7.5A fuse. See your authorized dealer. See your authorized dealer. |
- - -1/1 |
Pin Disconnect System Check (if equipped)Run engine at slow idle. Position bucket flat on the ground. Push and hold pin disconnect switch (A). LOOK: Does pin disconnect cylinder retract both pins, while switch is pressed? Go to next check. Hold a screwdriver blade against the end of the pin disconnect solenoid valve and check for magnetism with the switch pushed. Check differential lock and pin disconnect 5A fuse. See your authorized dealer. |
- - -1/1 |
Ride Control CheckPush ride control switch to OFF position.
Raise boom to maximum height and hold control lever over relief for 2 seconds. Lower boom and bucket to eye level. Observe loader boom as ride control switch is switched to ON. LOOK/FEEL: Does boom jump upward 304 mm (12 in.) or more? Start engine. Push ride control switch to AUTO position. Raise boom to maximum height and hold control lever over relief for 2 seconds. Lower boom and bucket to eye level and slowly accelerate to 5 mph while watching speedometer and bucket. LOOK/FEEL: Does ride control indicator come on at approximately 3 mph and bucket raise slightly? NOTE: Ride control switch must be turned on every time key is turned on to activate ride control. Go to next check. Check ride control 7.5A fuse. See your authorized dealer. |
- - -1/1 |
Hydraulic Oil Warm-Up ProcedureIMPORTANT: Hydraulic oil temperature must be in 120-150 °F (50-65 °C) range to get accurate test results. Engine running Press MENU to get Diagnostic Mode (d) displayed. Press SELECT to get (d 01) displayed, then press NEXT until d 06 is displayed. Press SELECT get d 061 displayed to monitor hydraulic system oil temperature. LOOK: Is hydraulic temperature in 120-150 °F (50-65 °C) range? Go to next check. Release park brake. Run engine at fast idle. Hold bucket rollback lever and raise and lower the boom. Periodically cycle all hydraulic functions to distribute warm oil. Heat oil until hydraulic temperature has reached operating range. |
- - -1/1 |
Hydraulic Oil Cool Down ProcedureIMPORTANT: Hydraulic checks oil temperature must be below 220 °F (104 °C) to get accurate test results. Engine running Press MENU on monitor until Diagnostic Mode (d) is displayed. Press SELECT to get (d 01) displayed, then press NEXT until (d 06) is displayed. Press SELECT get (d 061) displayed to activate hydraulic system oil temperature. LOOK: Is hydraulic oil temperature below 220 °F (104 °C)? Go to next check. Operate engine at fast idle. Cycle loader boom and bucket cylinders full stoke until hydraulic oil temperature is below 220 °F (104 °C). |
- - -1/1 |
Hydraulic Pump Performance CheckPress MENU on monitor until Accessory Mode (A) is displayed then press SELECT. Press NEXT until (a 05) STOP WATCH is displayed then press SELECT. Press SELECT to start the stop watch and SELECT again to stop it. Press NEXT to reset the stop watch. Run engine at slow idle. Steer machine to either stop and hold steering wheel while boom is raising. With bucket flat on ground, actuate boom raise and press SELECT on monitor at the same time to measure boom raise time to full height. Press SELECT when boom stops to record time. LOOK: Does boom raise to full height in less than 20 seconds? NOTE: Repeat boom raise three times to get average time. Go to next check Go to Steering System Leakage Check in this group. See your authorized dealer. |
- - -1/1 |
Control Valve Lift CheckRun machine at slow idle. Turn ride control switch to OFF if equipped. With bucket partially dumped, lower boom to raise front of machine. Stop engine and turn key switch ON. Press pilot enable/boom down switch to Boom Down Position and hold. Slowly move boom control lever to boom lower position. Slowly move bucket control lever to bucket dump position. LOOK: Does boom remain stationary and not allow front wheels to drop to the ground. Start engine. Slowly move boom control lever to boom lower position. Slowly move bucket control lever to bucket dump position. LOOK: Does front of machine raise without dropping first? Go to next check. See your authorized dealer. |
- - -1/1 |
Bucket Rollback Circuit Relief Valve CheckPosition bucket at a 45° angle against an immovable object. Engage transmission in third speed forward. Press accelerator to stop bolt and hold for 15 seconds. LOOK: Does bucket angle remain the same? Go to next check. See your authorized dealer. |
- - -1/1 |
Bucket Dump Circuit Relief Valve Check
With bucket dumped at 45° raise front of machine off the ground. Drive the machine backwards with the front wheels off the ground while observing bucket angle. LOOK: Does bucket rollback less than 5-8 degrees? Go to next check. See your authorized dealer. |
- - -1/1 |
Boom Down Check Valve Leakage CheckHeat hydraulic oil to operating temperature. (See Hydraulic Oil Warm-Up Procedure in this group.) Position bucket flat on ground. Run engine at slow idle for two minutes. LOOK: Does bucket remain on the ground? Go to next check. See your authorized dealer. |
- - -1/1 |
Boom and Bucket Cylinder Drift CheckSet bucket flat on the ground and raise about 50 mm (2 in.). Stop engine. Observe bucket for 1 minute. LOOK: Does bucket remain in position? Bucket should not settle to the ground. NOTE: Use good judgement to determine if the amount of drift is objectionable for your loader application. Go to next check. See your authorized dealer. |
- - -1/1 |
Axle Disconnect CheckOperate machine in an open area away from bystanders. With bucket partially dumped, lower boom to raise front wheels off the ground. Push axle disconnect switch (A) to ON position. Watch front wheels while operating the machine in reverse. Front wheels must not rotate as machine moves backwards. LOOK: Do front wheels remain stationary while machine moves backwards? Go to next check. Check differential lock and pin disconnect 5A fuse. See your authorized dealer. |
- - -1/1 |
8 Steering System Checks
- - -1/1 |
Steering Valve CheckTransmission in neutral. Run engine at slow idle. Remove foot from brake pedal. Release park brake. Turn steering wheel until machine frames contact right and left frame stops. LOOK: Does machine steer smoothly in both directions? NOTE: It is normal for machine frames to drift away from frame stops when steering wheel is released. When steering wheel is stopped, frames must stop. FEEL: Is excessive effort required to turn steering wheel? Go to next check. Go to next check. |
- - -1/1 |
Steering System Leakage CheckHeat hydraulic oil to operating temperature. (See Hydraulic Oil Warm-Up Procedure in this group.) Run engine at fast idle. Turn steering wheel rapidly until machine frame contacts stop. Jerk steering wheel, and hold approximately 22 N (5 lb) force on steering wheel. Count steering wheel revolutions for 1 minute. Repeat test in opposite direction. LOOK: Does steering wheel rotate less than 5 rpm? NOTE: Steering wheel may rotate very little or even faster than specification. Use good judgement, excessive steering wheel rpm does not mean steering will be affected. A new valve may exceed specification and work for your application. Go to next check. See your authorized dealer. |
- - -1/1 |
Secondary Steering System CheckIMPORTANT: Do not operate secondary steering pump for more than 15 seconds with the steering in neutral or damage to the pump and motor can occur. Park machine on a hard level surface with frames straight.
Without starting engine, turn key switch to START position and release. Steer machine to right and left. LOOK: Does machine steer approximately half way to stops in both directions? Does light in monitor come ON and stay on until key is turned off? Go to next check. Check converter, secondary and start aid 7.5A fuse. See your authorized dealer. If secondary steering pump and motor operate, but machine steers slow, see your authorized dealer. |
- - -1/1 |
Secondary Steering System Primary Check Valve CheckRun engine at fast idle. Turn steering wheel rapidly until machine frame is against steering stop. Hold approximately 22 N (5 lb) force on steering wheel. Actuate a hydraulic function and hold over relief. Return control lever to neutral. FEEL: Is steering wheel "kickback" felt as hydraulic function is released? NOTE: Steering wheel "kickback" is normal on machines without secondary steering. Go to next check See your authorized dealer. |
- - -1/1 |
9 Accessory Checks
NOTE: Engine OFF with key switch ON for these checks.
- - -1/1 |
Operating Lights CheckPress drive light switch to middle position. Note light operation. LOOK: Do lights (B and I) come ON? Press drive light switch to top position Note light operation. LOOK: Do lights (A, B and I) come ON? Go to next check Check high beam/drive light fuse. See your authorized dealer. |
- - -1/1 |
Work Light CheckPush work light switch to ON position. Note light operation. LOOK: Do work lights (D and G) come on? Does work light indicator light in monitor come ON? Go to next check Check fuse. See your authorized dealer. |
- - -1/1 |
4-Way Flasher CheckPress 4-Way Flasher switch to ON position. Note light operation. LOOK: Are lights (A and I) flashing? Go to next check. Check left and right flasher 7.5A fuse, 4-way flasher light bulbs, and 4-way light switch. See your authorized dealer. |
- - -1/1 |
Brake Light CheckStart engine and run at slow idle for about 1 minute. Stop engine. Press either brake pedal (A or B) and observe brake lights (I). LOOK: Do both brake lights come on? NOTE: Brake light switch is a pressure switch in the brake valve. If brake accumulator is discharged, machine will need to be started for brake lights to come ON. Go to next check. Check brake light 7.5A fuse and check brake light bulbs. |
- - -1/1 |
Horn Circuit CheckKey switch ON. Push horn button.
Go to next check. Check horn 7.5A fuse. |
- - -1/1 |
Start Aid System CheckStart engine and run at slow idle. Push Start Aid Switch.
Go to next check Check for empty start aid can (A). Check converter, secondary steering and start aid 7.5A fuse. |
- - -1/1 |
Air Heater CheckNOTE: Air heater will not operate if battery voltage is below 20 volts. Air heater will not operate unless engine coolant temperature is below 10°C (50°F). Disconnecting the engine coolant temperature sensor harness connector will fool the CCU into thinking the coolant temperature is very low. Disconnect the sensor only during operational checkout procedures.
To display coolant temperature: Turn key switch ON. Press MENU on monitor to display Diagnostic Mode (d). Press SELECT to display d 01. Press NEXT until d 04 is displayed. Press SELECT to display d 041 (Coolant Temperature). Note coolant temperature. If temperature is above 10°C (50°F) air heater will not operate. Key switch OFF. If coolant temperature is above 10°C (50°F), disconnect harness from engine coolant temperature sensor. NOTE: If battery voltage drops below 20 volts air heater may shut off early. Key switch ON and record length or time air heater stays ON. LOOK: Is engine preheat indicator ON? |
- - -1/1 |
|
LOOK: Does air heater indicator (A) remain ON for about 10 seconds?
FEEL: Is air heater housing HOT? NOTE: If key switch is turned to START while air heater is ON, air heater will shut off. After engine starts air heater will come back ON for 30 seconds. When engine is running and air heater is ON, battery voltage indicator will come ON until batteries are recharged to about 26 volts. Reconnect harness to engine coolant temperature sensor after check is complete. Go to next check. See your authorized dealer. Check air heater fuse. See your authorized dealer. |
-19- -1/1 |
10 Cab Component and Vandal Protection Checks
- - -1/1 |
Windshield Washer and Wiper CheckTurn front wiper switch knob clockwise to first position, then to second position. LOOK: Front wiper must operate at slow speed with switch in first detent and fast speed with switch in second position. Push front wiper switch knob to operate front windshield washer. LOOK: Does washer spray water on windshield? Turn front wiper switch knob counterclockwise to STOP front wiper. LOOK: Does front wiper park at side of windshield? Turn rear wiper switch to first detent position. NOTE: Rear wiper operates in a single speed only. LOOK: Does rear wiper operate? Push rear wiper switch to operate rear window washer. LOOK: Does washer spray water on rear window? Turn wiper off. LOOK: Does rear wiper park at side of rear window? Go to next check. Check Front Wiper 10A fuse and Rear Wiper 10A Fuse. |
- - -1/1 |
Heater/Defroster Blower CheckTurn blower speed switch knob (B) to low, medium, high and purge speeds. FEEL/LISTEN: Does blower have four speeds and OFF? Go to next check. Check Blower Motor 25A fuse and Pressurizer Motor 7.5A fuse. See your authorized dealer. |
- - -1/1 |
Heater Functional CheckOpen heater shut-off valve. Start engine and run at fast idle until engine reaches operating temperature. Turn temperature control knob (A) to maximum heat position (fully clockwise). Turn blower speed knob to purge speed. FEEL: Does warm air come from ducts under the seat, operator air ducts around the monitor, and windshield defrost ducts below the windshield? Go to next check Check blower motor 25A fuse and pressurizer motor 7.5A fuse. See your authorized dealer. |
- - -1/1 |
Air Conditioner Functional CheckStart engine and run at fast idle. Push air conditioner switch (C) ON. Turn temperature control knob (A) to maximum cool setting (CCW). Turn blower speed knob (B) to purge position. Wait for any warm air in duct system to dissipate. FEEL: Does cool air come from ducts under the seat, operator air ducts around the monitor, and windshield defrost ducts below the windshield? Go to next check Check Blower Motor 25A fuse and Pressurizer Motor 7.5A fuse. See your authorized dealer. |
- - -1/1 |
Dome Light CheckPush dome light switch to on (A) position. LOOK: Does dome light come on? Push dome light switch to off (B) position. LOOK: Does dome light go off? Push dome light switch to door (C) position. Open and close cab door while observing dome light. LOOK: Does dome light go off when door is closed, and come on when door is opened? Go to next check. Check fuse and bulb. See your authorized dealer. |
- - -1/1 |
Cab Door Latch CheckUnlatch cab door using outside door latch by pushing latch button. Enter cab and close cab door. Unlatch cab door from inside by pushing inside door latch lever forward. FEEL: Does door unlatch easily using outside latch button? LOOK: Does door close tightly and compress seal all around door edge? FEEL: Does door unlatch easily using inside latch lever? Go to next check Adjust, repair or replace door latch or seal. |
- - -1/1 |
Cab Door Hold-Open Latch CheckPush door to full open position and push door into hold-open latch (B) to engage. LOOK: Does pin (A) fit into latch notch (B)? Does latch retain door? Does door contact rubber bumper (C) on cab? Go to next check Adjust rubber bumper. Adjust, repair or replace latch. |
- - -1/1 |
Cab Door Release CheckRelease handle is located on the front panel of left console. Open door full open and push door into latch to engage. Pull handle up to release door from latch. LOOK/LISTEN: Does latch release door? Go to next check See your authorized dealer. |
- - -1/1 |
Cab Door Lock CheckClose cab door. Insert ignition key into slot in outside cab door handle button and turn counter clockwise to lock door latch. Push IN door latch button to verify latch is locked. Unlock cab door latch. LOOK: Does cab door handle button remain stationary when pushed IN with latch locked? FEEL: Does lock operate freely and does key slide into lock easily? Go to next check. Lubricate or repair lock. |
- - -1/1 |
Cab Rear Side Windows Latch CheckInspect window seals. Pull forward on handle to open right side cab window. Push handle to close window. LOOK: Does latch hold window tightly closed? LOOK: Does window compress seals all around the frame without gaps between seal and frame? Pull forward on handle to open latch. LOOK: Does latch hold window open when in extended position? Go to next check See your authorized dealer. |
- - -1/1 |
Cab Right Window CheckOpen window and push back to lock in open position. Inspect window seals. LOOK: Does latch hold window open? Push window latch (C) down to release and pull window closed. LOOK: Does window close securely? Does window compress seals all around the frame without gaps between seal and frame? Go to next check See your authorized dealer. |
- - -1/1 |
Steering Column Adjustment CheckLift lever (A) and move steering wheel column to all positions. Release lever at each position. LOOK: When lever is released, does steering column lock securely in that position? Go to next check. Check and adjust lever linkage. |
- - -1/1 |
Seat and Seat Belt CheckIMPORTANT: Seat belt must be replaced every three years regardless of appearance. A date label is attached to each belt to determine its age. Adjust seat to all positions. Lock and unlock seat belt. LOOK/FEEL: Does seat adjust freely and remain locked in desired position? Does seat belt lock and hold securely? Inspect seat shell and suspension for cracks, damage or looseness. Inspect seat belt date label to determine how long belt has been on machine. LOOK: Has seat belt been on the machine less than three years? Go to next check Replace worn or broken suspension parts. Replace seat belt if worn. Replace seat belt every three years regardless of appearance. Replace seat belt anytime parts appear worn or broken. |
- - -1/1 |
Storage Compartment and Operator Manual CheckUnlock and open storage compartment under operators seat. Close and lock door. FEEL: Does storage compartment lock operate smoothly and hold door closed securely? LOOK: Does door open and close smoothly? LOOK: Is Operators Manual on shelf inside storage compartment? Go to next check. Lubricate hinges. Lubricate or repair lock. See your authorized dealer. |
- - -1/1 |
Fresh Air Filter Door, Latch and Seals CheckLift lever (A) to unlock and open the fresh air filter door outside the cab. Close and lock door. LOOK: Does door open and close smoothly? LOOK: Does latch operate smoothly? LOOK: Are door seals in good condition? Go to next check. Lubricate hinges. Lubricate or repair latch. Replace door seal. |
- - -1/1 |
Engine Side Panels and Latch CheckUnlatch upper engine side panel by pulling latch handle (A). Open panel to full extent. Gas cylinder rod (B) will hold panel in open position. Close upper engine side panel. FEEL: Does upper engine side panel latch (A) operate freely and close securely? LOOK: Do panels open and close smoothly? LOOK: Does rod (B) hold the panel open and prevent the panel from closing? Are all parts free from damage? Repeat check on other side. Go to next check. Lubricate hinges. Repair or replace parts as needed. |
- - -1/1 |
Lower Engine Side Shield CheckRotate lower engine side panel latch (A) counterclockwise to unlatch. LOOK: Does lower engine side panel latch operate freely and hold panel securely closed? Swing lower engine side panel down. Close lower engine side panel and rotate latch (A) clockwise to latch side panel closed. Repeat check on other side. Go to next check. Lubricate hinges. Repair or replace parts as needed. |
- - -1/1 |
Engine Frame Mounting Step CheckCheck rubber step hangers (1) for damage or missing capscrews. LOOK: Are capscrews in place? Are rubber hangers in good condition? Go to next check. Repair or replace parts as needed. |
- - -1/1 |
Radiator Cap Access Door CheckOpen and close access door on top of grille housing. LOOK: Does door move freely and is locking tab for padlock in good condition? Go to next check. Lubricate hinges. Repair door. |
- - -1/1 |
Fuel Filler Access Door and Lock CheckInsert ignition key in lock and turn clockwise to lock and counterclockwise to unlock. Open and close door. Inspect hinge for damage. LOOK: Does lock hold door securely closed? Are hinges in good condition and not damaged? Go to next check. Repair or replace damaged parts as needed. |
- - -1/1 |
Cab Mount Step CheckInspect cab mounting step rubber hanger for missing hardware and damage. Inspect cab mounting steps for missing hardware and damage. LOOK: Is all hardware in place? Are mounting steps undamaged and in safe condition? Go to next check. Repair or replace damaged parts as needed |
- - -1/1 |
Frame Locking Bar CheckInstall frame locking bar to lock frames and prevent steering action. LOOK: Do frame locking bar pins (A) go through locking bar (B) and machine frames easily? Do pin clips (C) go through pins easily, do retaining springs "snap" closed securely and show no signs of damage? Install frame locking bar in stored position. Install pins and clips to hold it position. LOOK: Does locking bar easily fit into the storage brackets? Do pins (B) easily go through the brackets and boom lock? Do the pin clips (A) go through pins easily, do retaining springs "snap" closed and show no signs of damage? Go to next check. Install new locking bar and pins. |
- - -1/1 |
Boom Lock CheckRaise boom far enough to install the boom lock. LOOK: Does boom lock fit over boom cylinder rod easily? Is boom lock in good condition, not bent or broken? Does tab on end of boom lock fit in opening of rod end clevis easily? Is the attaching handle installed and hand tightened in lower channel hole? Remove boom lock from cylinder and install it in the stored position. LOOK: Does attaching screw hold boom lock securely in the stored position when not in use? Go to next check. Install new boom lock. |
- - -1/1 |
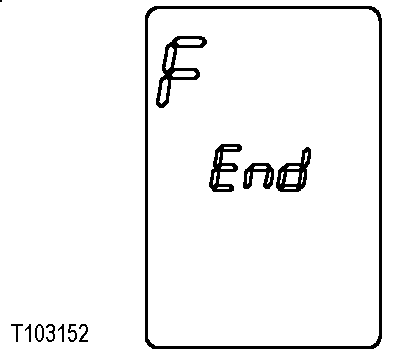
Service Decal CheckCheck service decal inside left engine shield door. LOOK: Is service decal legible? Operational checkout completed. Replace service decal. |
- - -1/1 |