Operational CheckoutUse this procedure to check all systems and functions on the machine. It is designed so you can make a quick check of machine operation while doing a walk around inspection and performing specific checks from the operator's seat. Should you experience a problem with your machine, you will find helpful diagnostic information in this checkout that will pinpoint the cause. This information may allow you to perform a simple adjustment yourself which will reduce the down time of your machine. Use the table of contents to help find adjustment procedures. The information you provide after completing the operational checkout will allow you or your authorized dealer to pinpoint a specific test or repair needed to restore the machine to design specifications. A location will be required which is level and has adequate space to complete the checks. No tools or equipment are needed to perform the checkout. Complete the necessary visual checks (oil levels, oil condition, external leaks, loose hardware, linkage, wiring, etc.) prior to doing the checkout. The machine must be at operating temperature for many of the checks. Start at the top of the left column and read completely down column before performing check. Follow this sequence from left to right. In the far right column, if no problem is found, you will be instructed to go to next check. If a problem is indicated, you will be referred to either a section in this manual or to your authorized dealer for repair. |
CED,OUO1079,96 -19-31MAR00-1/1 |
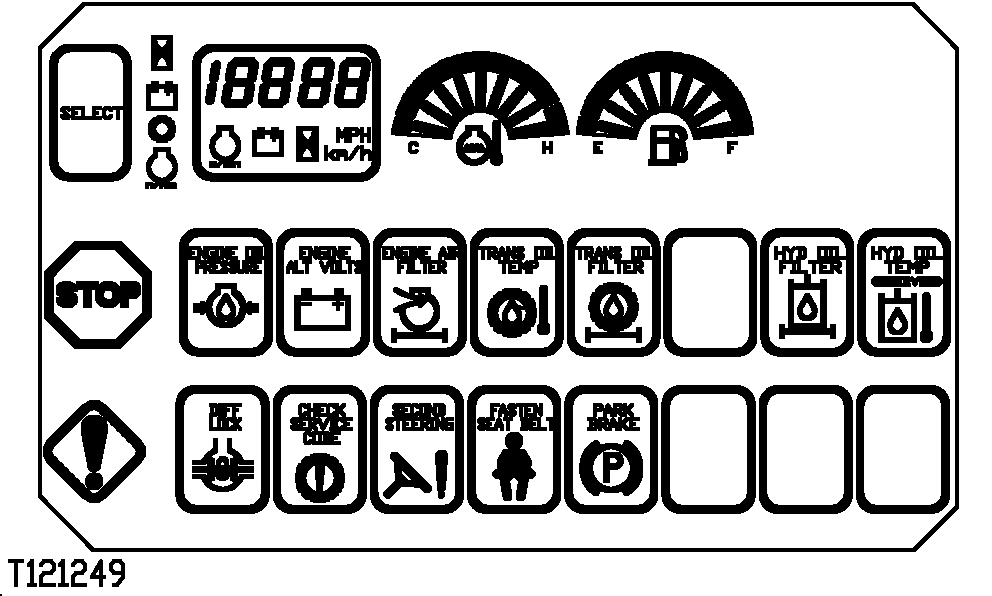
Gauge, Indicators and Control Checks (Engine Off)
- - -1/1 |
Monitor Display Window Check |
|
OK: Go to next check. NOT OK: Check F13 monitor fuse and F12 monitor battery voltage fuse. NOT OK: See your authorized dealer. |
||||||

- - -1/1 |
Monitor Indicator and Alarm Checks |
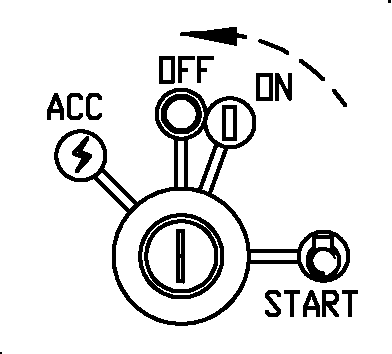
Turn key switch to ON position.
|
OK: Go to next check. NOT OK: Check 5 amp monitor (switched) fuse F13. NOT OK: See your authorized dealer. |
||||||||

- - -1/1 |
Engine Oil Pressure, Alternator Voltage, Park Brake and Differential Lock Monitor Indicators Check |
|
OK: Go to next check. NOT OK: See your authorized dealer. | ||||||
|
Start engine. Move shift lever from PARK to NEUTRAL.
|
OK: Go to next check. NOT OK: If engine oil pressure indicator stays ON, STOP ENGINE IMMEDIATELY and check oil level. NOT OK: If engine alternator voltage indicator is ON, increase engine speed to 1200 rpm and indicator must go out. NOT OK: If park brake indicator does not go out, see your authorized dealer. |
|||||||

- - -1/1 |
Park Brake Linkage Check |
|
OK: Go to next check. NOT OK: See your authorized dealer. |
|||
 CAUTION:
Do not operate machine if transmission control and park brake lever locking sleeve does not pass this check. Machine could be pulled out of PARK when dismounting and allow machine to move.
CAUTION:
Do not operate machine if transmission control and park brake lever locking sleeve does not pass this check. Machine could be pulled out of PARK when dismounting and allow machine to move.
- - -1/1 |
Gauge, Indicators, and Control Checks (Engine ON)
- - -1/1 |
Neutral Start Switch Check |
|
||||||
- - -1/1 |
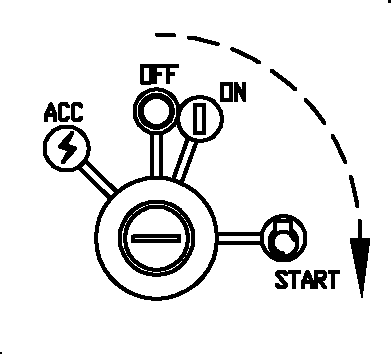
Park Start Circuit CheckTurn key switch to ON position. NOTE: Shift lever must not be removed from PARK until key switch is ON. Move shift lever to NEUTRAL position. Turn key switch to START position.
Go to next check. See your authorized dealer. |
- - -1/1 |
Start Circuit Check
Turn key switch to START position. LOOK: Fasten seat belt indicator and park brake indicator must be ON.
Park brake indicator must be ON and remain on and "P" must be displayed in monitor display window. Go to next check. If engine turns but does not start, check fuel shut-off fuse F9. Check fuel supply. If starting motor does not operate, check park brake fuse F1 and starter and park start fuse F2. See your authorized dealer. |
- - -1/1 |
Engine Alternator Output CheckStart engine and operate at slow idle in PARK position. Turn off all accessories. LOOK/LISTEN: All monitor indicators and alarms must be OFF except park brake indicator. IMPORTANT: Do not operate machine if STOP light is ON or alarm is sounding; machine damage could occur. NOTE: If engine alternator voltage indicator comes ON after approximately 3 seconds, increase engine speed to approximately 1500 rpm and light must go out. Due to varying electrical loads it may be normal for light to be ON at slow idle. If oil is cold, it is normal for hydraulic and transmission restriction indicators to be ON until oil warms. Go to next check. If engine alternator voltage indicator stays on after engine has been above 1500 rpm, see your authorized dealer. If any monitor indicator stays ON, see your authorized dealer. |
- - -1/1 |
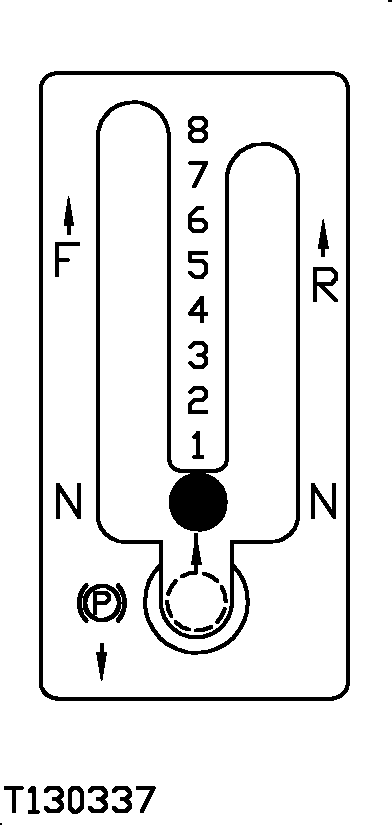
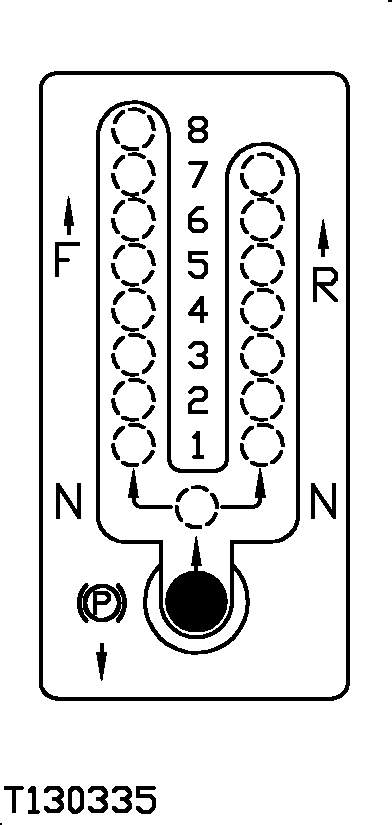
PARK and NEUTRAL Gear Position Switch CheckStart machine. Fully depress inching pedal and hold. Shift SLOWLY through all forward and reverse gears. Record each gear position as displayed on monitor. Each gear position should display as shown above. LOOK: Do gear positions and monitor display match? Go to next check. Machine may be in limp home mode. Place machine in PARK, turn key switch OFF, and redo test. If problem still exists, see your authorized dealer. |
- - -1/1 |
Reverse Warning Alarm CheckTurn key switch to ON. Put transmission in NEUTRAL REVERSE.
Go to next check. Check reverse warning alarm and switch. See your authorized dealer. |
- - -1/1 |
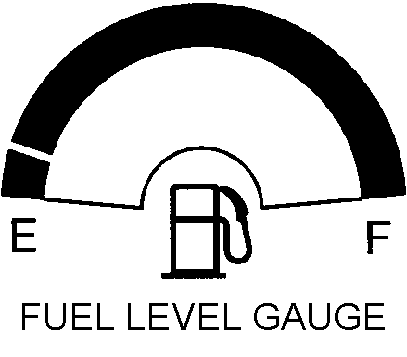
Display Window Function Check
LOOK: Hour meter reading must appear.
LOOK: Battery volt reading must be displayed (12-14 volts).
LOOK: The letter (P) should be displayed indicating park brake.
LOOK: RPM symbol must be displayed. Go to next check. No monitor reading displayed, check Monitor Fuse F13 and Monitor Battery Voltage Input Fuse F12. See your authorized dealer. |
- - -1/1 |
Engine Speed Control Knob Check-If EquippedOperate engine at slow idle. Twist speed control knob counterclockwise three turns.
Twist speed control knob clockwise three turns.
Depress button and pull knob out to fast idle and release button.
Tighten throttle lock clockwise then depress button and twist knob from fast idle to low idle. FEEL: Lock must increase friction on cable and but not stop movement. Go to next check. Inspect friction lock at base of knob. Check injection pump override linkage. See your authorized dealer. |
- - -1/1 |
Starting Aid Check-If EquippedOperate engine at slow idle. Push starting aid button once.
Go to next check. Check can (A) contents by shaking. If can has fluid, check starting aid fuse F6. If fuse is okay, see your authorized dealer. |
- - -1/1 |
Air Cleaner Restriction Indicator CheckMove shift lever into PARK position. Start engine and run at fast idle. LOOK: Air restriction indicator MUST NOT be ON. Go to next check. Clean or replace air cleaner element. (See Maintenance-As Required and Maintenance-Every 1000 Hours chapters.) |
- - -1/1 |
Brake System Checks
- - -1/1 |
Brake Accumulator Precharge CheckRun engine at slow idle. Raise blade to upper stop. Move shift lever to NEUTRAL. Lower blade while pumping the service brake pedal as fast as possible until blade raises front of machine. LOOK: Park brake indicator must not come ON.
Check complete. Brake accumulator precharge is low. See your authorized dealer. |
- - -1/1 |
Service Brake Linkage CheckNOTE: Transmission oil must be warmed to normal operating temperature. Start engine. Run at slow idle. Depress and release service brake pedal (A). LOOK: Pedal must return freely and have approximately 0.9 mm (0.035 in) gap between pedal and plunger. NOTE: Correct pedal-to-plunger gap will allow pedal foot pad to move approximately 6 mm (1/4 in.) before it contacts the plunger. Go to next check. Check for missing return spring. Check pedal for binding. If spring is okay, see your authorized dealer. |
- - -1/1 |
Brake Valve Neutral Leakage Check1. Run engine for 30 seconds to fill brake accumulator. 2. Stop engine. 3. Push service brake pedal (A) at five second intervals 12 times and count the number of times an oil "hiss" is heard as brake is applied.
4. Run engine for 30 seconds to fill brake accumulator. 5. Stop engine. 6. Wait three minutes. 7. Push brake pedal at five second intervals 12 times and count the number of times a oil "hiss" is heard as brake is applied.
Go to next check. See your authorized dealer. |
- - -1/1 |
Service Brake CheckRun engine at fast idle. Operate machine in 3RD FORWARD. Press service brake pedal (A) to load engine. Brakes must be able to slow machine until engine is lugged down to approximately 800 rpm. Go to next check. See your authorized dealer. |
- - -1/1 |
Park Brake Check-With WinchMove shift lever to PARK position and differential lock ON. Run engine at half speed. Attach winch cable to a stump or other immovable object. Move winch control lever to the POWER IN position and slide machine backward without holding service brakes. LOOK: All four wheels must slide and not turn as machine moves backward. Go to next check. See your authorized dealer. |
- - -1/1 |
Park Brake Check-Without WinchPosition machine on gradual slope with front of machine pointed down hill. Raise blade and grapple, if equipped, off ground. Move shift lever to NEUTRAL position and differential lock OFF. Let machine coast freely for several feet. Move transmission control lever to PARK position. LOOK: Did machine stop? Move transmission control lever to NEUTRAL. LOOK: Did machine move or coast freely? Go to next check. See your authorized dealer. |
- - -1/1 |
Steering System Checks
- - -1/1 |
Steering System Operation CheckRun engine at slow idle in PARK. Differential lock OFF. Turn steering wheel until frames hit the right stop and then the left stop. Observe effort to turn steering wheel. LOOK: Frames must steer smoothly in both directions. When the steering wheel is stopped, the frames must stop. FEEL: Excessive effort must not be required to turn the steering wheel. NOTE: If steering wheel is turned to stop and released, it is normal for wheel to rock back and forth up to 1/3 turn before stopping. Go to next check. See your authorized dealer. |
- - -1/1 |
Steering Priority Valve CheckRun engine at slow idle. Steer machine frames to maximum left position. Lower stacking blade to ground. While steering machine to the right, raise stacking blade. Observe stacking blade. LOOK: Stacking blade MUST raise slowly, but steering speed must be normal. NOTE: It is normal for steering wheel to jerk or kickback if hydraulic function is moved while steering is held against stops. Go to next check. See your authorized dealer. |
- - -1/1 |
Steering Priority Valve Pressure CheckRun engine at slow idle. Steer unit until frames are straight. Press differential lock button to engage differential lock. Steer to left then right. LOOK: Steering wheel must not turn more than 1/2 turn in either direction. Go to next check. See your authorized dealer. |
- - -1/1 |
Steering System Leakage CheckRun engine at slow idle. Switch differential lock to OFF. Turn steering wheel right until frames contact stop. IMPORTANT: Steering wheel must be "jerked" to shift steering valve into full flow mode. If wheel is not jerked, wheel will continue to move while slight pressure is exerted on it and simulate a leaking steering valve. Hold steering wheel against stop, jerk wheel against stop, continue turning steering wheel using approximately 22 N (5 lb force) while counting steering wheel revolutions per minute. Repeat check to the left. LOOK: Steering wheel must not turn more than 5 rpm. NOTE: Use good judgement; excessive steering wheel rpm may not affect steering function during normal operation. Go to next check. See your authorized dealer. |
- - -1/1 |
Secondary Steering System Check-If EquippedIMPORTANT: Do not operate secondary steering pump for more than 15 seconds with the steering in neutral or damage to the pump and motor can occur. Turn key OFF after test or pump damage can occur. Move shift lever to NEUTRAL. Park machine on a hard level surface with wheels straight. Stop engine. Without starting engine, turn key to START position and release. This will start pump when the steering wheel is turned left or right. Steer machine to right and left. LOOK: Machine must steer approximately half-way to stops in both directions.
Go to next check. See your authorized dealer. |
- - -1/1 |
Transmission Cold Weather Disconnect Checks-If Equipped
- - -1/1 |
Transmission Cold Weather Disconnect Clutch Check-If EquippedNOTE: Approximately 89 N (20 lb-force) will be needed to pull disconnect handle out. Stop engine. Remove left engine shield. Pull disconnect clutch handle forward to disconnect transmission. LOOK/FEEL: Handle must stay forward in detented position. Start engine. Move transmission control and park brake lever to NEUTRAL. LOOK: Monitor must still indicate machine is in PARK. Move transmission control and park brake lever to PARK.
Push disconnect clutch handle rearward to connect transmission. Then wiggle handle to check free travel. LOOK/FEEL: Handle must stay rearward in detented position and have approximately 30 mm (1-1/4 in.) of free travel. IMPORTANT: If handle has excessive free travel, disconnect is not engaged properly. Check disconnect engagement by "bumping" engine starter (do not start engine) and then checking until only 30 mm (1-1/4 in.) free movement of handle is felt. Start engine. LOOK/LISTEN: Only park brake indicator should be on. Fasten seat belt light will be on until it times out. No grinding noise should be heard from clutch. Go to next check. See your authorized dealer. |
- - -1/1 |
Driving Checks
IMPORTANT: Transmission and hydraulic oil must be at operating temperature.
- - -1/1 |
Inching Pedal CheckDepress inching pedal fully. Slowly release inching pedal and listen for click of switches.
Start engine and shift machine to 4TH FORWARD. Drive machine in a circle at slow idle. Depress inching pedal to lower stop and observe machine movement. LOOK/FEEL: Machine must slow and then come to a complete stop. Release inching pedal slowly and observe machine movement. LOOK/FEEL: Machine must slowly come up to speed as pedal is released. Go to next check. See your authorized dealer. |
- - -1/1 |
Transmission Noise CheckRun engine at half speed. Shift transmission into all gears, including 8TH FORWARD and 7TH REVERSE speeds, driving the machine approximately 100 yards in each speed.
Go to next check. See your authorized dealer. |
- - -1/1 |
Differential Lock Capacity Check
Ensure differential lock is not engaged. Steer machine in full turn. Shift machine into 1ST FORWARD and operate at slow idle. Push differential lock button to engage differential lock. LOOK: Differential lock indicator must be ON and machine must try to go straight and tires must be scuffing the surface. NOTE: It is normal for differential lock to make growling sound if on hard surface. Push differential lock button to disengage differential lock. LOOK: Differential lock indicator must go off and differential lock must release and allow machine to turn. NOTE: It is normal for rear axle to make a "clunk" sound when differential lock releases. Go to next check. See your authorized dealer. |
- - -1/1 |
Differential Gears and Pinion Noise CheckMove transmission control and park brake lever to 1ST FORWARD and differential lock disengaged. Run engine at slow idle. Turn machine full right.
Go to next check. If noise is heard with the machine in a full turn, see your authorized dealer. |
- - -1/1 |
Hydraulic System Checks
IMPORTANT: Hydraulic oil must be at operating temperature for these checks. See warm-up procedure below.
- - -1/1 |
Hydraulic System Warm-Up ProcedureIf hydraulic oil is not at operating temperature, heat oil until machine cylinders feel warm to touch, using the following procedure: Operate engine at fast idle. Turn steering wheel back and forth from stop-to-stop. Periodically cycle all hydraulic functions to distribute heated oil to all functions. Go to next check. |
- - -1/1 |
Hydraulic Pump Performance CheckOperate engine at fast idle (2400 rpm). Slowly lower blade to ground level. Measure cycle time required to raise the blade to maximum height. LOOK: The maximum cycle time is: 540G-III, 548G-III: 1.3-2.0 seconds 640G-III: 2.0-2.7 seconds 648G-III: 1.3-2.0 seconds 748G-III: 1.5-2.2 seconds NOTE: Repeat the above cycle time check three times. Average the cycle times recorded. The average cycle time will give a general indication of hydraulic pump performance. Go to next check. If cycle times are slow, check engine fast idle specifications. See your authorized dealer. |
- - -1/1 |
Grapple Control Valve Functional Check-If EquippedStart engine and run at slow idle. Activate equipment control levers while watching equipment for movement. LOOK: Direction of travel indicated on the control decals must correspond with equipment travel. Equipment travel should be continuous and smooth. Go to next check. If function moves in different direction from control valve movement, check hose routing to see that they are not reversed. See your authorized dealer. |
- - -1/1 |
Blade and Grapple System Leakage Checks-If EquippedRaise blade to maximum UP position. Raise arch to maximum UP position. Open grapple and position grapple control lever in NEUTRAL. Run engine at slow idle. Activate blade up, grapple boom up, arch up, and grapple open functions, one at a time.
Go to next step in this check. See your authorized dealer. Lower blade to maximum DOWN position. Close grapple and move control lever to NEUTRAL. Lower arch to maximum DOWN position. Run engine at slow idle. Activate blade down, grapple close, and boom down functions, one at a time.
Activate arch down function.
Go to next check. See your authorized dealer. |
- - -1/1 |
Grapple Rotate System Crossover Relief Check-If Equipped
Run engine at slow idle. Activate grapple rotate control switch and stall grapple tong against ground in each direction.
Go to next check. See your authorized dealer. |
- - -1/1 |
Grapple Rotate Rotation Check-If EquippedClose grapple. Push and hold each half of the grapple rotate switch (A). Grapple should rotate continuously in each direction. Go to next check. Check fuse F3. Listen for solenoid to CLICK when switch is activated. Check for a pinched hose. See your authorized dealer. |
- - -1/1 |
Trail Building Blade Control Valve Float Leakage Check-If EquippedMove blade control lever to FLOAT position. Run engine at slow idle. Move blade control lever to NEUTRAL position.
Go to next check. See your authorized dealer. |
- - -1/1 |
Blade and Tilt Control Valve Linkage Check-If EquippedWith engine off, move blade and tilt control levers to the UP position and release lever. Move blade control lever to the DOWN position and observe lever stop (stacking blade only). Move blade control lever down into FLOAT position and observe lever stop (trail building). LOOK: Blade and tilt levers must return to NEUTRAL freely. The blade and tilt levers must contact the lever stops when levers are pushed down. The blade control valve (trail building blade only) must detent in FLOAT position and remain in float. NOTE: If control levers do not contact lever stops, the control valve cables or linkage can be damaged. Go to next check. See your authorized dealer. |
- - -1/1 |
Blade Function Drift CheckLower the blade until blade is approximately 50 mm (2.0 in.) above ground. Run engine at slow idle and observe blade. LOOK: If blade touches the ground or rises 50 mm (2.0 in.) within 1 minute, leakage is indicated in blade control valve or blade cylinders. Go to next check. See your authorized dealer. |
- - -1/1 |
Grapple Function Drift Check-If EquippedOpen grapple tongs to the maximum OPEN position. Place valve in NEUTRAL position. Lower boom until tong tips are approximately 50 mm (2.0 in.) above ground. Run engine at slow idle and observe grapple tongs. LOOK: If grapple tongs touch the ground within 1 minute, leakage is indicated in either the grapple control valves or cylinder, or boom control valve or cylinders. Go to next check. See your authorized dealer. |
- - -1/1 |
Grapple Control Valve Detent Check-If EquippedPosition grapple control valve in the CLOSE detent position. Move grapple control valve out of the detent position and observe force required to move lever. FEEL: Grapple control valve must require approximately 45-111 N (10-25 lb-force) to move valve out of detent.
Go to next check. The grapple control valve must remain in the detent position when the grapple skidder is in operation. If the grapple control valve will not remain in the detent, see your authorized dealer. |
- - -1/1 |
Trail Building Blade and Tilt Control Valve Lift Check Test-If EquippedTilt blade with the left corner down. Lower blade to ground and raise front of machine. Stop engine and operate blade tilt lever to tilt left. Operate blade valve to lower blade. LOOK: Blade or tilt functions MUST NOT move when control lever is activated. Go to next check. If blade moves right when tilt control valve is opened or blade moves up when control valve is actuated to lower the blade, control valve lift check or cylinders are leaking. See your authorized dealer. |
- - -1/1 |
Grapple Valve, Arch, and Grapple Section Lift Check Test-If EquippedRaise grapple arch to the maximum UP position. Close grapple and return control lever to NEUTRAL. Stop engine. Activate the grapple arch raise and grapple close functions one at a time. LOOK: Function MUST NOT move. Go to next check. If function movement is noted, control valve lift check or cylinder leakage is indicated. See your authorized dealer. |
- - -1/1 |
Grapple Valve Boom Section Lift Check Test (Dual Function)-If EquippedClose grapple and extend boom cylinders approximately 50 mm (2.0 in.) from end of stroke. Stop engine. Activate the boom raise control valve. LOOK: Boom MUST NOT move when control valve is activated. LOOK: Arch and grapple tongs MUST NOT move when control lever is activated. Go to next check. If function movement is noted, control valve lift check or cylinder leakage is indicated. See your authorized dealer. |
- - -1/1 |
Arch or Boom Cylinder Cavitation Pump TestRaise arch or boom. Lower arch or boom at slow engine speed. LOOK: Cavitation MUST NOT occur. LOOK: Arch or boom MUST NOT become spongy or bounce. Check completed. If arch of boom become spongy or bounces, use higher engine speeds when lowering arch or boom. |
- - -1/1 |
Grapple Damper Check-If EquippedRotate grapple until it is perpendicular to the arch frame. Close grapple tongs and raise grapple arch to maximum height. Slowly lower arch until grapple tongs are approximately 300 mm (12.0 in.) from ground. Observe grapple frame angle when grapple is angled forward. LOOK: Grapple must be approximately 10-15° from vertical. IMPORTANT: Correct damper adjustment will occasionally allow grapple-to-boom contact when operating on very rough terrain. If grapple swings too freely, the grapple may contact base of boom and damage grapple or boom. Go to next check. Adjust damper. See your authorized dealer. |
- - -1/1 |
Grapple Shock Absorber Check-If EquippedGrapple frame must be perpendicular to arch frame. Close grapple tongs and raise arch until tongs are 300 mm (12.0 in.) off ground. Jerk steering wheel to the left and then to the right and observe grapple side-to-side movement. LOOK: Grapple must not continue to move from side-to-side after rear of machine stops moving. NOTE: Shock absorber is designed to prevent empty grapple from hitting frame during normal transport. A new shock absorber will occasionally allow grapple-to-boom contact when operating on very rough terrain. If grapple swings too freely, the grapple may contact base of boom and damage grapple or boom. Go to next check. Replace shock absorber. (See Replacing Grapple Shock in Maintenance.) |
- - -1/1 |
Tong Timing Check-If EquippedRaise arch and fully open tongs. Close tongs and observe speed of each tong. LOOK: Tongs must close at approximately the same speed and close completely. NOTE: If tongs do not close evenly, open tongs to maximum open position. Close tongs completely to reset tong timing. Go to next check. See your authorized dealer. |
- - -1/1 |
Winch Checks
IMPORTANT: Transmission oil must be at operating temperature for these checks.
- - -1/1 |
Winch Hydraulic System Functional Check-If EquippedOperate engine at slow idle. Operate winch in POWER IN and FREE SPOOL several times and observe when the drum turns each time. Start counting the number of seconds when the lever is moved in each position, one thousand one, one thousand two, and etc. LOOK: The normal engagement time for the winch clutch or brake disengagement is one second or less. Go to next check. If the engine stalls when the winch control lever is placed in POWER IN position with the engine at slow idle, a problem is indicated in the winch control circuit. See your authorized dealer. |
- - -1/1 |
Winch Valve Return Spring Check-If EquippedRun engine at slow idle. Place winch control valve lever in POWER IN position and quickly release control valve lever. Observe position control valve lever stops. LOOK: The winch control valve lever must return and stop in PARK position detent.
Go to next check. See your authorized dealer. |
- - -1/1 |
Winch Control Valve Linkage Stop Check-If EquippedOperate engine at slow idle. Move winch control lever slowly to the POWER IN position until winch drum turns. LOOK: Winch lever must be approximately 6 mm (1/4 in.) from stop as winch drum starts to turn. Move winch control lever to FREE SPOOL position and release lever. LOOK/FEEL: Lever must remain in free spool detent position and front of lever must be approximately 3 mm (1/8-in.) from stop. Go to next check. See your authorized dealer. |
- - -1/1 |
Winch Free Spool, Drum, and Cable Check-If EquippedRun engine at slow idle. Place winch control valve lever in FREE SPOOL position. Pull cable from drum until all cable is removed from the drum. LOOK: The winch drum must turn freely and the effort required to pull cable MUST NOT be excessive. NOTE: The cable MUST NOT be tangled on the drum and all cables must unwind from drum except the end retained in the winch. LOOK: The end of the cable must be retained on the winch drum per forestry operating codes in your area. NOTE: If the cable is tangled and cannot be removed by hand, attach "choker" cable to immovable object and pull cable out of winch with skidder. Rewind winch cable on drum. Go to next check If winch free spool effort is excessive, check winch drum rolling drag torque. (See Winch FREE SPOOL Drag Adjustment in Operating the Machine.) |
- - -1/1 |
Winch Drum Drag Check-If EquippedRun engine at slow idle. Winch chokers until mainline belts are almost up to horizontal roller. Move lever to FREE SPOOL position detent. LOOK/FEEL: Chokers should drop to ground but drum should not continue turning. NOTE: Drag can be set to suit operator. Drag should be set to prevent cable from getting tangled during free spool. Go to next check. Adjust as required. (See Winch FREE SPOOL Drag Adjustment in Operating the Machine.) |
- - -1/1 |
Winch BRAKE OFF Adjustment Check-If EquippedMove winch control lever to FREE SPOOL position detent. Pull lever rearward with approximately 7 N (5 lb-force), then move lever to left side. LOOK/FEEL: Lever must move freely through the gate and not rub against front of left slot. Release lever from hand. LOOK: Lever must not pull out of detent or move from hold to PARK position. Go to next check. See your authorized dealer. |
- - -1/1 |
Winch BRAKE OFF Function and Control Linkage Checks-If EquippedConnect winch line to an immovable object. Place winch control lever in the BRAKE OFF position and against right gate of slot. LOOK: When the control lever is placed in BRAKE OFF position, the lever must remain against gate. Drive skidder in 2ND FORWARD and observe drum as cable unwinds. Stop machine. LOOK: The drum must keep tension on the cable as the cable unwinds with the skidder moving and as the skidder stops. NOTE: It is normal for winch drum to turn when no load is on winch and control lever is moved directly from POWER IN to BRAKE OFF.
LOOK/FEEL: Resistance must be felt as lever is pulled from BRAKE OFF to PARK position. Lever must then remain in PARK position detent. Go to next check If winch control lever does not contact the gate in the slot when winch is in brake off position, see your authorized dealer. |
- - -1/1 |
Winch Clutch and Brake Check-If EquippedIMPORTANT: Transmission oil must be at operating temperature for these checks. Be sure winch clutch and brake engage in one second or less before doing this test. In cold operating conditions the transmission oil may be at operating temperature; however, the oil in the two winch hoses will be cold. This can cause delayed winch function operation. Align skidder with an immovable object directly behind the skidder and run engine at approximately 1500 rpm. Put the transmission control and park brake lever in PARK position "P". Attach the winch cable to the immovable object. Operate power-in function until front of skidder is approximately 0.61 m (2.0 ft) off the ground. Place winch control valve lever in PARK position. NOTE: Ground conditions may cause wheels to slide backward, preventing front of machine from raising. LOOK: The winch clutch must be able to lift the front of the skidder off the ground or slide machine backward. The winch brake must hold the skidder front end off the ground or not slip if machine is driven in 1ST FORWARD. Go to next check. If the winch clutch slips before front end is off ground, see your authorized dealer. |
- - -1/1 |
Winch Fairlead Roller Check-If EquippedRotate the two vertical rollers by hand. Rotate the horizontal roller by hand. LOOK: The rollers must rotate freely by hand and bushings MUST NOT have excessive looseness. Go to next check. Lubricate or repair. See your authorized dealer. |
- - -1/1 |
Accessory Check (Engine OFF)
- - -1/1 |
Horn Switch CheckTurn key ON. Push horn button (A). LOOK: Button must push in easily and come back out.
Go to next check. If horn does not sound, inspect fuse F7. See your authorized dealer. |
- - -1/1 |
Work Light Switch Check-If EquippedTurn key ON. Push rocker switch to right (ON) position. LOOK: Two front lights and two rear lights must come on. Go to next check. Inspect fuse F30 and circuit breakers F18 and F25. See your authorized dealer. |
- - -1/1 |
Deluxe Work Light Switch Check-If EquippedTurn key ON. Push rocker switch to left (FRONT ON) position. LOOK: Two front lights must come on. Push rocker switch to right (BOTH ON) position. LOOK: Two front lights and two rear lights must come on. Go to next check. Inspect circuit breakers F19 and F31. See your authorized dealer. |
- - -1/1 |
Defroster Functional Check-If EquippedTurn temperature control knob (B) fully clockwise to HOT (red) position. Start engine and operate at fast idle. Wait 2 minutes. Push defroster, heater, and air conditioner switch (C) to left (DEFROSTER) position. Turn blower knob (A) fully clockwise. FEEL: Warm air must come from defroster vents. Turn blower knob counterclockwise one position at a time.
Go to next check. See your authorized dealer. |
- - -1/1 |
Heater Functional Check-If EquippedTurn temperature control knob (B) fully clockwise to HOT (red) position. Start engine and operate at fast idle. Wait 2 minutes. Push defroster, heater, and air conditioner switch (C) to middle (HEATER AND VENT) position. Turn blower knob (A) fully clockwise. FEEL: Warm air must come from vents. Turn temperature control knob fully counterclockwise to COLD (blue) position. FEEL: Outside-temperature air must come from vents. Turn blower knob counterclockwise one position at a time.
Go to next check. See your authorized dealer. |
- - -1/1 |
Air Conditioner Functional Check-If EquippedTurn temperature control knob fully counterclockwise to COLD (blue) position. Start engine and operate at fast idle. Press defroster, heater, and air conditioner switch (C) to right (AIR CONDITIONER) position. Turn blower knob (A) fully clockwise. Air in duct system may be warm. Wait for several minutes until warm air is removed from system. FEEL: Cool air must come from vents. Go to next check. See your authorized dealer. |
- - -1/1 |
Battery Disconnect Switch CheckMove battery disconnect switch (A) to OFF. Turn key to ON position. LOOK: Monitor lights must not come on. Go to next check. See your authorized dealer. |
- - -1/1 |
ROPS and Cab Component Checks
- - -1/1 |
Door Latch CheckUnlatch door. Close door with force. Repeat with other door. LOOK: Door latches must work freely and latch must hold door closed. Go to next check Oil hinges. Adjust doors. See your authorized dealer. |
- - -1/1 |
Door Lock CheckLock cab doors. LOOK: Cab door latches must not move. FEEL: Locks must operate freely and key must not stick in locks. Go to next check See your authorized dealer. |
- - -1/1 |
Door Opener CheckUnlatch door and let go of latch. LOOK/FEEL: Door must open and remain open against restraining strap. Go to next check. See your authorized dealer. |
- - -1/1 |
Cab Door Window CheckInspect window seals. Open sliding window to maximum open position and back to 1/2 open notch and release latches (A). Close sliding window. LOOK: Latches must hold window tightly closed, and hold in any notched position. LOOK: Window seals must not have gaps between seals and window frames. Go to next check. Oil latch. Replace window seals if necessary. See your authorized dealer. |
- - -1/1 |
Protective Screen ChecksLoosen screen knob and swing shield out to clean window. LOOK/FEEL: Screen must swing open to allow cleaning of window. Swing screen back in place and tighten knob. LOOK/FEEL: Screen must align with retaining knobs and tighten in place. Repeat check for left and right side screens and left and right door screens. Go to next check. Repair or oil hinges and retainer. See your authorized dealer. |
- - -1/1 |
Front Windshield Washer and Wiper ChecksTurn key to ACC position. Turn front wiper control knob (A) clockwise to first position. LOOK: Wiper must operate at a rate of one cycle per second. Turn front wiper control knob clockwise to second position. LOOK: Wiper must operate at a rate of about two cycles per second. Turn front wiper control knob fully counterclockwise. LOOK: Wiper blade must "park" on right side of windshield when knobs are OFF. Push front wiper control knob.
LOOK: Fluid squirts from nozzle mounted on wiper blade. Go to next step in this check. If wiper does not operate, inspect fuse F8. See your authorized dealer. |
- - -1/1 |
Rear Windshield Washer and Wiper Checks-If EquippedTurn key to ACC position. Turn rear wiper control knob (B) clockwise to first position. LOOK: Wiper must operate at a rate of one cycle per second. Turn rear wiper control knob to clockwise second position. LOOK: Wiper must operate at a rate of about two cycles per second. Turn rear wiper control knob fully counterclockwise. LOOK: Wiper blade must "park" on right side of windshield when knobs are OFF. Push rear wiper control knob.
LOOK: Fluid squirts from nozzle mounted on wiper blade. Go to next step in this check. If wiper does not operate, inspect fuse F27. See your authorized dealer. |
- - -1/1 |
Seat Adjustment ChecksRaise armrest. FEEL: Armrest must move freely and remain in up position. Raise lever (C) and lean against seat back to tilt rearward. Lower lever (C) to lock seat back. FEEL: Seat back must adjust forward and rearward and remain in position. Go to next step in this check. Lubricate or repair as necessary. See your authorized dealer. Turn knob (B) clockwise for firm ride or counterclockwise for soft ride. FEEL: Weight adjustment knob (B) must adjust seat for ride. Go to next step in this check. Lubricate or repair as necessary. Move lever to the left to unlock side rails. Slide seat forward and rearward. Release lever to lock seat in place. FEEL: Seat must move forward and rearward and lock in all positions. Go to next check. Lubricate or repair as necessary. See your authorized dealer. Lift swivel lever to unlock seat position. Swivel seat forward and right. Release lever to lock seat in place. FEEL: Seat must swivel forward and right and lock in three positions. Go to next check. Lubricate or repair as necessary. See your authorized dealer. |
- - -1/1 |
Air Ride Seat Adjustment Checks-If EquippedRaise the armrest. FEEL: Armrest must move freely and remain in up position. Raise lever (A) and lean against seat backrest to tilt rearward. Lower lever to lock seat backrest. FEEL: Seat backrest must adjust forward and rearward and remain in position. Go to next step in this check. Lubricate or repair as necessary. See your authorized dealer. Raise lever (B) to unlock side rails. Slide seat forward and rearward. Release lever to lock seat in place. FEEL: Seat must move forward and rearward and lock in all positions. Raise lever (C) to unlock seat swivel. Swivel seat forward and right. Release lever to lock seat in place. FEEL: Seat must swivel forward and right and lock in three positions. Turn key switch to ACC position. Pull button (D).
Push button.
Go to next check. Lubricate or repair as necessary. See your authorized dealer. |
- - -1/1 |
Seat Belt CheckPull seat belt (A) across your lap and insert in left side buckle (B). LOOK: Seat belt must latch. Recoil on right side must remove excess slack. Release seat belt. LOOK: Seat belt must release when buckle is pressed. Belt must recoil completely into right holder. IMPORTANT: Replace the complete seat belt assembly every three years regardless of appearance. A date label, to determine the age of the belt, is attached to each belt. Go to next check. Clean belt or replace. See your authorized dealer. |
- - -1/1 |
Fire Extinguisher CheckCheck gauge (A) reading. LOOK: Indicator needle must be in green zone of gauge. Go to next check. Recharge or replace extinguisher. See your authorized dealer. |
- - -1/1 |
Operator Manual Holder CheckOpen left door. Open operator manual holder (A) and check manual. LOOK: Operator manual must be inside holder in readable condition. Go to next check. No manual or damaged manual. Order new manual and install in holder. See your authorized dealer. |
- - -1/1 |
Miscellaneous Checks
- - -1/1 |
Fuel Tank Strainer CheckRemove fuel tank filler cap. Rotate fuel strainer to notch. Remove fuel strainer and inspect. LOOK: Strainer screen must be in good condition and clean. Go to next check. Clean or replace strainer. See your authorized dealer. |
- - -1/1 |
Engine Shield Latch CheckTurn handle to remove front engine side shield. LOOK/FEEL: Latch must turn freely and shield must be easily removed. Install shield and lock. LOOK/FEEL: Shield must install easily and fit tightly in place. Repeat check on other engine shield. Go to next check. Replace or adjust latch. See your authorized dealer. |
- - -1/1 |
Heater or A/C Access Door CheckTurn knobs (A) on heater or air conditioner access cover to loosen. Open heater or air conditioner access door. LOOK/FEEL: Knobs must release, allowing heater or air conditioner access door to open. Knobs must remain attached to heater or air conditioner access door. Close heater or air conditioner access door. Turn knobs to tighten. LOOK/FEEL: Knobs must hold heater or air conditioner access door securely closed. Go to next check. Repair or replace knobs. See your authorized dealer. |
- - -1/1 |
Vandal Protection CheckCheck vandal locking tabs on following components: Fuel tank fill cap, hydraulic reservoir fill cap, transmission dipstick door, heater or A/C access door, and engine side shields. LOOK: Tabs must accept padlocks, and lock covers in place. Go to next check. Repair or replace locking tabs. See your authorized dealer. |
- - -1/1 |
Service Decal CheckOpen left side cab door. Check service decal on inside of left cab door. LOOK: Service decal must be legible. Go to next check. Replace service decal. See your authorized dealer. |
- - -1/1 |
Frame Locking Bar CheckLocate locking bar mounted on right side of machine. LOOK: Locking bar must be pinned in place and painted red. Operational Checkout completed. Replace locking bar and pins. See your authorized dealer. |
- - -1/1 |