Operational Checkout
|
Use this procedure to check all systems and functions on the machine. It is designed so you can make a quick check of the operation of the machine while doing a walk around inspection and performing specific checks from the operator's seat. Should you experience a problem with your machine, you will find helpful diagnostic information in this checkout that will pinpoint the cause. This information may allow you to perform a simple adjustment which will reduce the downtime of your machine. Use the table of contents to help find adjustment procedures. The information you provide after completing the operational checkout will allow you or your authorized dealer to pinpoint the specific test or repair work needed to restore the machine to design specifications. A location will be required which is level and has adequate space to complete the checks. No tools or equipment are needed to perform the checkout. |
Complete the necessary visual checks (oil levels, oil condition, external leaks, loose hardware, linkage, wiring, etc.) prior to doing the checkout. The machine must be at operating temperature for many of the checks. Before starting this operational checkout, check diagnostic Service codes in monitor. These service codes must be corrected or cleared before starting this checkout. Start at the top of the left column and read completely down column before performing check, follow this sequence from left to right. In the far right column, if no problem is found (YES), you will be instructed to go to next check. If a problem is indicated (NO) or (NOT OK), you will be referred to either a section in this manual or to your authorized dealer. |
TX,95,JC2199 -19-03NOV99-1/1 |
1 Monitor Messages
- - -1/1 |
Check for Monitor Messages |
Turn key to RUN position. LOOK: Monitor must display 8888 and then current time. Move FNR lever to FORWARD position. LOOK: Monitor must display current time. Turn key to START position. LOOK: Monitor must display current time. |
OK: Go to first step of operational checkout. NOT OK: If any codes are displayed, see your authorized dealer. |
- - -1/1 |
2 Key Switch, Monitor Indicator and Gauge Checks
- - -1/1 |
Monitor Circuit |
|
OK: Go to next check. NOT OK: Check fuses. IF OK: See your authorized dealer. | |||
|
LOOK: Monitor display shows time. |
OK: Go to next check. NOT OK: See your authorized dealer. |
||||
- - -1/1 |
Alarm, Park Brake Indicator, Forward Indicator, and Reverse Indicator Check |
|
OK: Go to next check. NOT OK: Check fuses. IF OK: See your authorized dealer. |
||||||
- - -1/1 |
Seat Belt Indicator |
|
||||||
- - -1/1 |
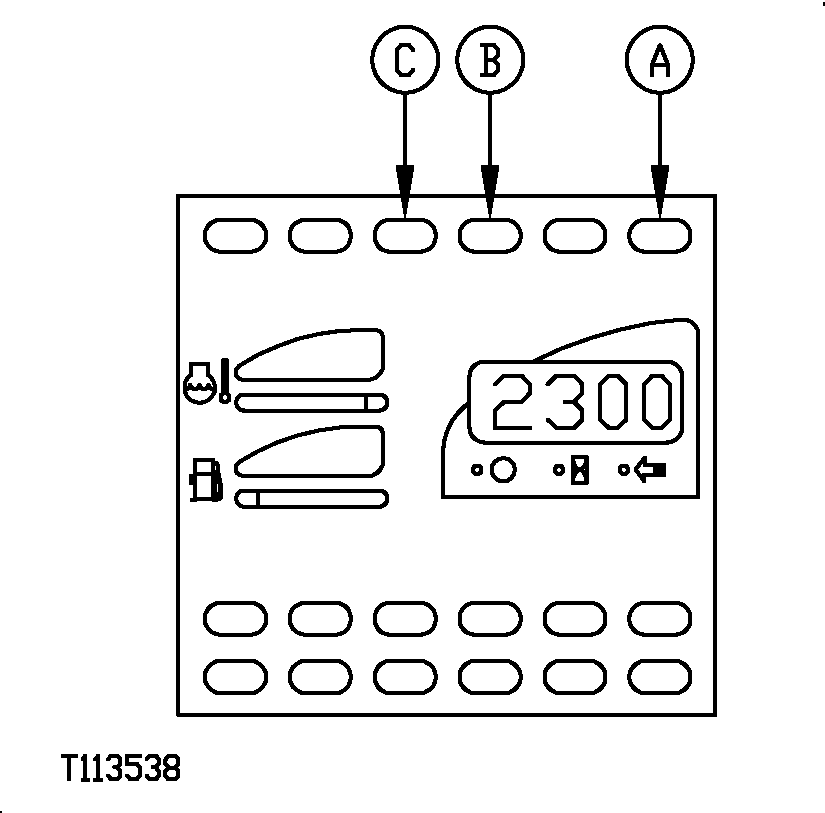
Clock, Hour Meter, and SpeedometerStart the engine. LOOK: Clock indicator (D) is on and display (A) defaults to the current time. (See Setting the Clock in Operator's Station chapter.) Push mode switch (E) on the side panel. LOOK: Hour meter indicator (C) comes on and display (A) shows the total hours of machine operation. Push mode switch again. LOOK: The speed indicator (B) comes on and display (A) shows the speed of the machine in miles per hour or kilometers per hour. Go to next check. Check fuses. See your authorized dealer. |
- - -1/1 |
3 Power Train and Engine Linkages, Neutral Start Switch, and Reverse Warning Alarm Checks
- - -1/1 |
FNR Selector Lever and Neutral Lock LeverEngine OFF. Engage neutral lock latch (B) and turn key ON. Apply slight effort to move lever (A) into forward and reverse. LOOK: Neutral lock latch must stay engaged and alarm must not come on. Release lock (B), and move selector lever to each position. LOOK: Lever must align with speed indicator in each detented position. Alarm will sound during this check in forward and reverse. FEEL: Lever must move freely and must detent in each position. Twist speed selector (A) to HI and LOW position. LOOK: Knob must align with speed indicator in each detented position. FEEL: Knob must move freely through both positions. Go to next check. See your authorized dealer. |
- - -1/1 |
Neutral Start and Reverse Warning Alarm CircuitEngine OFF. Release neutral lock latch. Move FNR lever to REVERSE and turn key switch to START position.
Release key switch. Move FNR lever to FORWARD and turn key switch to START.
Release key switch. Move FNR lever to NEUTRAL position and turn key to START.
Go to next check. See your authorized dealer. |
- - -1/1 |
Engine Speed Control LinkageEngine OFF. Open hood. Check injection pump lever with accelerator pedal up. (Ensure accelerator pedal is fully up by pulling pedal.) LOOK: Slow idle stop screw (A) must contact injection pump housing. Fully depress accelerator pedal (C) and use a weight to keep pedal depressed. Check injection pump lever position. FEEL: Accelerator pedal must contact stop bolt (D). LOOK: Long lever must slightly over-travel short lever (B). Go to next check. Adjust linkage. Go to Engine Speed Linkage Adjustment. See your authorized dealer. |
- - -1/1 |
4 Optional Equipment Checks
- - -1/1 |
Start Aid-If EquippedEngine at slow idle. Push start aid button (B) once.
Go to next check. Check for empty start aid can. Check fuse. Replace. See your authorized dealer. |
- - -1/1 |
5 Brake System Checks
- - -1/1 |
Park Brake Hydrostatic LockoutStart engine. LOOK: Park brake indicator must be ON. Place FNR lever in low speed FORWARD.
Slowly increase engine speed to fast idle. LOOK: Machine must not move. Repeat check with FNR lever in low speed REVERSE. LOOK/LISTEN: Machine must not move and backup and warning alarms must sound. Go to next check. See your authorized dealer. |
- - -1/1 |
Park Brake
Push mode button until speedometer indicator illuminates. Fasten seat belt, then drive machine a 3.2 km/h (2 mph) and engage park brake with switch (A). LOOK/FEEL: Machine must stop within 1 m (3 ft). Go to next check. Go to Park Brake Adjustment in Maintenance chapter. See your authorized dealer. |
 CAUTION:
Wear seat belt, machine will stop suddenly when park brake is engaged while machine is moving.
CAUTION:
Wear seat belt, machine will stop suddenly when park brake is engaged while machine is moving.
- - -1/1 |
Service Brake
Fasten seat belt. Start engine, release park brake. Shift power train to LOW FORWARD. Drive machine at fast idle. Rapidly and fully apply brake pedal (A). LOOK: Machine must stop within 2 m (6 ft). Go to next check. See your authorized dealer. |
- - -1/1 |
Service Brake SwitchFully depress brake pedal (A). LOOK: Brake lights (B) must come on. Go to next check. Check fuses. See your authorized dealer. |
- - -1/1 |
6 Steering System Checks
- - -1/1 |
Steering ValveWith machine on a hard surface, run engine at slow idle. Turn steering wheel until frames are at maximum right (A) and then left (B) positions. LOOK: Frames must move smoothly in both directions. When steering wheel is stopped, frames must stop. FEEL: Excessive effort must not be required to turn steering wheel. Go to next check. See your authorized dealer. |
- - -1/1 |
Priority Valve Operation, Steering and Working HydraulicsRun engine at slow idle. Cycle steering wheel from full left to full right at maximum steering speed. At the same time, move control lever to boom raise. LOOK: Steering effort and speed must not change while control lever is in boom raise position. NOTE: While steering, boom does not raise when at slow idle. At higher idle speeds, boom will move. Go to next check. See your authorized dealer. |
- - -1/1 |
Steering System LeakageNOTE: Hydraulic oil must be at operating temperature for this check. Run engine at slow idle. Turn steering wheel until frames are in maximum right turn position. Hold with approximately 22 N (5 lb) force on steering wheel. LOOK: Steering wheel must not turn more than 2 rpm left or right. Repeat leakage check turning steering wheel to the left. LOOK: Steering wheel must not turn more than 2 rpm left or right. Go to next check. Steering system leakage is indicated. See your authorized dealer. |
- - -1/1 |
Steering Valve Inlet Check ValveRun engine at slow idle. Turn steering wheel so frames are against stop and hold steering wheel. Hold a hydraulic function over relief and then return control lever to neutral. FEEL: A slight "jerk" in direction of wheel rotation is acceptable when control lever is activated, but steering wheel must not "kick back" excessively when control lever is released. Go to next check. See your authorized dealer. |
- - -1/1 |
7 Driving Checks
NOTE: Hydraulic system oil must be at operating temperature for these checks.
- - -1/1 |
Power Train NoiseRun engine at half speed. Drive loader with FNR lever (A) in LOW and HIGH FORWARD and LOW and HIGH REVERSE.
Go to next check. See your authorized dealer. |
- - -1/1 |
High/Low Hydrostatic DownshiftStart engine. Operate machine at fast idle in HIGH FORWARD. Move speed selector to LOW. LOOK: Power train must shift smoothly to LOW. Go to next check. See your authorized dealer. |
- - -1/1 |
High/Low Hydrostatic UpshiftOperate machine at fast idle in LOW FORWARD. Move high/low speed selector to HIGH. FEEL: Power train must shift smoothly to HIGH. Go to next check. See your authorized dealer. |
- - -1/1 |
Hydrostatic OperationRun engine at slow idle. Put FNR lever (A) in LOW FORWARD. Slowly increase engine speed to fast idle. FEEL: Machine speed must increase smoothly as engine speed is increased to fast idle. Repeat check in REVERSE. Go to next check. See your authorized dealer. |
- - -1/1 |
Direction Regulation-Low Speed
Put FNR lever in LOW FORWARD. Run engine fast idle. Shift several times from FORWARD to REVERSE and REVERSE to FORWARD. FEEL: Machine must slow down and change direction smoothly. Go to next check. See your authorized dealer. |
- - -1/1 |
Direction Regulation-High Speed
Put FNR lever in HIGH FORWARD. Run engine fast idle. Shift several times from FORWARD to REVERSE and REVERSE to FORWARD. NOTE: When machine is travelling at speeds higher than 13 km/h (8 mph) and the lever is shifted to opposite travel direction, the hydrostatic pump will go to neutral and stay there until the machine speed has decreased to 13 km/h (8 mph). Only then will the hydrostatic pump shift to the opposite travel direction. FEEL: Machine must slow down smoothly, and then change direction. Go to next check. See your authorized dealer. |
- - -1/1 |
Inching PedalIMPORTANT: Make sure inching linkage is properly connected. Put FNR lever in LOW FORWARD. While driving forward, slowly depress brake/inching pedal (A). LOOK: Machine must slow down. When pedal reaches approximately one third the way to floor, service brakes must engage and machine must stop. Go to next check. Adjust linkage. See your authorized dealer. |
- - -1/1 |
8 Hydraulic System Checks
- - -1/1 |
Hydraulic Pump PerformanceCheck that oil level in hydraulic reservoir is full. Operate the loader until the hydraulic cooler and radiator fan comes on. Run engine at fast idle. Turn the steering wheel to steer the machine against the stops. Continue steering the machine against the stops with the machine at fast idle. With the bucket on the ground, raise the boom and time the boom raise cycle. LOOK: Boom must raise to full height within 5.0 seconds. Go to next check. Do Steering System Leakage Check in step 5. See your authorized dealer. |
- - -1/1 |
Loader Control ValveLower equipment to ground. Stop engine. Turn key switch OFF. Move control lever to all positions and then release. LOOK: Lever must return to neutral detent when released from all positions. Go to next check See your authorized dealer. |
- - -1/1 |
Return-to-DigStart engine. Place return-to-dig switch in ON position. Position bucket in dump position near the ground. Move control lever to bucket rollback (detent) then release lever. LOOK: Bucket must rollback to the level position and then lever must return to neutral. Go to next check. Check return-to-dig switch adjustment. (See Return-to-Dig Adjustment in Operating the Machine chapter.) Remove boot around lever and clean dust and debris from control lever area. See your authorized dealer. |
- - -1/1 |
Boom FloatSlightly dump bucket and lower boom to raise front of machine. Place float switch to ON position. Push control lever into float position (A). LOOK: Lever must stay in float position. FEEL: Front of machine must lower to the ground. Go to next check. Inspect machine for mechanical obstruction on the loader frame or loader linkage. See your authorized dealer. |
- - -1/1 |
Boom Height KickoutStart engine. Place boom height kickout switch to ON position. Move control lever to boom raise position (detent) then release lever. LOOK: Boom must rise to the height of switch setting and then the lever must return to neutral. Go to next check. Check boom height kickout adjustment. (See Boom Height Kickout Adjustment in Operating the Machine chapter.) Remove boot around control lever and remove dust and debris from control lever area. See your authorized dealer. |
- - -1/1 |
Boom and Bucket Cylinder DriftRaise bucket approximately 50 mm (2.0 in.) off ground with bucket level. Stop engine. Wait one minute. LOOK: Bucket must not touch ground. Go to next check. See your authorized dealer. |
- - -1/1 |
Pilot Enable/Boom Down SwitchRaise bucket about 1 m (3 ft) off the ground. Tip bucket forward. Stop engine. While pressing pilot control valve override switch (A), operate bucket dump and boom lower functions. LOOK: Bucket must dump and boom must lower. Go to next check. See your authorized dealer. |
- - -1/1 |
Control Valve Lift CheckRun machine at slow idle. With bucket partially dumped, lower boom to raise front of machine. Stop engine and turn key to ON. Press pilot enable/boom down switch to Boom Down Position and hold. Slowly move boom control lever to boom lower position. Slowly move bucket control lever to bucket dump position. LOOK: Boom must remain stationary and not allow front wheels to drop to ground. Start engine. Slowly move boom control lever to boom lower position. Slowly move bucket control lever to bucket dump position. LOOK: Front of machine must rise without dropping. Go to next check. See your authorized dealer. |
- - -1/1 |
Bucket Dump Circuit Relief ValveRaise front of machine with bucket dumped to 45°. Backdrag with bucket while observing bucket angle. LOOK: Bucket angle must not change. NOTE: If bucket is fully dumped, bucket angle may change but must not collapse to ground. Go to next check. See your authorized dealer. |
- - -1/1 |
Bucket Rollback Circuit Relief ValvePosition bucket at a 45° angle against an immovable object. Increase engine speed until wheels begin to spin. LOOK: Bucket angle must change. Go to next check. See your authorized dealer. |
- - -1/1 |
Boom Raise Circuit Relief ValveForce bucket into a dirt bank. Activate bucket rollback. LOOK: Boom must not lower. Go to next check. See your authorized dealer. |
- - -1/1 |
9 Accessory and Vandal Protection Checks
NOTE: Engine should be stopped and key switch should be ON for these checks.
- - -1/1 |
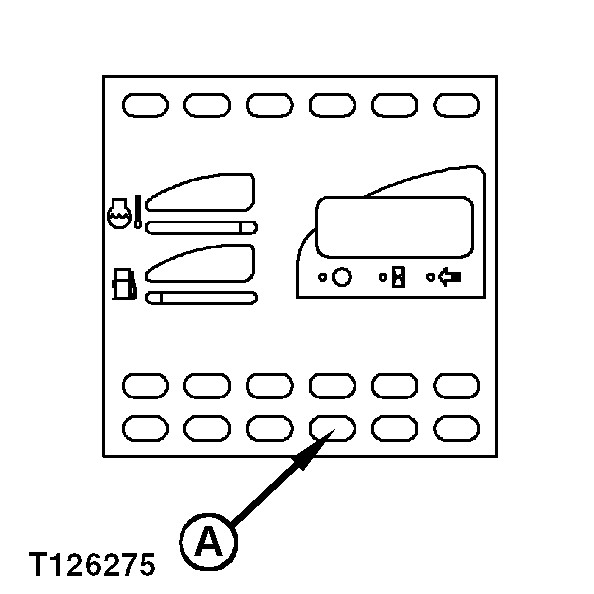
Monitor Panel Backlighting, Daytime Running Lights, and Tail LightsPlace light switch (A) to middle position. LOOK: Clock, hour meter, and speed display, temperature gauge, and fuel gauge backlighting comes on. LOOK: Daytime running lights (B), and tail lights (C) come on. Go to next check. Check for burned out light bulbs or fuses. See your authorized dealer. |
- - -1/1 |
Drive LightsTurn key switch to ON. Push the light switch (A) up. LOOK: Drive lights (C) must come on. Pull back on turn signal lever (B) two times. LOOK: Drive lights (C) must alternate between high and low beam. Go to next check. Check for burned out light bulbs or fuses. See your authorized dealer. |
- - -1/1 |
Work Lights-If EquippedMove front work light switch (A) to ON position. LOOK: Front work lights (D) must come on. Move rear work light (B) switch to ON position. LOOK: Rear work lights (C) must come on. Go to next check. Check for burned out bulbs or fuses. See your authorized dealer. |
- - -1/1 |
Turn SignalsMove turn signal lever to left turn position and then right turn position. LOOK: Left front and rear amber lights (A) and dash indicator, then right front and rear amber lights (B) and dash indicator must be flashing. Go to next check. Check for burned out bulbs or fuses. See your authorized dealer. |
- - -1/1 |
Hazard Warning LightsMove hazard warning lights switch (A) to ON. LOOK: Front and rear amber lights and dash indicator must be flashing. Move turn signal lever to left turn position. LOOK: Left front and rear amber lights must flash and right front and rear amber lights come on steady. Move turn signal lever to right turn position. LOOK: Right front and rear amber lights must flash and left front and rear amber lights come on steady. Go to next check. Check for burned out bulbs or fuses. See your authorized dealer. |
- - -1/1 |
Brake LightDepress brake pedal and observe brake lights (A). LOOK: Brake lights must come on. Go to next check. Check for burned out light bulbs or fuses. See your authorized dealer. |
- - -1/1 |
Horn CircuitPush horn button (A).
Go to next check. Check fuse. See your authorized dealer. |
- - -1/1 |
HoodUnlock hood with key at lock (A). Unlatch hood at latch (C). Open hood (B). Close and latch hood. Lock hood with key at lock (A). LOOK: Hood, latch, and lock must operate smoothly. Go to next check. Lubricate hood hinges. See your authorized dealer. |
- - -1/1 |
Service DecalCheck service decal (A). LOOK: Service decal must be legible. Go to next check. See your authorized dealer. |
- - -1/1 |
10 Cab Component Checks
- - -1/1 |
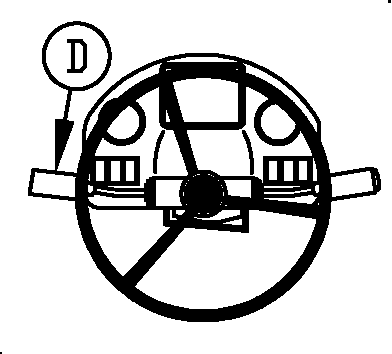
Steering Column Adjustment CheckLift up on latch (A) and move steering column to several positions. LOOK: Latch must lock steering column securely in each position. Go to next check. See your authorized dealer. |
- - -1/1 |
Seat and Seat Belt CheckStanding over seat reach down and lift seat assembly to top of travel then let go. Lift seat slowly until latch "clicks", and release seat. repeat for upper latch. LOOK/FEEL: Seat must have 3 positions and must latch in 2 upper positions. Inspect seat shell and suspension for cracks, broke welds or looseness. LOOK: Seat must be in safe condition. Check seat adjustment functions. LOOK: Bounce on seat to check suspension operation. FEEL: Seat suspension must not bottom out and must support operator's weight when the weight adjustment knob is adjusted properly. Inspect seat belt for damage. FEEL: Seat belt must stay adjusted snugly and not slip in adjuster. Go to next check. See your authorized dealer. |
- - -1/1 |
Front Windshield Wiper and WasherTurn handle (A) on turn signal lever to each detent position. LOOK: Wiper must operate intermittently in first position, slow in second position and fast in third position. Push in handle (B) on turn signal lever. LOOK: Washer fluid must spray onto windshield. Go to next check. Check fuses and washer fluid level. See your authorized dealer. |
- - -1/1 |
Door Locks and LatchesLock and unlock door. LOOK/FEEL: Door locks must work smoothly. Open and close door. LOOK/FEEL: Door should latch securely closed. Unlatch door and inspect door seal. Close door to first latch position. LOOK: Door must latch in first position. The door will have movement in this position. Door seal must not be damaged. Go to next check. Grease hinges. See your authorized dealer. |
- - -1/1 |
Fuel CapUse key to lock and unlock fuel cap (A). LOOK/FEEL: Cap lock should work smoothly. Cap should not be able to be removed when locked. Go to next check. Clean or replace cap. See your authorized dealer. |
- - -1/1 |
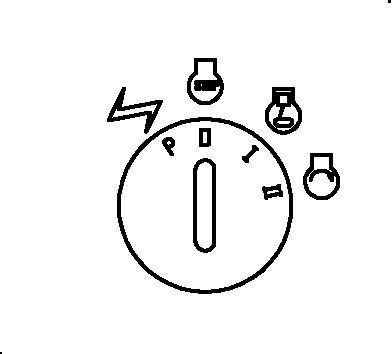
HeaterStart engine and run at fast idle. Wait until engine reaches operating temperature. Slide heater control (A) maximum heat and turn blower switch (B) to HIGH speed. FEEL: Air from ducts must be warm. Go to next check. See your authorized dealer. |
- - -1/1 |
Air Flow ControlTurn key switch to RUN. Turn blower switch (A) to HIGH speed. Place air flow control (B) to the rear position. FEEL: Air flow into external vent on right side of cab should be present. Little or no air flow should be present at vent inside of cab on right side of seat. Place air flow control (B) to forward position. FEEL: Air flow should be present at internal vent and little or no air flow at external vent. Go to next check. Check cab air filter. See your authorized dealer. |
- - -1/1 |
Heater/Defroster BlowerTurn key switch to RUN. Turn blower switch knob (A) to LOW, MEDIUM, and HIGH speeds. FEEL/LISTEN: Blower must have three speeds and OFF. Go to next check. See your authorized dealer. |
- - -1/1 |
Air Conditioner Functional Check-If EquippedStart engine and operate at fast idle. Turn air conditioner switch (A) fully clockwise. Turn blower knob (B) fully clockwise. Push air flow control (C) down. Air in duct system may be warm. Wait for several minutes until warm air is removed from system. FEEL: Is air from ducts cool? Go to next check. See your authorized dealer. |
- - -1/1 |
Door-Open Latch CheckPush door open to full door-open position. Pull lever (A) back to release door-open latch. LOOK: Door-open latch must retain door against rubber stops. When lever is pulled back, door must release from door-open latch. Go to next check. See your authorized dealer. |
- - -1/1 |