Operational Checkout
Use this procedure to check all systems and functions on the machine. It is designed so you can make a quick check of machine operation while performing specific checks from the operator's seat.
Should you experience a problem with the machine, you will find helpful diagnostic information in this checkout that will pinpoint the cause. This information may allow you to perform a simple adjustment which will reduce the down time of the machine. Use the table of contents to help find adjustment procedures.
The information provided, after completing the operational checkout, will allow you to pinpoint a specific test or repair needed to restore the machine to design specifications.
A location will be required which is level and has adequate space to complete the checks. No tools or equipment are needed to perform the checkout.
Complete the necessary visual checks (oil levels, oil condition, external leaks, loose hardware, linkage, wiring, etc.) prior to doing the checkout. The machine must be at operating temperature for many of the checks.
Start at the top of the left column and read completely down column before performing check. Follow this sequence from left to right. In the far right column, if no problem is found, you will be instructed to go to next check. If a problem is indicated, you will be referred either to a section in this manual for a specific procedure or to your authorized dealer.
1 Operator Station Checks—Key Switch ON, Engine Stopped
1A Gauges and Indicator Lights Check
Action:
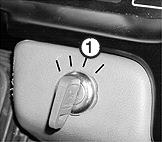
T144013B-UN-17JUL01
1 - ON Position
With battery disconnect switch ON, turn key switch to ON position (1).ENGLISH Does the following happen?
- All indicators light or flash.
- All gauges and speedometer move to center position.
- All segments of MDU LCDs will display.
- All segments of transmission control LED display and mode button indicator will light.
- Warning alarm sounds.
NOTE: Warning alarm will sound until air pressure reaches normal operating pressure.
Cold start indicator will remain lit for a maximum of 20 seconds in low ambient temperature conditions.
ENGLISH After 3 seconds, do all gauges, LCD and LED displays return to normal operation mode and warning alarm silences? Do all indicators, except for secondary steering (marked emergency steering), battery charge and park brake indicators go out?
Air pressure indicator may also remain lit, depending on system air pressure. Cold start indicator may also remain lit, depending on ambient temperature.
Result:
YES: Go to next check.
NO: Check circuit breakers. Reset if tripped.
IF OK: Check indicator bulbs. Replace if necessary.
IF OK: See your authorized dealer.
2 Operator Station Checks—Key Switch ON, Engine Running
2A Key Switch Start Check
Action:
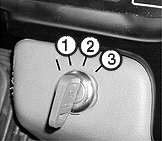
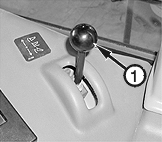
T144013C-UN-26JUL01
1 - OFF Position
2 - ON Position
3 - START Position
Turn key switch to ON position (2).Turn key switch to START position (3).
IMPORTANT: DO NOT hold start switch for more than 17 seconds. If the engine does not start during this period, turn key switch to OFF position (1). Wait 1 minute and try again.
ENGLISH Starter motor will start the engine.
Run engine for a few seconds then turn key switch to OFF position.
ENGLISH Engine must stop immediately when key switch is turned OFF.
Result:
YES: Go to next check.
NO: Check battery disconnect switch.
NO: Check battery.
NO: See your authorized dealer.
2B Gauges and Indicators Checks
Action:
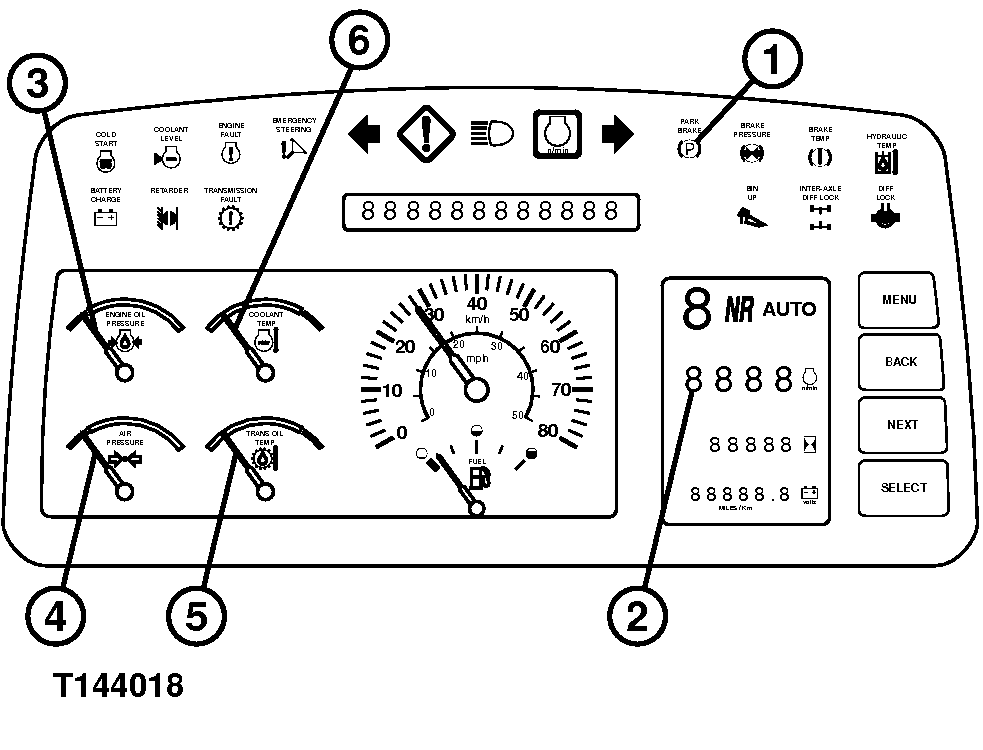
T144018-UN-21AUG01
1 - Park Brake Indicator
2 - RPM Display of MDU
3 - Engine Oil Pressure Gauge
4 - Air Pressure Gauge
5 - Transmission Oil Temperature Gauge
6 - Coolant Temperature Gauge
Start the engine.NOTE: Warning alarm will sound until air pressure reaches normal operating pressure.
Transmission temperature gauge (5) will not begin to indicate temperature until transmission temperature is close to operating temperature.
ENGLISH Do all the indicators, except park brake indicator (1), go out after the engine starts?
ENGLISH Does the MDU display engine RPM (2)?
Observe engine oil pressure gauge (3).
ENGLISH Does needle of gauge indicate pressure is increasing to normal (green)?
Observe air pressure gauge (4) immediately after the engine is started.
ENGLISH Does needle of gauge indicate pressure is increasing to normal (green)?
Observe coolant temperature gauge (6) immediately after the engine is started.
ENGLISH Does needle of gauge indicate temperature is increasing to normal (green)?
Result:
YES: Go to next check.
NO: See your authorized dealer.
2C Brake Accumulator Check
Action:Ensure brake accumulators are fully charged by pressing brake pedal repeatedly to make pump recharge accumulators several times.
Stop pumping during a recharge cycle to ensure brakes are not using oil after pump stops.
Stop engine.
Turn key switch to ON position and wait until warning indicator goes out.
Press brake pedal repeatedly. Count the number of applications the brake pedal is pressed before brake pressure indicator lights.
ENGLISH Does machine allow 8 full applications before brake pressure indicator lights?
Result:
YES: Start machine and go to next check.
NO: See your authorized dealer.
2D Service Brake Check
Action:NOTE: Perform this check in an open area where machine can travel at full speed.
Drive machine slowly.
Push brake pedal to stop machine.
Release brake pedal.
ENGLISH Does brake pedal push easily without binding?
ENGLISH Does brake pedal return to the released position so brakes are not dragging?
ENGLISH Do brakes stop machine in a reasonable distance without pulling to one side or making noises?
Operate machine at full speed.
Release accelerator and apply service brakes to stop machine.
ENGLISH Do brakes stop machine in a reasonable distance without pulling to one side or making noises?
Result:
YES: Go to next check.
NO: See your authorized dealer.
2E Park Brake Check
Action:
 CAUTION: Machine will stop abruptly during this check. Fasten
seat belt. Perform check in an open area.
CAUTION: Machine will stop abruptly during this check. Fasten
seat belt. Perform check in an open area.
NOTE: Park brake will not release if air pressure is below 410 kPa (4.1 bar) (60 psi).
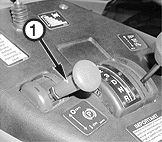
T147682B-UN-19NOV01
1 - Park Brake Lever
Start engine.Lift park brake lever (1) and move forward.
NOTE: Park brake will apply at any speed. Apply only when moving slowly.
Drive machine at slow idle in 1st gear.
With machine moving 5 km/h (3 mph) or less, pull park brake lever rearward until it locks into position.
ENGLISH Does park brake indicator come ON, park brake engage and machine stop?
Result:
YES: Continue check.
NO: See your authorized dealer.
Action:
With the engine running, transmission in neutral (N) and park brake ON, lift park brake lever and move forward.
Shift transmission to drive (D).
Slowly increase engine speed.
ENGLISH Does machine move when engine speed is just above slow idle?
Return engine to slow idle.
Shift transmission to neutral (N).
Result:
YES: Go to next check.
NO: See your authorized dealer.
2F Steering Check
Action:Move machine to an open area and park on a hard, level surface.
Turn inter-axle lock switch to OFF position.
Release park brake.
Release service brakes.
Run engine at slow idle.
Turn steering wheel fully left then fully right.
ENGLISH Does machine turn both directions smoothly?
Result:
YES: Continue with check.
NO: If steering is jerky or steering wheel is hard to turn, see your authorized dealer.
Action:
Run engine at fast idle.
Turn steering wheel fully left then fully right.
ENGLISH Does machine turn both directions smoothly?
Result:
YES: Go to next check.
NO: If steering is jerky or steering wheel is hard to turn, see your authorized dealer.
2G Dump Body Raise and Lower Checks
Action:
CAUTION: Ensure there is at least 7.6 m (25 ft) clearance above
machine. DO NOT perform this check within 4 m (13.1 ft) of a high
voltage power line.
T144028B-UN-17JUL01
1 - Dump Body Control Lever
Perform this check in an open area away from other people.Position the machine straight.
CAUTION: Clear all personnel from behind machine. Some material
may slide out of dump body as it is raised.
CAUTION: Ensure area above dump body is clear of obstructions
and power lines. Height of raised dump body is 7226 mm (23 ft 8.5
in.).
Ensure the dump body is empty.
Operate the engine at 1500 rpm.
Pull dump body control lever rearward to raise dump body.
When dump body is almost completely up, reduce engine speed to slow idle.
ENGLISH Does dump body raise to full height smoothly?
Result:
YES: Continue check.
NO: See your authorized dealer.
Action:
Release dump body control lever.
ENGLISH Does dump body control lever return to neutral position?
Result:
YES: Continue check.
NO: See your authorized dealer.
Action:
Push dump body control lever to full forward detent dump body float position and release lever.
ENGLISH Does control lever return to neutral position?
ENGLISH Does dump body lower to full down position smoothly?
Result:
YES: Go to next check.
NO: See your authorized dealer.
2H Lights Check
Action:
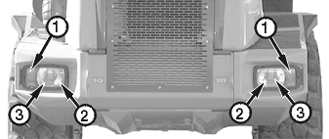
T147683B-UN-09NOV01
T147684B-UN-09NOV01
1 - Front Turn Indicator Light (2 used)
2 - Front Parking Light (2 used)
3 - Headlight (2 used)
4 - Rear Turn Indicator Light (2 used)
5 - Tail, Brake and Parking Light (2 used)
6 - Backup Light (2 used)
Push lower half of headlight switch to first ON position.ENGLISH Are front parking lights (2) and tail, brake and parking lights (5) ON?
Result:
YES: Continue with check.
NO: See your authorized dealer.
Action:
Push lower half of headlight switch to second position ON.
ENGLISH Are headlights (3) ON?
Result:
YES: Continue with check.
NO: See your authorized dealer.
Action:
Push steering column lever forward.
ENGLISH Are high beam headlights and high beam indicator ON?
Result:
YES: Continue with check.
NO: See your authorized dealer.
Action:
With headlight switch in the OFF position, have a helper push the brake pedal.
ENGLISH Are tail, brake and parking lights (5) ON?
Result:
YES: Continue with check.
NO: See your authorized dealer.
Action:
NOTE: Hazard lights will operate with the key switch in OFF position.
Press lower half of hazard switch.
ENGLISH Do turn indicators (1 and 4) flash?
Result:
YES: Continue with check.
NO: See your authorized dealer.
Action:
CAUTION: Perform check in an open area. Machine may move unexpectedly.
Park brake ON.
Push and hold service brake.
Shift transmission into reverse (R).
Have a helper look at backup lights (6).
ENGLISH Are backup lights ON?
Result:
YES: Go to next check.
NO: See your authorized dealer.
3 Miscellaneous Checks
3A Dump Body Warming System Check—If Equipped
Action:
CAUTION: Engine exhaust flows through tubes in sides of dump
body. Tubes may be hot.
Check dump body warming system.
ENGLISH Do tubes in sides of dump body warm as engine temperature increases to normal?
Result:
YES: Go to next check.
NO: Check to see that tubes aren't plugged.
NO: See your authorized dealer.
3B Service Decal Check
Action:Check all service and safety decals, ensure they are in place and in readable condition.
Result:
YES: Operational checkout complete.
NO: Replace safety decals. See your authorized dealer.
|
OUO1043,0000E2A-19-20011030 |