Remove Cooling Shroud and Remove Debris (Z915B)
 CAUTION: Compressed air can cause debris to fly a long distance.
• Clear work area of bystanders.
• Wear eye protection when using compressed air for cleaning purposes.
• Reduce compressed air pressure to 210 kPa (30 psi).
IMPORTANT: To ensure proper cooling, keep the engine cooling fins and surrounding area clean at all times. Operating the engine with obstructed cooling fins could cause engine damage due to overheating.
-
Park machine safely. (See Parking Safely in the SAFETY section.)
-
Allow engine to cool.
-
Remove engine access grill.
-
Loosen and remove five socket head bolts (A) and remove fan screen guard (B).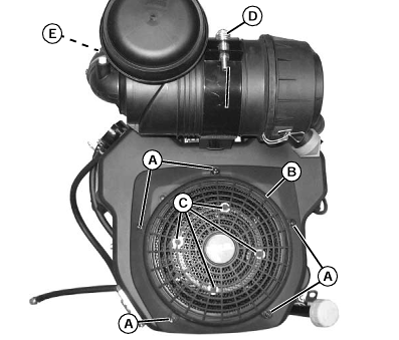
TCAL43514-UN-21MAR13 -
Remove four hex head bolts (C), fan screen and metal ring below fan screen.
-
Remove air cleaner canister bolt (D) and spread straps. Bend air intake hose (E), lift canister away from strap and move air filter housing away from engine shroud.
-
Remove two air cleaner bracket bolts (F).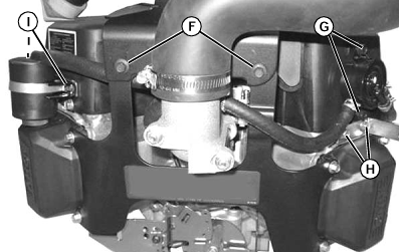
TCAL43515-UN-21MAR13 -
Remove two fuel pump bolts (G).
-
Remove two shroud/lift bracket bolts (H).
-
Remove dip stick mounting bolt (I) and dipstick housing (J) from engine.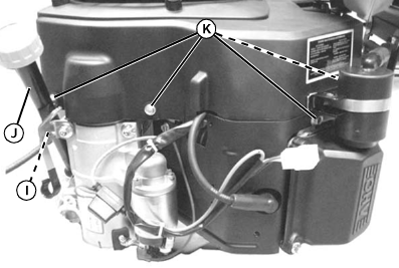
TCAL43516-UN-21MAR13 -
Remove four shroud bolts (K). Install dipstick housing (J) on engine and secure with one bolt (I).
-
Remove wiring harness connector (L) from voltage regulator.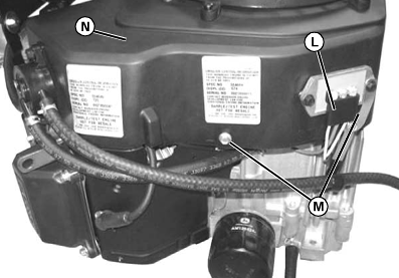
TCAL43517-UN-21MAR13 -
If engine is equipped with an oil cooler, remove mounting bolts.
-
Remove two shroud bolts (M). Lift shroud (N) upward and remove from engine.
-
Clean debris from engine area and all engine cooling fins.
-
Reverse steps to install shroud and tighten all hardware securely.
-
Install engine access grill.
|
MX00654,0000190-19-20131014 |