Removing and Installing Battery
-
Aeration head must be lowered to lowest point to allow access to battery area.
-
NOTE: Put transport stops in aeration position. Aeration head must be lowered to lowest point to allow access to battery area.
Lower aeration head:
-
Turn key to ON position.
-
Put MANUAL/AUTOMATIC switch in MANUAL position.
-
Hold bail (A) to handlebar (B).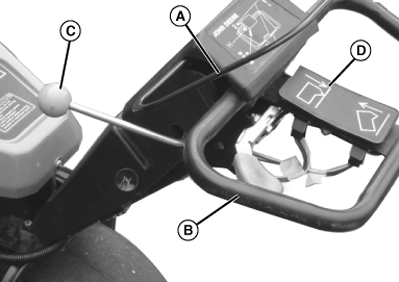
TCAL41098-UN-18JAN13 -
Pull clutch lever (C) toward the operator to engage drive clutch.
-
Push and hold the aerator engagement switch (D) in the direction of the aeration head to lower aeration head.
-
Turn key to STOP position. Release bail.
-
-
Remove aeration head cover.
-
Remove cover on left side of machine: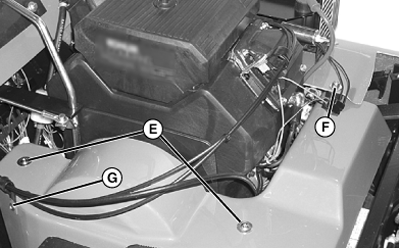
TCAL41099-UN-18JAN13-
Remove two screws (E) and one nut and washer (F).
-
Remove screw (G) and nut holding cable guide to cover.
-
Raise edge of cover on right side and remove left cover.
-
-
Remove rubber hold-down strap (H) to remove battery.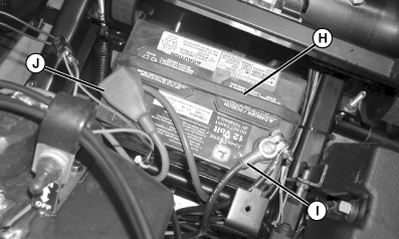
TCAL41100-UN-18JAN13 -
Remove negative (-) (black) cable (I) from battery first.
-
Remove positive (+) (red) cable (J).
-
If battery is very dirty, remove battery.
-
Clean battery, battery terminals, cable ends, hold-down, and battery tray with a solution of one part baking soda to four parts water. Keep solution out of battery cells.
-
Install battery.
-
Install positive (+) (red) cable to battery (+) terminal first.
-
Install negative (-) (black) cable to battery negative (-) terminal.
-
Apply spray lubricant on battery terminals to help prevent corrosion.
-
Slip rubber cover over positive terminal.
-
Install rubber hold-down strap.
-
Install covers and hardware.
|
OUO1082,00065C9-19-20130225 |