Changing Transmission Oil and Filter
IMPORTANT: Avoid damage! Contamination of hydraulic fluid can cause transmission damage or failure. Do not remove cap from fill opening unless necessary.
Severe or unusual conditions require a more frequent service interval.
-
Raise attachment to service position. (See Using the Lift Cylinder Safety Support in the Safety section.)
-
Park vehicle safely. (See Parking Safely in the Safety section.)
- Allow the engine and transmission to cool.
-
Thoroughly clean areas around the transmission fill cap/dipstick (A). Remove fill cap/dipstick.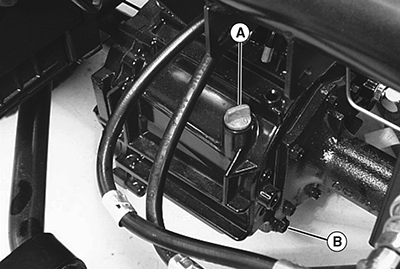
TCAL45065-UN-14MAY13 -
Locate drain plug (B) under right side of transmission.
-
Remove drain plug. Allow oil to drain into a drain pan.
-
NOTE: If the vehicle is equipped with an auxiliary hydraulic kit, the transmission filter (C) is relocated to the left side of the vehicle.
Locate transmission oil filter (C) on the left side of vehicle on the transaxle.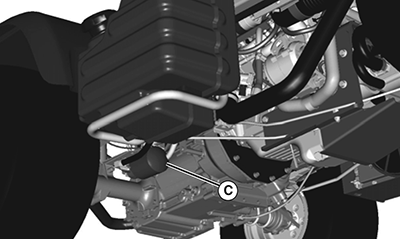
TCAL45066-UN-14MAY13NOTE: If vehicle does not have an auxiliary hydraulic kit installed, the transmission filter (D) is located in the center of vehicle, directly behind control valve.
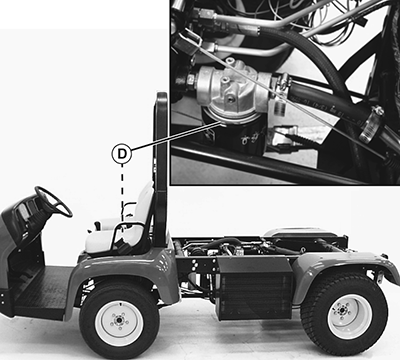
TCAL45067-UN-14MAY13- Locate transmission oil filter (D) on standard machine in the center behind control valve.
-
Turn filter counterclockwise to remove. Use a drain pan to catch dripping oil.
-
Install new filter.
- Apply a film of clean oil on gasket of new filter.
- Turn filter clockwise until gasket contacts the mounting surface. Tighten 1/2 to 3/4 turn after gasket contact.
-
Clean transmission oil strainer.
-
Install and tighten drain plug, torque to specification.
Item Measurement Specification Transmission Drain Plug Torque 49 N·m (36 lb.-ft.) -
Add recommended fluid into fill opening.
-
NOTE: DO NOT tighten dipstick. Allow threads to rest on top of transmission housing.
Install fill cap/dipstick.
-
NOTE: Check oil level with attachment in the lowered position.
Remove fill cap/dipstick. Check oil level; add or drain oil to correct level if necessary.
-
Install fill cap/dipstick.
|
OUMX068,000073F-19-20150629 |