Using the Fourth and/or Fifth Gear Lockout
 CAUTION: Avoid injury! Reduce speed before braking or turning,
when hauling loads, and when operating around obstacles or on hazardous
off-road conditions.
CAUTION: Avoid injury! Reduce speed before braking or turning,
when hauling loads, and when operating around obstacles or on hazardous
off-road conditions.
NOTE: Setting the gear lockout requires access to the transmission shift input shaft on the left side of the transmission, above the rear axle. If an attachment is installed, empty attachment and raise to service position. Park safely (see Using the Lift Cylinder Safety Support in the Safety section) and install the safety support.
Make sure that the vehicle is on a hard level surface, and the park brake is locked. Place the transmission in “Neutral” and turn the key switch to the STOP position before setting the fourth and/or fifth gear lockout.
TCT012901-UN-16JUL15
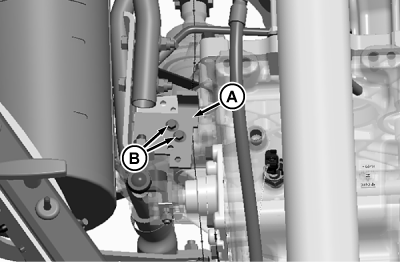
This vehicle is equipped with a lock bracket feature (A) for 4th and/or 5th gear lockout. Preventing the use of 4th or 5th gear while limiting vehicle ground speed is advisable in certain operating conditions.
The lockout feature was included in a parts bag from the factory to allow all gears. Use of the lockout feature requires installation of two factory bolts (B).
To Lock Out Fifth Gear:
NOTE: If vehicle transmission is already in fifth gear, lock does not operate.
-
Move gearshift lever to any position except fifth gear.
-
Position lock bracket (A) as shown and fasten with two bolts (B).
TCT012901-UN-16JUL15 -
Remove safety support and lower attachment.
To Lock Out 4th and 5th Gear:
NOTE: If vehicle transmission is already in fourth or fifth gear, lock does not operate.
-
Move gearshift lever to any position except 4th or 5th gear.
-
Position lock bracket (A) as shown and fasten with two bolts (B).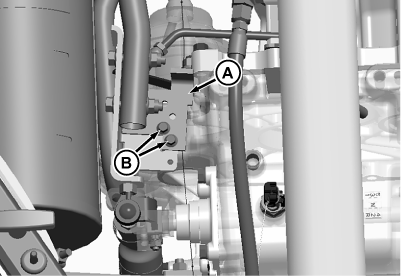
TCT012902-UN-16JUL15 -
Remove safety support and lower attachment.
To Unlock 4th and/or 5th Gear:
NOTE: Setting the gear lockout requires access to the transmission shift input shaft on the left side of the transmission, above the rear axle. If an attachment is installed, empty attachment and raise to service position. Park safely (see Using the Lift Cylinder Safety Support in the Safety section) and install the safety support.
-
Remove bracket and bolts, and store separately from machine.
-
Remove safety support and lower attachment.
|
OUMX068,0000CDA-19-20150716 |