Removing and Installing Implements on Front Hitch—If Equipped
Installing Implements on Front Hitch with Category 1 A-Frame
-
Check to be sure that the implement hydraulic hoses are out of the way if applicable.
-
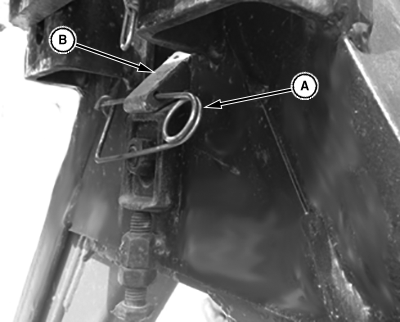
LV23638-UN-08JAN15Category 1 A-Frame
D - Locking Clip
E - Latch
Remove locking clip (A) from latch (B), retain for future use. -
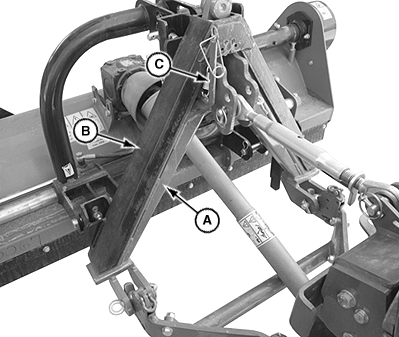
LV19397-UN-22OCT13A - A-Frame
B - Implement
C - Locking Clip
Drive tractor forward slowly and align A-frame (A) with mount on implement (B). -
Raise hitch to install A-frame on mount.
-
Ensure latch is fully engaged.
-
For Category 1 A-frame, lock implement onto A-frame by placing locking clip through latch.
Removing Implement on Front Hitch with Category 1 A-Frame
-
Lower implement on flat ground until the weight of the implement is no longer supported by the A-frame.
-
Prepare implement:
-
Adjust support legs if applicable.
-
Disconnect implement hydraulic hoses if applicable.
-
Disconnect implement drive shaft if applicable.
-
Remove locking clip from latch.
-
-
Set tractor hydraulic SCV lever into the float position.
-
Pull the disconnect handle (C) reward on A-frame allowing A-frame and arms to float downward and disconnect from implement A-frame receiver. Replace locking clip into latch for storage.
Installing Implements on Front Hitch with Category 1N A-Frame
-
Check to be sure that the implement hydraulic hoses are out of the way if applicable.
-

LV23634-UN-07JAN15Category 1N A-Frame
A - Locking Bolt
B - Locking Plate
C - Category 1N A-Frame
Remove locking bolt (A) and locking plate (B), retain for future use. -
Drive tractor forward slowly and align A-frame (C) with mount on implement.
-
Raise hitch to install A-frame on mount.
-
For Category 1N A-frame, lock implement onto A-frame with locking bolt (A) and locking plate (B).
Removing Implement on Front Hitch with Category 1N A-Frame
-
Lower implement on flat ground until the weight of the implement is no longer supported by the A-frame.
-
Prepare implement:
-
Adjust support legs if applicable.
-
Disconnect implement hydraulic hoses if applicable.
-
Disconnect implement drive shaft if applicable.
-
Remove locking bolt (A) and locking plate (B).
-
-
Set tractor hydraulic SCV lever into the float position.
-
Allow A-frame to float downward and disengage from implement. Drive tractor rearward slowly to separate from implement.
-
Replace locking bolt (A) and locking plate (B).
|
UP00731,00002C3-19-20150108 |