Diagnostic Light Check (All Models Except Z915E
The electronic control unit provides a diagnostic light to help the operator identify operational and electrical problems by flashing a diagnostic code.
Diagnostic “Real Time” Codes
-
Park machine safely. (See Park Safely in SAFETY section.)
-
The operator can be seated on the machine or standing next to the machine.
Turn the key to the START position and release key to RUN mode.
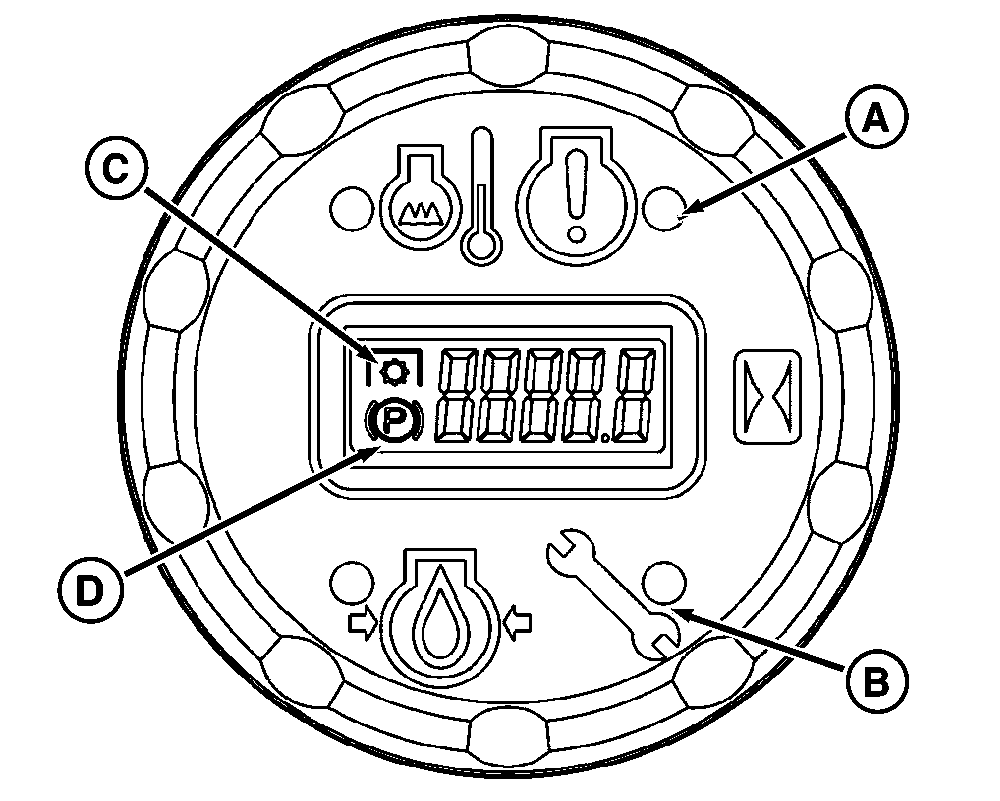
TCT011743-UN-22NOV14A - Engine Diagnostic Indicator Light (A) is used for Z925M and Z930M EFI engines only. If active engine diagnostic code is present, light is on. See your John Deere dealer.
B - Vehicle Diagnostic Indicator Light (B) flashes a diagnostic code to help the operator identify operational and electrical problems.
C - PTO Indicator Light (C) flashes a diagnostic code to help the operator identify if PTO does not engage with PTO switch activated (raised).
D - Park Brake Indicator Icon (D) is used to help the operator identify if the Park Brake is engaged. Icon is visible with Park Brake engaged.
-
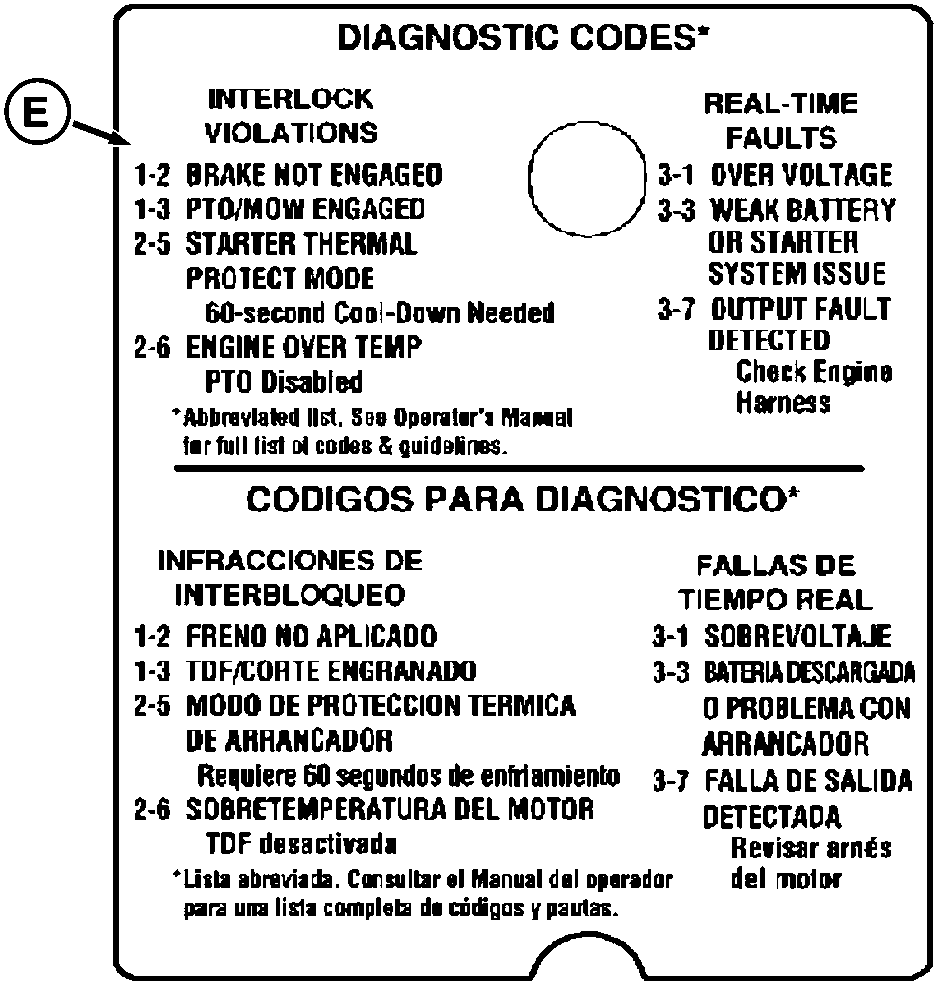
TCT011744-UN-22NOV14Diagnostic code label is on right side console beside operators seat.
If starter does not engage, use the diagnostic light (B) and diagnostic codes (E) to diagnose the problem.- BRAKE NOT ENGAGED (1-2) diagnostic code: one flash, a short pause and two additional flashes. This code sequence indicates that the park brake switch has not been activated. Lock park brake to start engine.
- STARTER THERMAL PROTECT MODE (2-5) diagnostic code: two flashes, a short pause and five additional flashes. This code sequence indicates that the module has started a 60 second cool-down period to prevent the starter from overheating. Turn key switch to OFF position and let the starter cool down for at least 60 seconds before making another attempt to start engine.
-
Once the unit has started and/or while operating the machine, the following codes may occur:
-
For safety, the PTO does not engage with the park brake
locked and/or operator out of seat.
PTO/MOW ENGAGED (1-3) diagnostic code: one flash, a short pause and three additional flashes. This code sequence can occur when the operator gets out of the seat while operating the machine with the PTO engaged. This code can be reset by turning off the PTO (knob) switch. - OVER VOLTAGE (3-1) diagnostic code: three flashes, a short pause and one additional flash. This code sequence indicates that the vehicle control unit has detected a voltage higher than normal in the electrical system. If the problem is severe, the control unit may disable the PTO output to the PTO clutch. Check electrical wiring for loose connections, specifically the battery positive and negative, starter, and frame ground on engine block.
- WEAK BATTERY OR STARTER SYSTEM ISSUE (3-3) diagnostic code: three flashes, a short pause and three additional flashes. This code sequence indicates that the battery may have become too weak to turn the starter or that the vehicle control unit has detected an excessive current draw. Recharge the battery. If this does not remove the code, check that all starter circuit harness connections are secure and not “shorted” to ground.
- OUTPUT FAULT DETECTED (3-7) diagnostic code: three flashes, a short pause and seven additional flashes. This code sequence indicates that the vehicle control unit has detected an electrical problem in the engine wiring harness. The vehicle control unit's internal “resettable” fuse had tripped to protect the system. This will remain tripped until the fault is removed. Check engine wiring harness for pinched or frayed wires.
-
For safety, the PTO does not engage with the park brake
locked and/or operator out of seat.
-
Refer to the troubleshooting section for additional diagnostic codes. If further diagnostic assistance is needed, refer to the Technical Manual or consult your John Deere distributor.
Diagnostic Test Mode
This is a troubleshooting mode that can be used to check the integrity of the switches, sensors, wiring, and hardware of the vehicle control unit. The diagnostic information is generated in the vehicle control unit and displayed through a flashing diagnostic code on the display module. Please refer to the troubleshooting section of this manual for more information.
|
MX52301,0000EE9-19-20160323 |