Assembly
Remove Hood
-
Lift hood at top center of opening (A) and tilt to fully upright position.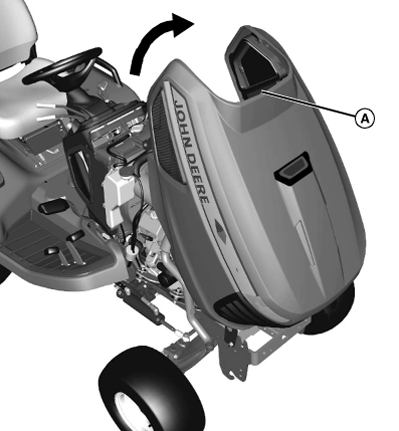
MXAL41906-UN-18FEB13 -
Disconnect headlight harness before removing hood.
Disconnect headlight harness (B) on left side of machine.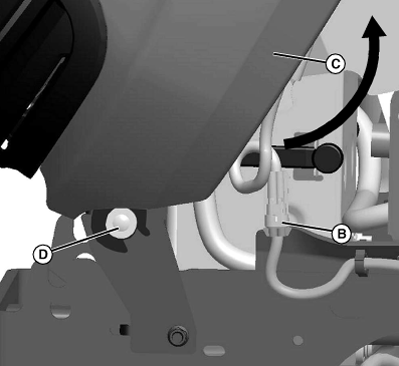
MXAL41907-UN-18FEB13 -
Pull hood (C) forward and lift off bushing (D).
Charge and Connect Battery
Check Battery
- Battery is filled with acid and charged when it left the factory. To extend battery life, charge battery prior to delivery.
- Check battery voltage. Battery should be charged for 30 minutes at 5-10 amps if voltage is below 12.3 volts. Battery is fully charged at 12.6 volts.
Connect Battery
-
Use a wire brush to remove any glazing from battery posts and cable ends.
-
Hardware has been provided for two different battery types:
-
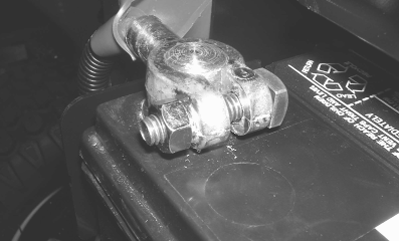
MXAL41908-UN-18FEB13Tapered battery post
Use the large square head bolts and hardware for the tapered style battery terminal post. -
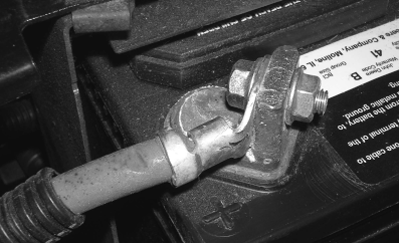
MXAL41909-UN-18FEB13Ring battery post
Use the small hex head bolts and hardware for the ring style battery terminal post.
-
-
Connect red positive (+) cable to battery. Apply general purpose grease or silicone spray to terminal to help prevent corrosion. Make sure connection is tight. Push cover over positive terminal.
-
Connect black negative (-) cable to battery. Apply general purpose grease or silicone spray to terminal to help prevent corrosion. Make sure connection is tight.
Install Hood
-
Position hood (A) upright.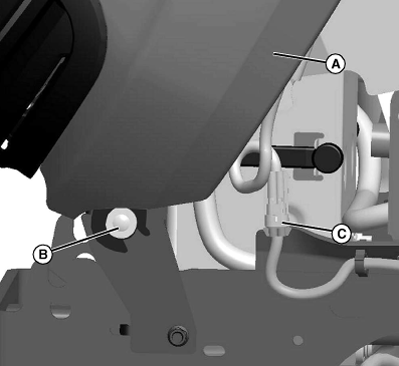
MXAL41910-UN-18FEB13 -
Install hood onto bushing (B).
-
Connect headlight harness (C) on left side of machine.
-
Lower hood.
Install Steering Wheel
-
Install steering wheel on shaft.
-
Install and tighten nut (A) to specifications.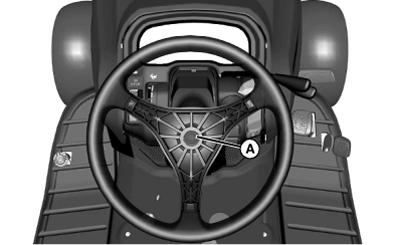
MXAL41911-UN-18FEB13Steering Wheel Nut Torque 38 N·m (28 lb·ft) -
Install cover (B).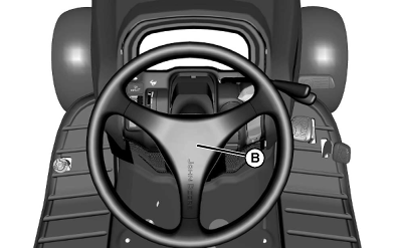
MXAL41912-UN-18FEB13
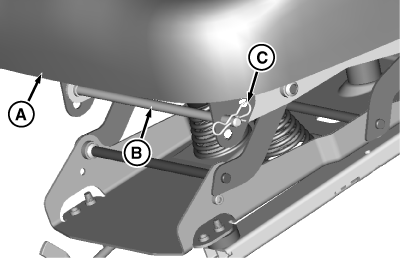
Install Seat (Standard Seat)
MXT020970-UN-26JUL17
-
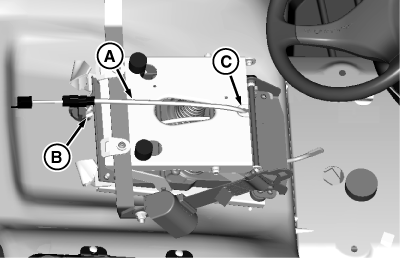
Route wiring harness (A) through hole in fenderdeck (B) and hole in seat base (C).
-
MXT020951-UN-26JUL17
Install seat (A) onto seat base and secure with pin (B) and locking pin (C).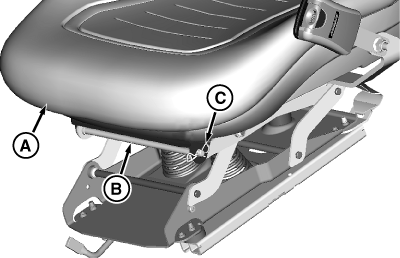
MXT020952-UN-25JUL17 -
Connect wiring harness connector (E) to seat switch connector (F).
Install Seat (Deluxe Seat)
MXT020957-UN-25JUL17
-
Remove bag of parts (two bolts and four caps).
-
Remove backrest cushion from packaging and slide left and right frame tubes into grooves of left and right pivot bracket.
-
Install four bolts (A) through backrest shroud holes into seat frame, two on left side and two on right side. Tighten to 23 N·m (17 lb.-ft.).
-
Pull recline handle up and adjust backrest into operating position. Release handle.
-
Press four plastic caps (A) into back shroud holes, two on left side and two on right side.
MXT020958-UN-25JUL17
Check Tire Pressure
 Explosive separation of tire and rim parts is possible
when they are serviced incorrectly:
Explosive separation of tire and rim parts is possible
when they are serviced incorrectly:
- Do not attempt to mount a tire without the proper equipment and experience to perform the job.
- Do not inflate the tires above the recommended pressure.
- Do not weld or heat a wheel and tire assembly. Heat can cause an increase in air pressure resulting in an explosion. Welding can structurally weaken or deform the wheel.
- Do not stand in front or over the tire assembly when inflating. Use a clip-on chuck and extension hose long enough to allow you to stand to one side.
-
Check tires for damage.
-
Check tire pressure with an accurate gauge.
-
Add or remove air, if necessary.
Testing Safety Systems
Engine exhaust fumes contain carbon monoxide and can
cause serious illness or death.
Do not run an engine in an enclosed area, such as a garage, even with doors or windows opened.
Move the machine to an outside area before running the engine.
The safety systems installed on your machine should be checked before each machine use. Be sure you have read the machine operator manual and are completely familiar with the operation of the machine before performing these safety system checks.
Use the following checkout procedures to check for normal operation of machine.
If there is a malfunction during one of these procedures, do not operate machine. See your authorized dealer for service.
Perform these tests in a clear open area. Keep bystanders away.
Testing PTO Switch
The mower blades should stop in approximately five
seconds when the mower or PTO is disengaged.
If you believe that your blades may not be stopping in that period of time, take your machine to your authorized dealer where they can safely check and service your machine.
Engaging the Brake pedal will no longer stop the PTO.
Test 1:
-
Depress brake pedal, or lock park brake.
-
Pull PTO switch up to engage PTO.
-
Try to start engine.
Result: Engine must not start. If engine starts, there is a problem with your safety interlock circuit.
Test 2:
-
Start engine.
-
Unlock park brake and release brake pedal.
-
Move throttle lever up to maximum engine speed.
-
Pull PTO switch up to engage PTO.
-
Depress brake pedal.
Result: PTO and engine should continue to run. If PTO shuts off, there is a problem with your safety interlock circuit.
Testing Seat Switch
Test 1:
-
Start engine.
-
Move throttle lever up to maximum engine speed.
-
Unlock park brake and release brake pedal.
-
Pull PTO switch up to engage PTO.
-
Raise up off seat. Do not get off machine.
Result: PTO should stop and engine should begin to stop. If PTO does not stop and engine does not begin to stop, there is a problem with your safety interlock circuit.
Test 2:
-
Disengage PTO.
-
Start engine.
-
Unlock park brake and release brake pedal.
-
Raise up off seat. Do not get off machine.
Result: Engine should begin to stop. If engine does not begin to stop, there is a problem with your safety interlock circuit.
Testing Park Brake Switch
Test 1:
-
Park machine safely. (See Parking Safely in the SAFETY Section.)
-
Unlock park brake and release brake pedal.
-
Try to start engine.
Result: Engine must not start. If engine starts, there is a problem with your safety interlock circuit.
Test 2:
-
Disengage PTO.
-
Start engine.
-
Lock park brake.
-
Raise up off seat. Do not get off machine.
Result: Engine should continue to run. If engine stops, there is a problem with your safety interlock circuit.
Testing Reverse Implement Option (RIO)
Rotating blades are dangerous. Children or bystanders
may be injured by runover and rotating blades.
Before backing up, carefully check the area around the machine.
-
Park machine safely. (See Parking Safely in the SAFETY Section.).
-
Start engine.
-
Move throttle lever up to maximum engine speed.
-
Engage PTO to start attachment.
-
Look behind machine to be sure there are no bystanders.
-
Begin reverse travel by depressing reverse travel pedal.
Result: Attachment should stop operation. If attachment continues to operate while machine travels in reverse, do not continue to operate attachment. See your John Deere dealer for service.
Install Mower or Attachment
- Install mower or attachment.
- Make sure PTO shaft is connected properly and collar is locked.
- If mower is installed, level for best cutting performance.
|
JK79365,00008F5-19-20170726 |