Leveling the Rotary Cutter1. Attach rotary cutter to tractor and park on level ground. (Refer to procedures in Attaching and Detaching section.)2. Lower rotary cutter onto transport lock. |
OUO6077,00014A7 -19-21MAY07-1/5 |
|
IMPORTANT: To avoid improper inflation of air spring (A) or incorrect height setting of cutter, make sure both wings are lowered and SCV lever placed in FLOAT position before leveling cutter. 3. Lower both wings and move tractor SCV lever into FLOAT position. (See LOWERING WING(S) in Operating the Rotary Cutter section.) 4. CX15 and CX20: Adjust pressure in air spring: a. Inflate air spring (A) until shock absorber rises above desired mark. b. Slowly relieve pressure from each air spring to lower shock absorber to CENTER mark (B) or WING mark (C).
|
|
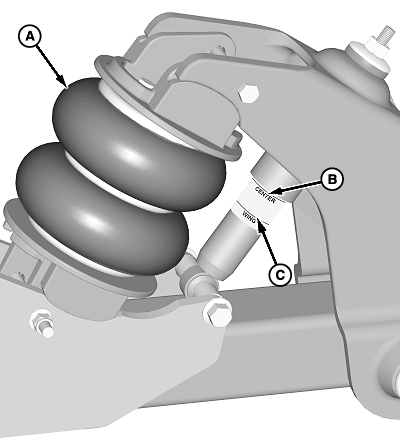
OUO6077,00014A7 -19-21MAY07-2/5 |
|
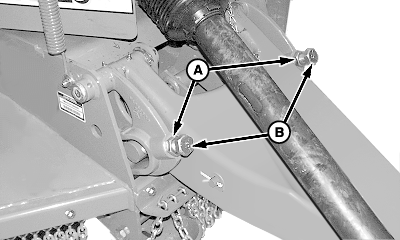
IMPORTANT: To avoid having more machine weight on one leveling rod than the other, be sure to adjust cap screws (B) equally. 5. Loosen leveling rod jam nut (A) on each side of hitch. NOTE: Adjusting front of machine lower than rear decreases shredding ability and increases material discharge height. Adjusting rear of machine lower than front increases shredding ability by allowing a double cut of the material. 6. Adjust leveling rod cap screws (B) as equal as possible until front of hinge-to-floor distance (C) is at an equal height to the rear.
|
|

OUO6077,00014A7 -19-21MAY07-3/5 |
|
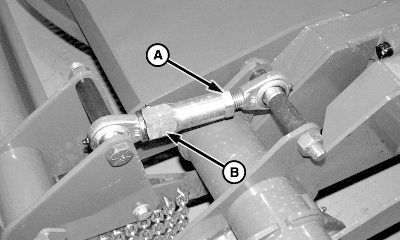
NOTE: To ease turnbuckle adjustment, raise wing slightly and place on safety stands to relieve weight of wing from center section. 7. Loosen jam nut (A). IMPORTANT: Be careful not to damage turnbuckle lube fitting with adjustment wrench. 8. Adjust turnbuckle (B) "IN" or "OUT" as needed to level wings.
9. Tighten jam nut (A). |
|
OUO6077,00014A7 -19-21MAY07-4/5 |
|
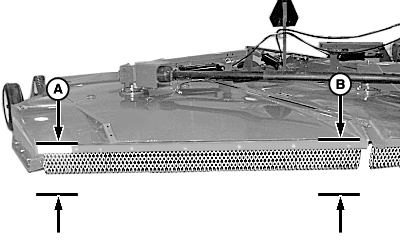
10.
Check to make sure wing is level by measuring distance from top edge of front corner of wing frame-to-ground (B), then measure from top edge of outer end of wing-to-ground (A). Measurements should be within 12 mm (1/2 in.) of each other. If not, repeat procedure.
11. Repeat on opposite wing.
|
|
OUO6077,00014A7 -19-21MAY07-5/5 |