Detaching the Bucket or Attachment
 CAUTION:

X9811-UN-23AUG88
If an accident occurs, see a doctor immediately. Any fluid injected into the skin must be surgically removed within a few hours or gangrene may result. Doctors unfamiliar with this type of injury should reference a knowledgeable medical source. Such information is available from Deere & Company Medical Department in Moline, Illinois, U.S.A.
W07029-UN-17SEP04
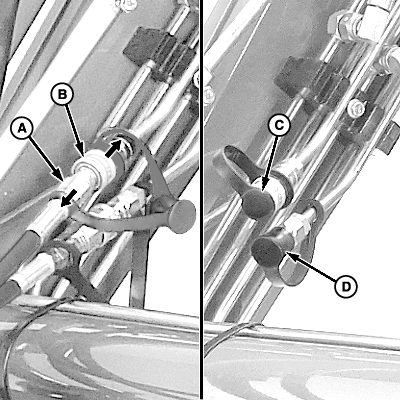
A - Coupler, Male (1 per connection)
B - Coupler, Female (1 per connection)
C - Plug (1 per female coupler)
D - Cap (1 per male coupler)
If equipped with hydraulic operated attachment (grapple bucket): Disconnect hydraulic hoses as follows:- Shut off tractor engine and remove key.
- Move control lever(s) back and forth and side-to-side (if applicable) several times to relieve system pressure. (See your tractor Operator's Manual.)
- Push and hold collar on female coupler (B).
- Disconnect male coupler (A).
- Release collar on female coupler.
- Repeat Steps 3—5 for remaining hydraulic hose connection.
- Insert plug (C) into female coupler and place cap (D) on male coupler. Install plug and cap on female and male couplers on hydraulic hoses.
QUIK-CHANGE™ Attachment Carrier
W06637-UN-09MAR04
W06638-UN-09MAR04
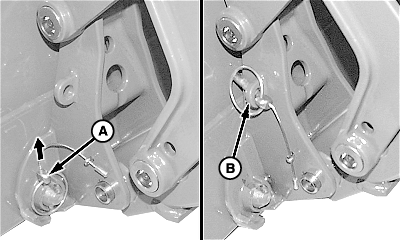
A - Quick Lock Pin
B - Storage Position
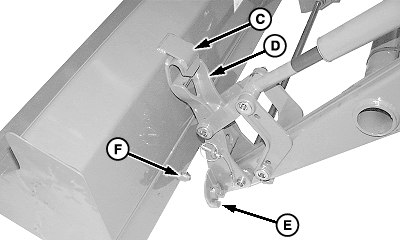
C - Hook
D - Holder
E - Holder Strap
F - Bucket Pin
-
NOTE: Procedure is the same for all attachments. Bucket attachment shown.
Start tractor engine.
-
Release parking brake and/or place transmission in NEUTRAL.
-
Roll bucket/attachment back slightly and raise boom approximately 460 mm (18 in.) above ground level.
-
Remove quick lock pin (A) from each side of bucket/attachment.
-
Store pins in storage position (B).
-
Extend bucket cylinders until pin (F) releases from holder strap (E) on each side of bucket/attachment.
-
Lower loader boom, place transmission in REVERSE and move away from bucket/attachment. Holder (D) will release from hook (C) on each side of bucket/attachment.
-
Set parking brake and/or place transmission in PARK. Shut off tractor engine and remove key.
Skid-Steer Attachment Carrier
W08389-UN-29NOV06
Left-Hand Lock Pin
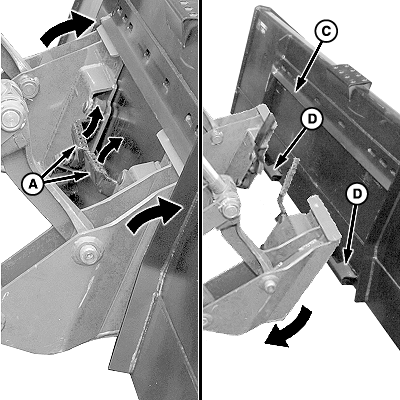
W08399-UN-28NOV06
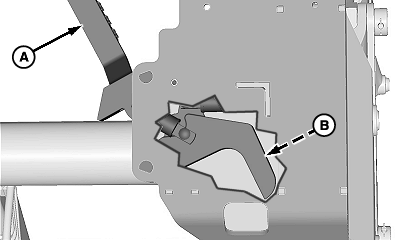
A - Latch Handles
B - Lock Pin (1 each side)
C - Lip
D - Latches
-
Start tractor engine and position machine on flat level ground. Level bucket/attachment and lower loader completely to the ground.
-
Place transmission in PARK and shut off engine.
-
IMPORTANT: Make sure both latch handles (A) are completely up and lock pins (B) are fully retracted.
Raise both latch handles (A) to the UP (unlatched) position.
-
Start tractor engine and place transmission in NEUTRAL. Slowly tilt carrier forward (extend bucket cylinders) until carrier clears bottom latches (D).
-
Place transmission in REVERSE and slowly back away from bucket/attachment.
-
Lower loader to the ground, place transmission in PARK, shut off engine and remove key.
|
OUMX005,0002889-19-20091117 |