Adjusting The Automatic Knife Sharpening Device
Requirements
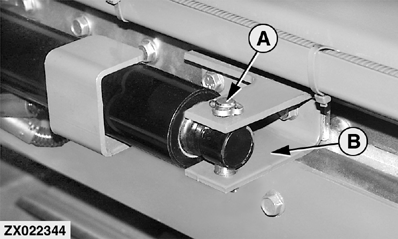
Remove the safety bolt (A) on the piston of the linear motor and slide away the swivel (B) of the cable so that the piston can move freely.
NOTE:
The designations clockwise and counterclockwise are defined while looking at the top of the cross section of the piston.
Park Position
1.
Press and hold the power saver on/off switch while turning on power with the key switch. The control LED's should flash to indicate calibration mode being active.
2.
Hold the kernel processor switch and turn the kernel processor spacing knob until number 4 appears on the tachometer. This indicates calibration mode 4, which is used to calibrate the sweep motor park position
3.
Press the sharpening button. The sweep motor moves to the stone sweep in limit, pauses for a second, moves to the stone park position, pauses there for 2 seconds and repeats the process. The piston of the motor continues to move between these positions as long as calibration mode 4 is active.
4.
The park position of the linear motor ( factor of the internal potentiometer ) is coordinated correctly with the power saver program, if the piston does not turn when retracted. This can be checked as follows: Turn off the ignition key. The piston has to be turned clockwise until it turns automatically counterclockwise when retracted. After that the piston should be moved out 1/2 rotation counterclockwise again ( ignition key off ), so that the bore in the piston is aligned with the bore on the swivel of the cable. The piston should only be turned when the ignition key is off. Choose calibration mode 4 to move the piston.
5.
If the calibration of the park position is correct, the calibration mode 4 is stopped by turning off the ignition key.
|
|
|
|
OUZXMAY,0000307 -19-25SEP00-1/3
|
|
6.
Slide the swivel of the cable in the direction of the linear motor and connect the piston with the swivel using the safety bolt.
Feeding Position
1.
Connect the guide block with the cable clamp by tightening the screw on the cable. The cable clamp should be tightened so that on the one hand the guide block is moved with the process of the linear motor but on the other hand the pull is passed through while reaching the feeding position.
2.
Activate the calibration mode by pressing and holding the power saver switch in the overhead panel and turning the key to ACC position. The flashing of the LED's indicates that the calibration mode is active.
3.
Hold the kernel processor switch and turn the kernel processor spacing knob until number 5 appears on the tachometer. This indicates calibration mode 5, which is used to calibrate the feeding position.
4.
Press the sharpening button. The sweep motor moves to the feeding position, pauses for a second, moves back to the smoothing position, pauses there for 2 seconds and repeats the process. The piston of the motor continues to move between these positions as long as calibration mode 5 is active.
5.
After the guide block has reached the feeding position and returns to the smoothing position ( linear motor has reached the stationary point ), turn off the ignition key to stop the calibration mode.
6.
Tighten the cable clamp of the sharpening stone to 40 N·m (29.5 lb-ft).
7.
Activate calibration mode 5 again to check if the sharpening stone lowers, that is the cam wheel turns only one tooth.
8.
It may happen that the feeding position must be corrected by readjusting the setting screw of the crank and the stop screw. Steps 1 to 6 must be repeated until step 7 is correct. While checking the feeding of the stone, take care to provide clearance between the sharpening stone and the cutterhead. Move the sharpening stone to the upper end position, if necessary.
|
|
|
|
OUZXMAY,0000307 -19-25SEP00-2/3
|
|
After having terminated the calibration of the feeding position, the guide block must be moved back to the park position by pressing and holding the manual and automatic switches on the power saver module of the overhead panel in the roof console. If the guide block is in park position, align the stop screw so that there is about 10 mm (0.4 in.) clearance between the guide block and the screw head.
|
|
|
|
OUZXMAY,0000307 -19-25SEP00-3/3
|
|
