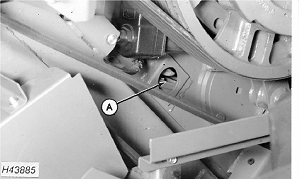
Adjusting ConcaveRemove the inspection hole covers (A) on both sides of the combine. |
|
OUZXMAG,00007AA -19-08SEP00-1/12 |
|
Open Concave
Remove locking pin (A) to allow you to turn the cylinder easily. Open the concave fully until the clutch on the actuator motor makes a ratcheting sound. |
|
OUZXMAG,00007AA -19-08SEP00-2/12 |
|
Loosen Concave Stop
Loosen cap screws (A) securing concave stop. |
|
OUZXMAG,00007AA -19-08SEP00-3/12 |
|
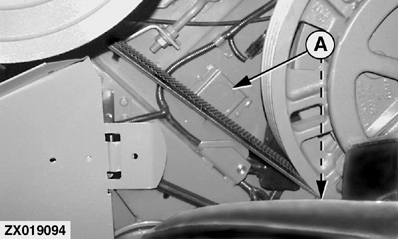
Close Concave
Rotate cylinder until rasp bar with washer appears in the front inspection hole (A). Close the concave until the concave crossbar appears in the inspection hole. |
|
OUZXMAG,00007AA -19-08SEP00-4/12 |
|
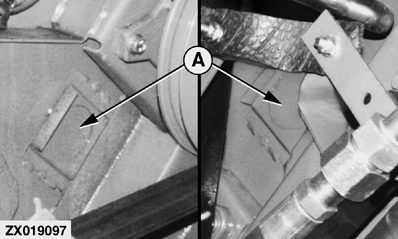
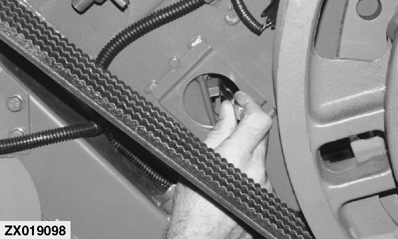
Insert Gauge in Front R.H Inspection Hole
Insert gauge (4.7 mm 0.19 in. scale) into front inspection hole. Slowly close the concave until the rasp bar touches the gauge and a ratcheting sound is heard. |
|
OUZXMAG,00007AA -19-08SEP00-5/12 |
|
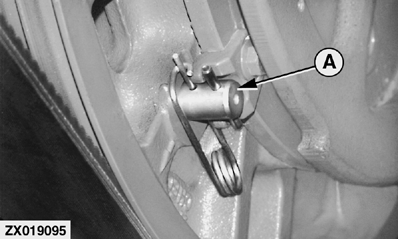
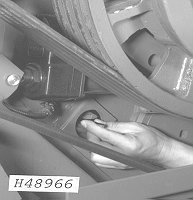
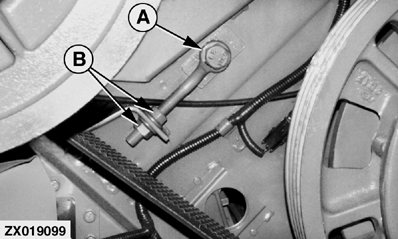
Insert Gauge in Front L.H. Inspection Hole
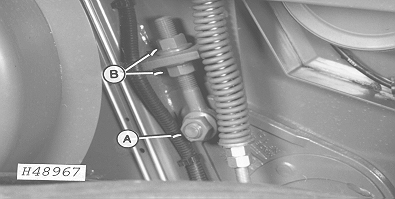
Go to the left-hand side of the combine and insert gauge into the front inspection hole between the rasp bar and the concave; it should fit firmly. If adjustment is necessary, loosen bolt (A) on eyebolt and adjust nuts (B) to obtain correct clearance. Tighten bolt (A) to specification. Specification
Remove gauge from the left-hand side of the concave. |
|
OUZXMAG,00007AA -19-08SEP00-6/12 |
|
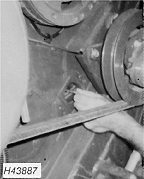
Remove Gauge from Front R.H Inspection Hole
Open concave slightly to remove gauge from right-hand side of the concave. With the gauges removed, open the concave completely. |
|
OUZXMAG,00007AA -19-08SEP00-7/12 |
|
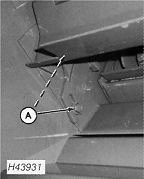
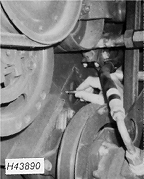
Insert Gauge in Rear R.H. Inspection Hole
Rotate cylinder clockwise until rasp bar with washer is visible in the rear inspection hole. Insert gauge into the rear right-hand inspection hole. Slowly close concave until the rasp bar is resting against the gauge and a ratcheting sound is heard. If a ratcheting sound is heard before the concave touches the cylinder, adjustment is necessary. Loosen bolt (A) on eyebolt and adjust nuts (B). Tighten bolt (A) to specification. Specification
|
|
OUZXMAG,00007AA -19-08SEP00-8/12 |
|
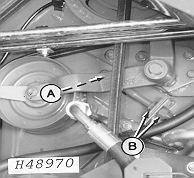
Insert Gauge in Rear L.H Inspection Hole
Go to the left-hand side of the combine and insert gauge into left-hand side rear inspection hole between the rasp bar and the concave; it should fit firmly. If adjustment is needed, loosen retaining bolt (A) and adjust nuts (B) to obtain correct clearance. Tighten retaining bolt (A) to specification. Specification
|
|
OUZXMAG,00007AA -19-08SEP00-9/12 |
|
Remove Gauge from Rear R.H Inspection Hole
Go to right-hand side and open the concave slightly to remove gauge. Open the concave completely. |
|
OUZXMAG,00007AA -19-08SEP00-10/12 |
|
Insert Gauge In Front R.H Inspection Hole
Rotate the cylinder counterclockwise until the rasp bar with the washer is visible in the front inspection hole (A). Slowly close the concave until the concave crossbar appears in the inspection hole. Insert the gauge between the rasp bar and the concave. Close the concave until the rasp bar is against the gauge and a ratcheting sound is heard. |
|
OUZXMAG,00007AA -19-08SEP00-11/12 |
|
Secure Concave Stop
Reposition concave stop and retighten cap screws (A) securing stop. Reset Control UnitThe concave calibration procedure must be performed before initial use or when the concave sensor is replaced, see "Calibration Procedures" Section. |
|
OUZXMAG,00007AA -19-08SEP00-12/12 |